Install MemryX MX3 on Raspberry Pi 5 and Build Your First Computer Vision Project
Learn how to install the MemryX MX3 AI accelerator on a Raspberry Pi 5, run real-time computer vision examples, and build a gesture-controlled LED project.

During my adventures in Embedded Systems, I used to struggle with the limitations of microcontrollers where they had a very limited memory and processing power. Adding wireless communication, cellular connectivity, or GPS also required separate modules, which made my circuits more complicated and introduced additional points of failure.
That experience improved significantly once I learned how to build projects with single-board computers. These systems provide better performance and integrate many, if not all, of these communication capabilities onto a single board. Later, I used a Raspberry Pi to build a student attendance system for my electrical engineering graduation project.
With more than 75 million units sold, Raspberry Pi boards are among the best-known single-board computers (SBCs). They are widely used in maker spaces and are relatively easy to learn, with thousands of guides and tutorials available online. As mentioned in the introduction to this series, Raspberry Pi boards also provide interfaces for communicating with external sensors and devices through their GPIO pin headers. This makes the Raspberry Pi a robust platform for building sophisticated embedded systems.
Previous: Introduction to Integrating Computer Vision to any Hardware project
This guide begins with installing Raspberry Pi OS on a microSD card and ends with using a webcam and computer vision to control an LED. Use the following table to navigate to your preferred step or simply start from the beginning.
Steps Covered in This Guide:
- 1. Preparing Raspberry Pi operating system
- 2. Setting up Raspberry Pi Desktop
- 3. Setting up MemryX MX3 Hardware
- 4. Installing MemryX Software
- 5. Running a simple Computer Vision example
- 6. Control LED light using webcam
Requirements:
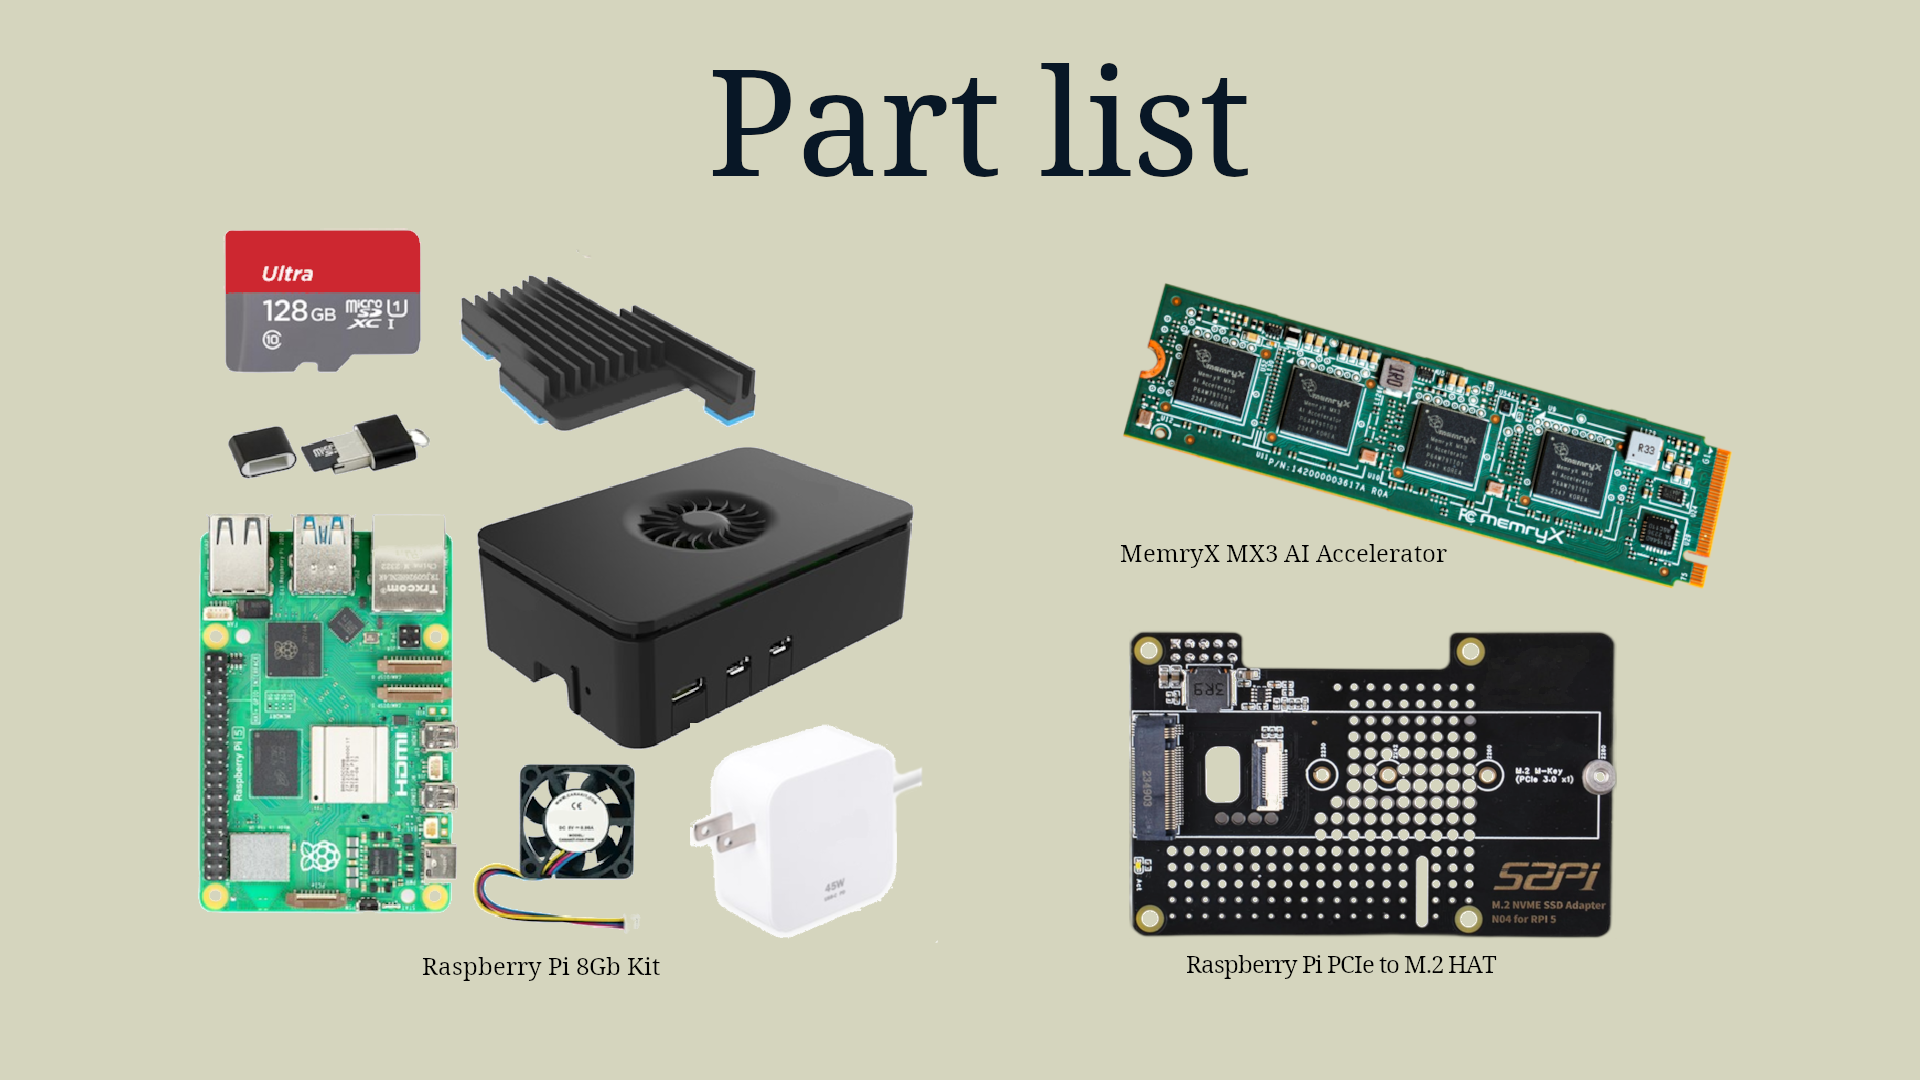
To complete this guide, you need the following:
1. Preparing Raspberry Pi operating system
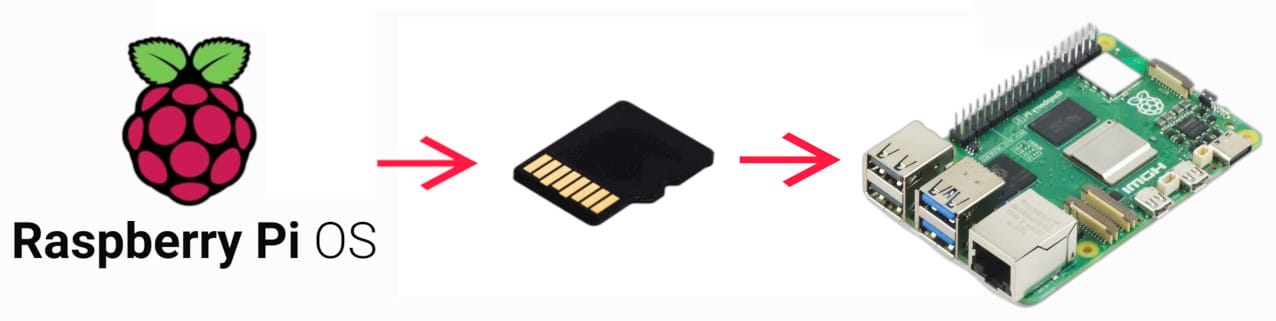
The Raspberry Pi is an impressive piece of hardware. Small enough to fit in the palm of your hand, it has everything needed to operate as a complete Linux computer.
Let us begin by writing the Raspberry Pi OS image to a microSD card.
1. MicroSD Card
2. MicroSD Card reader
3. Computer running Linux, macOS, or Windows
1: Download and install Raspberry Pi OS 64-bit Imager from the official download website, Select the version for your computer’s operating system.
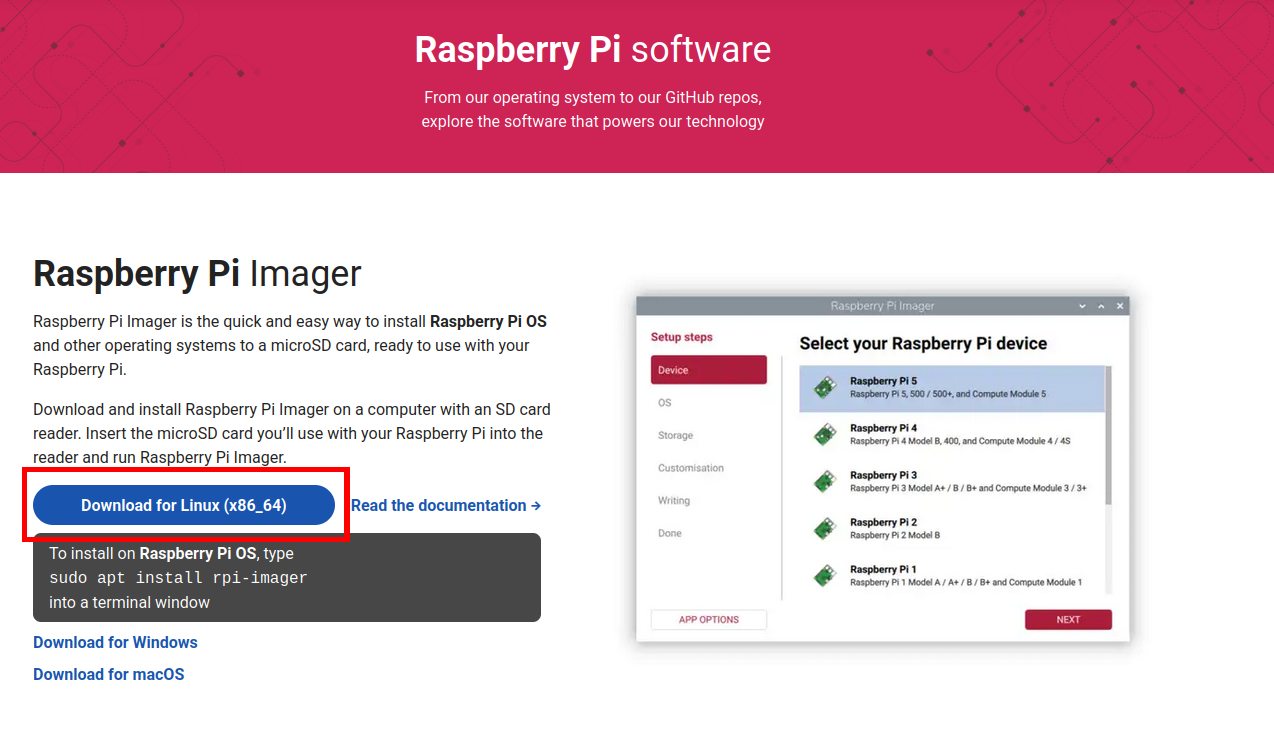
2: Insert the microSD Card in your computer using the MicroSD card reader
3: Launch Raspberry Pi Imager
- Choose your Raspberry Pi, in this case, Raspberry Pi 5
- Choose Operating System, in this case, the latest 64-bit version of Raspberry Pi OS
- Select the microSD card as the storage device
- In Customization, press "Skip Customization"
- Click “Write” to erase MicroSD and start installing the OS
- Raspberry Pi Imager will download the image and write it to the microSD card. This process may take several minutes, depending on your internet connection.
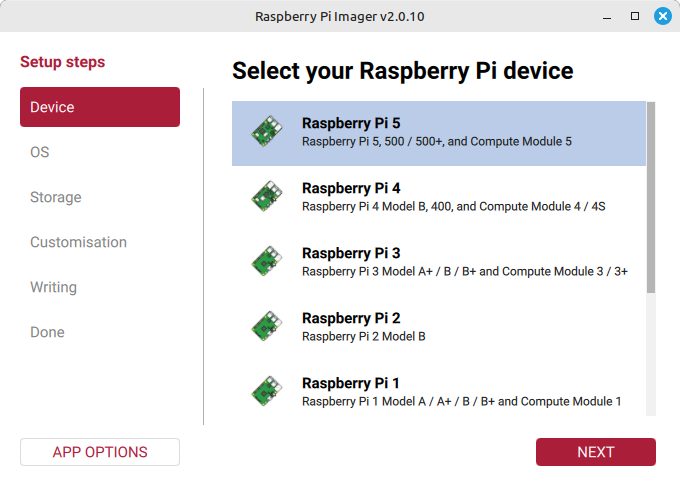
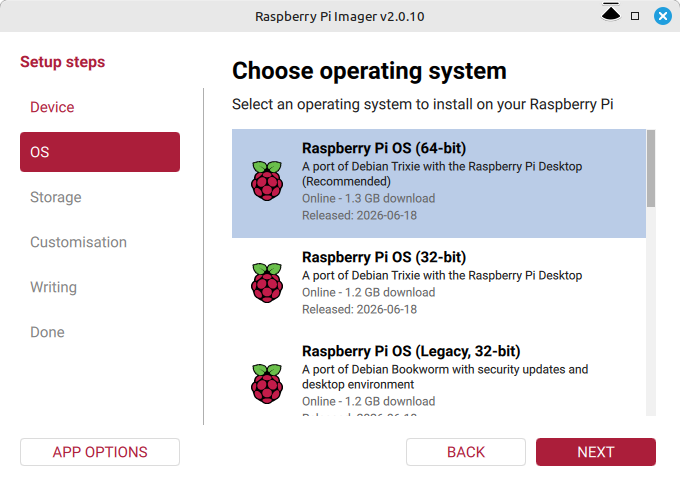
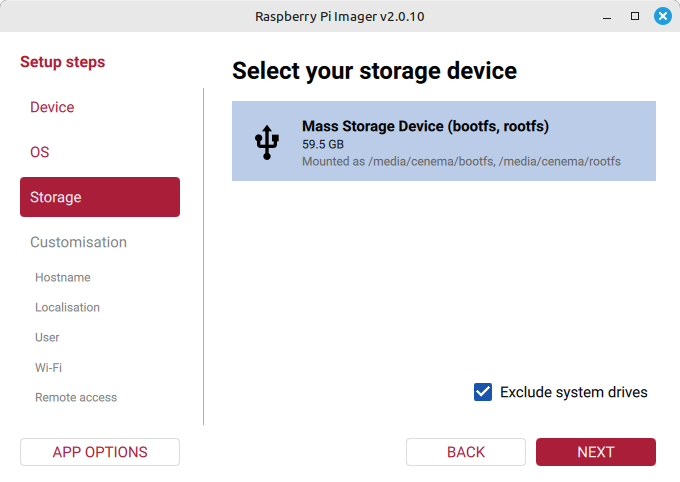
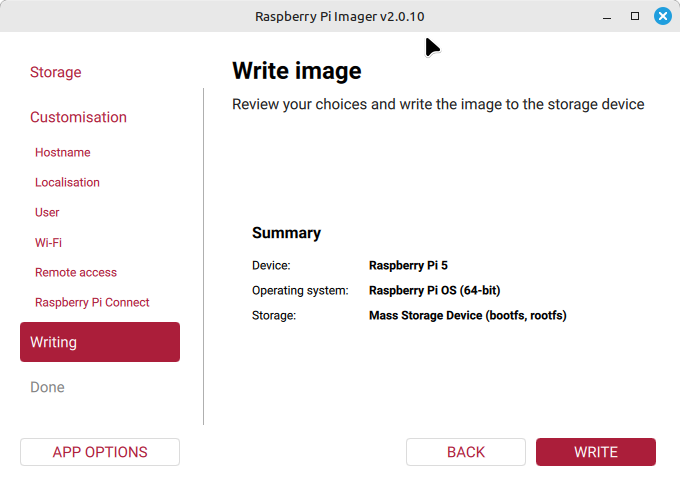
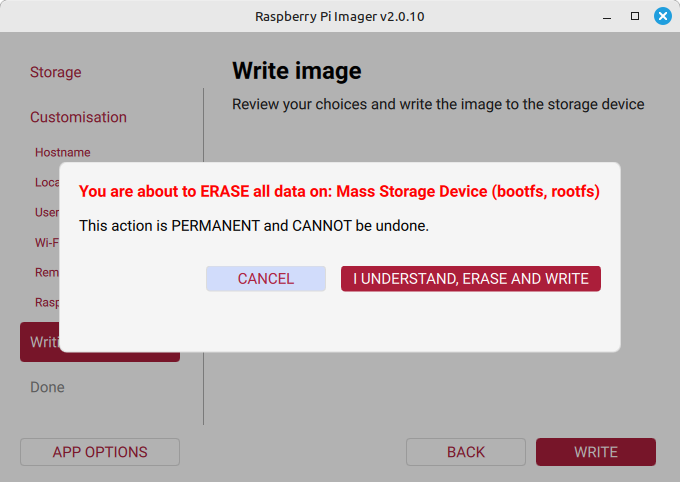
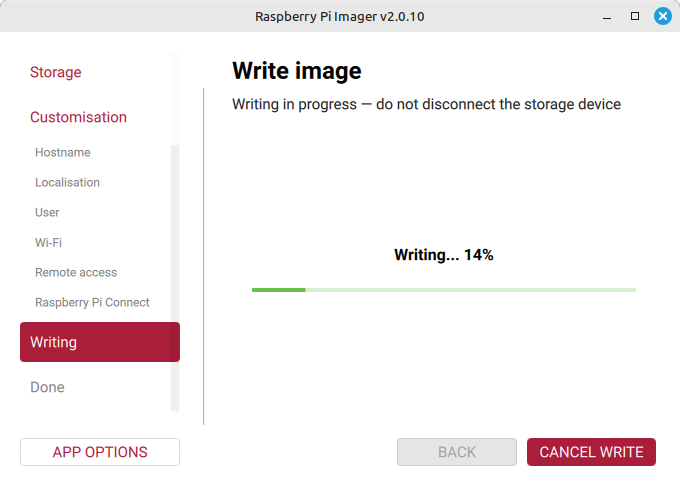
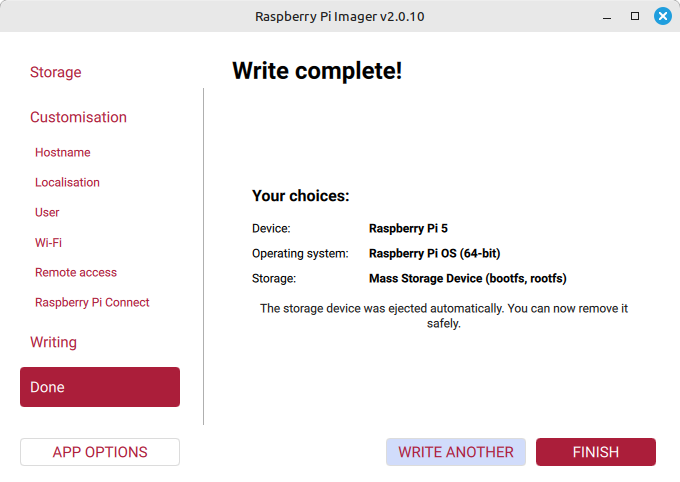
Raspberry Pi Imager selecting the options and writing to the drive
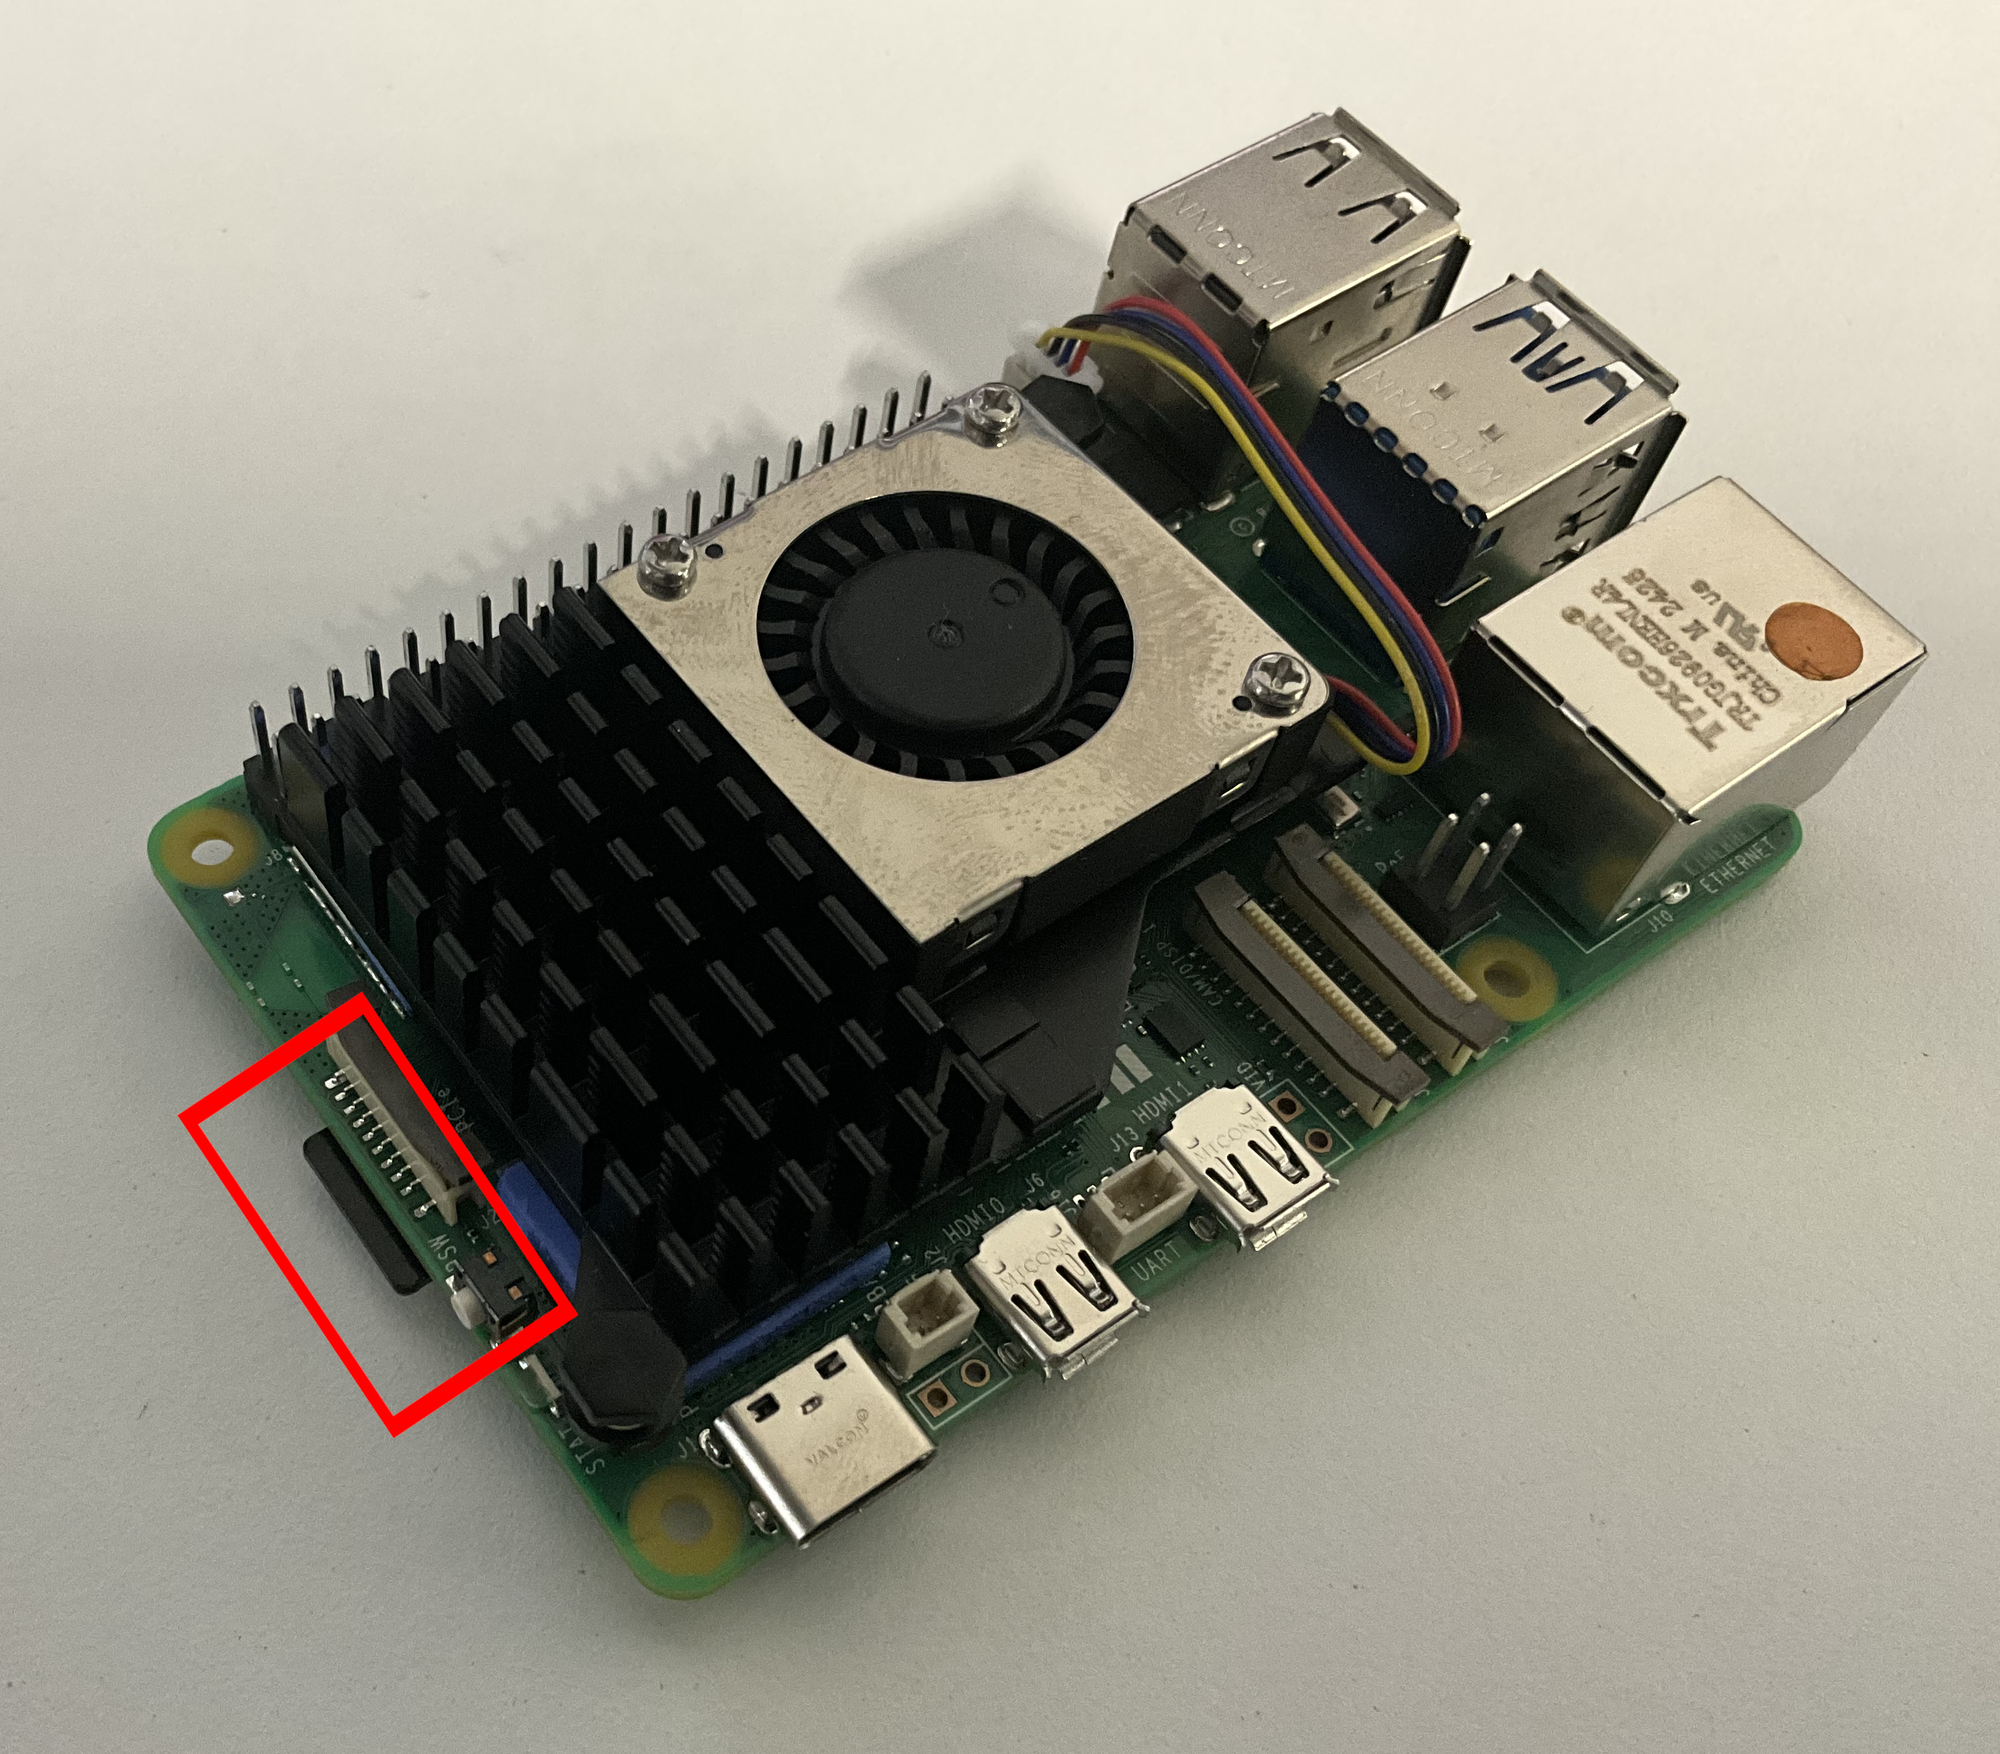
After Raspberry Pi Imager finishes writing the operating system, safely remove the microSD card from your computer. Insert the microSD card into the Raspberry Pi’s card slot in the correct orientation.
2. Setting up Raspberry Pi Desktop
In this section, we will connect the Raspberry Pi, turn it on, and complete the initial desktop setup.
1. Raspberry Pi 5
2. HDMI-to-micro-HDMI cable
3. Power supply adapter
1: Connect the Raspberry Pi
- Connect one end of the HDMI-to-micro-HDMI cable to the monitor and the other end to the Raspberry Pi’s HDMI 0 port.
- Connect the mouse and keyboard to the Raspberry Pi’s USB ports.
- To use Ethernet instead of Wi-Fi, connect the network cable now. For the remainder of this guide, we will use Wi-Fi.
- Connect the power adapter to a wall outlet, and then connect it to the Raspberry Pi’s USB-C power port.
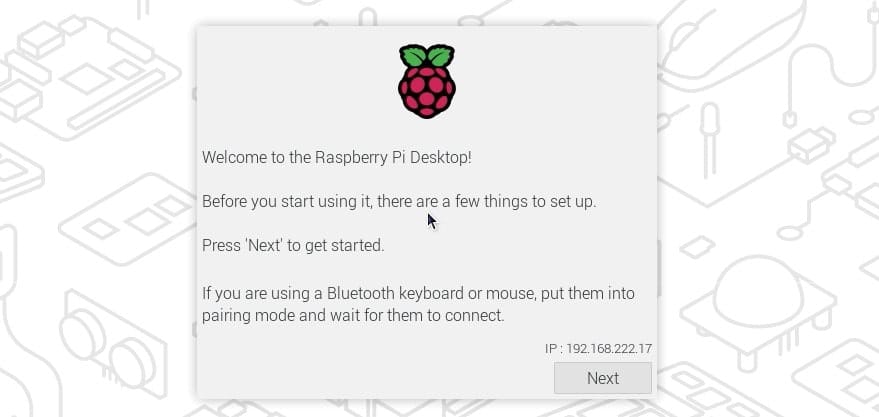
2: Raspberry Pi Desktop Wizard
The “Welcome to the Raspberry Pi Desktop” window will appear. This setup wizard will guide you through preparing the Raspberry Pi for first-time use.
Complete the following steps:
- Click “Next” on the welcome screen.
- Select your country, language, and time zone. Check the “Use US keyboard” option if you are using a US keyboard layout.
- Create a username and password for your Raspberry Pi. Choose a password that you can remember and store it securely, as you may need it when installing software or changing system settings.
- Select your Wi-Fi network, click “Next,” and enter the network password. You can skip this step if you are using Ethernet.
- Choose your preferred web browser. Either available option will work for this guide.
- The next window will ask whether you want to update the system software. We recommend completing the update now. However, you can skip it and update the system later if you have limited internet connectivity or do not want to wait.
- On the final page, click “Launch.”
3. Setting up MemryX MX3 Hardware
Now that the Raspberry Pi desktop is fully set up and running, let us install the accelerator. MemryX provides detailed documentation for preparing the accelerator, and we will follow the same procedure described in its "Install hardware" guide.
1. Raspberry Pi M.2 HAT
2. MemryX MX3 accelerator module
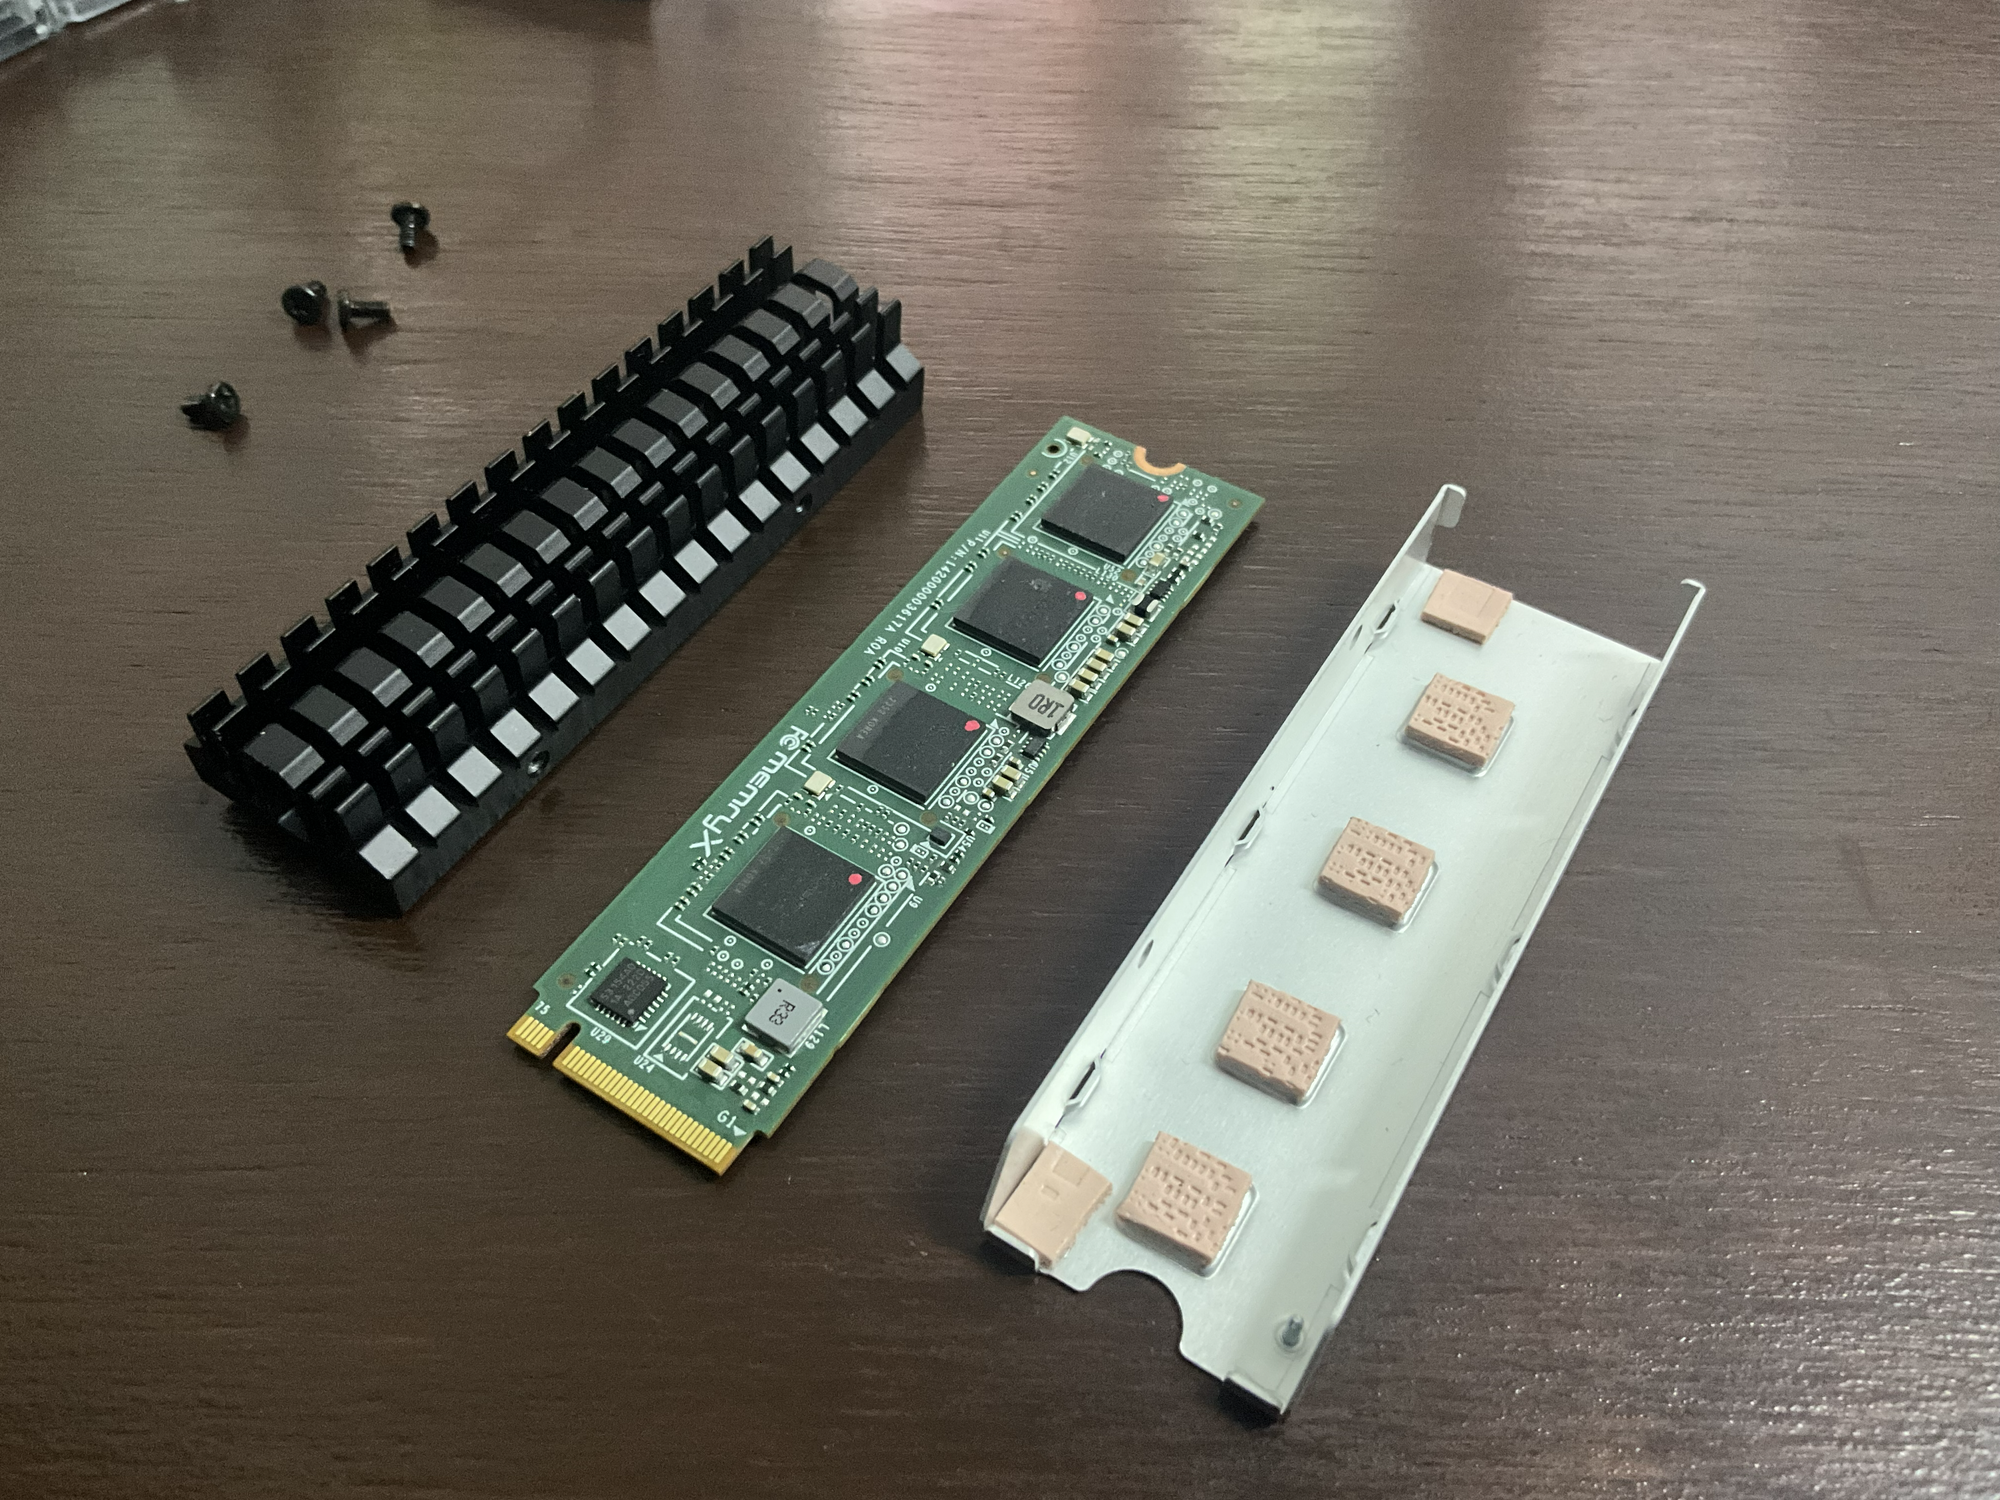
1: Prepare the accelerator
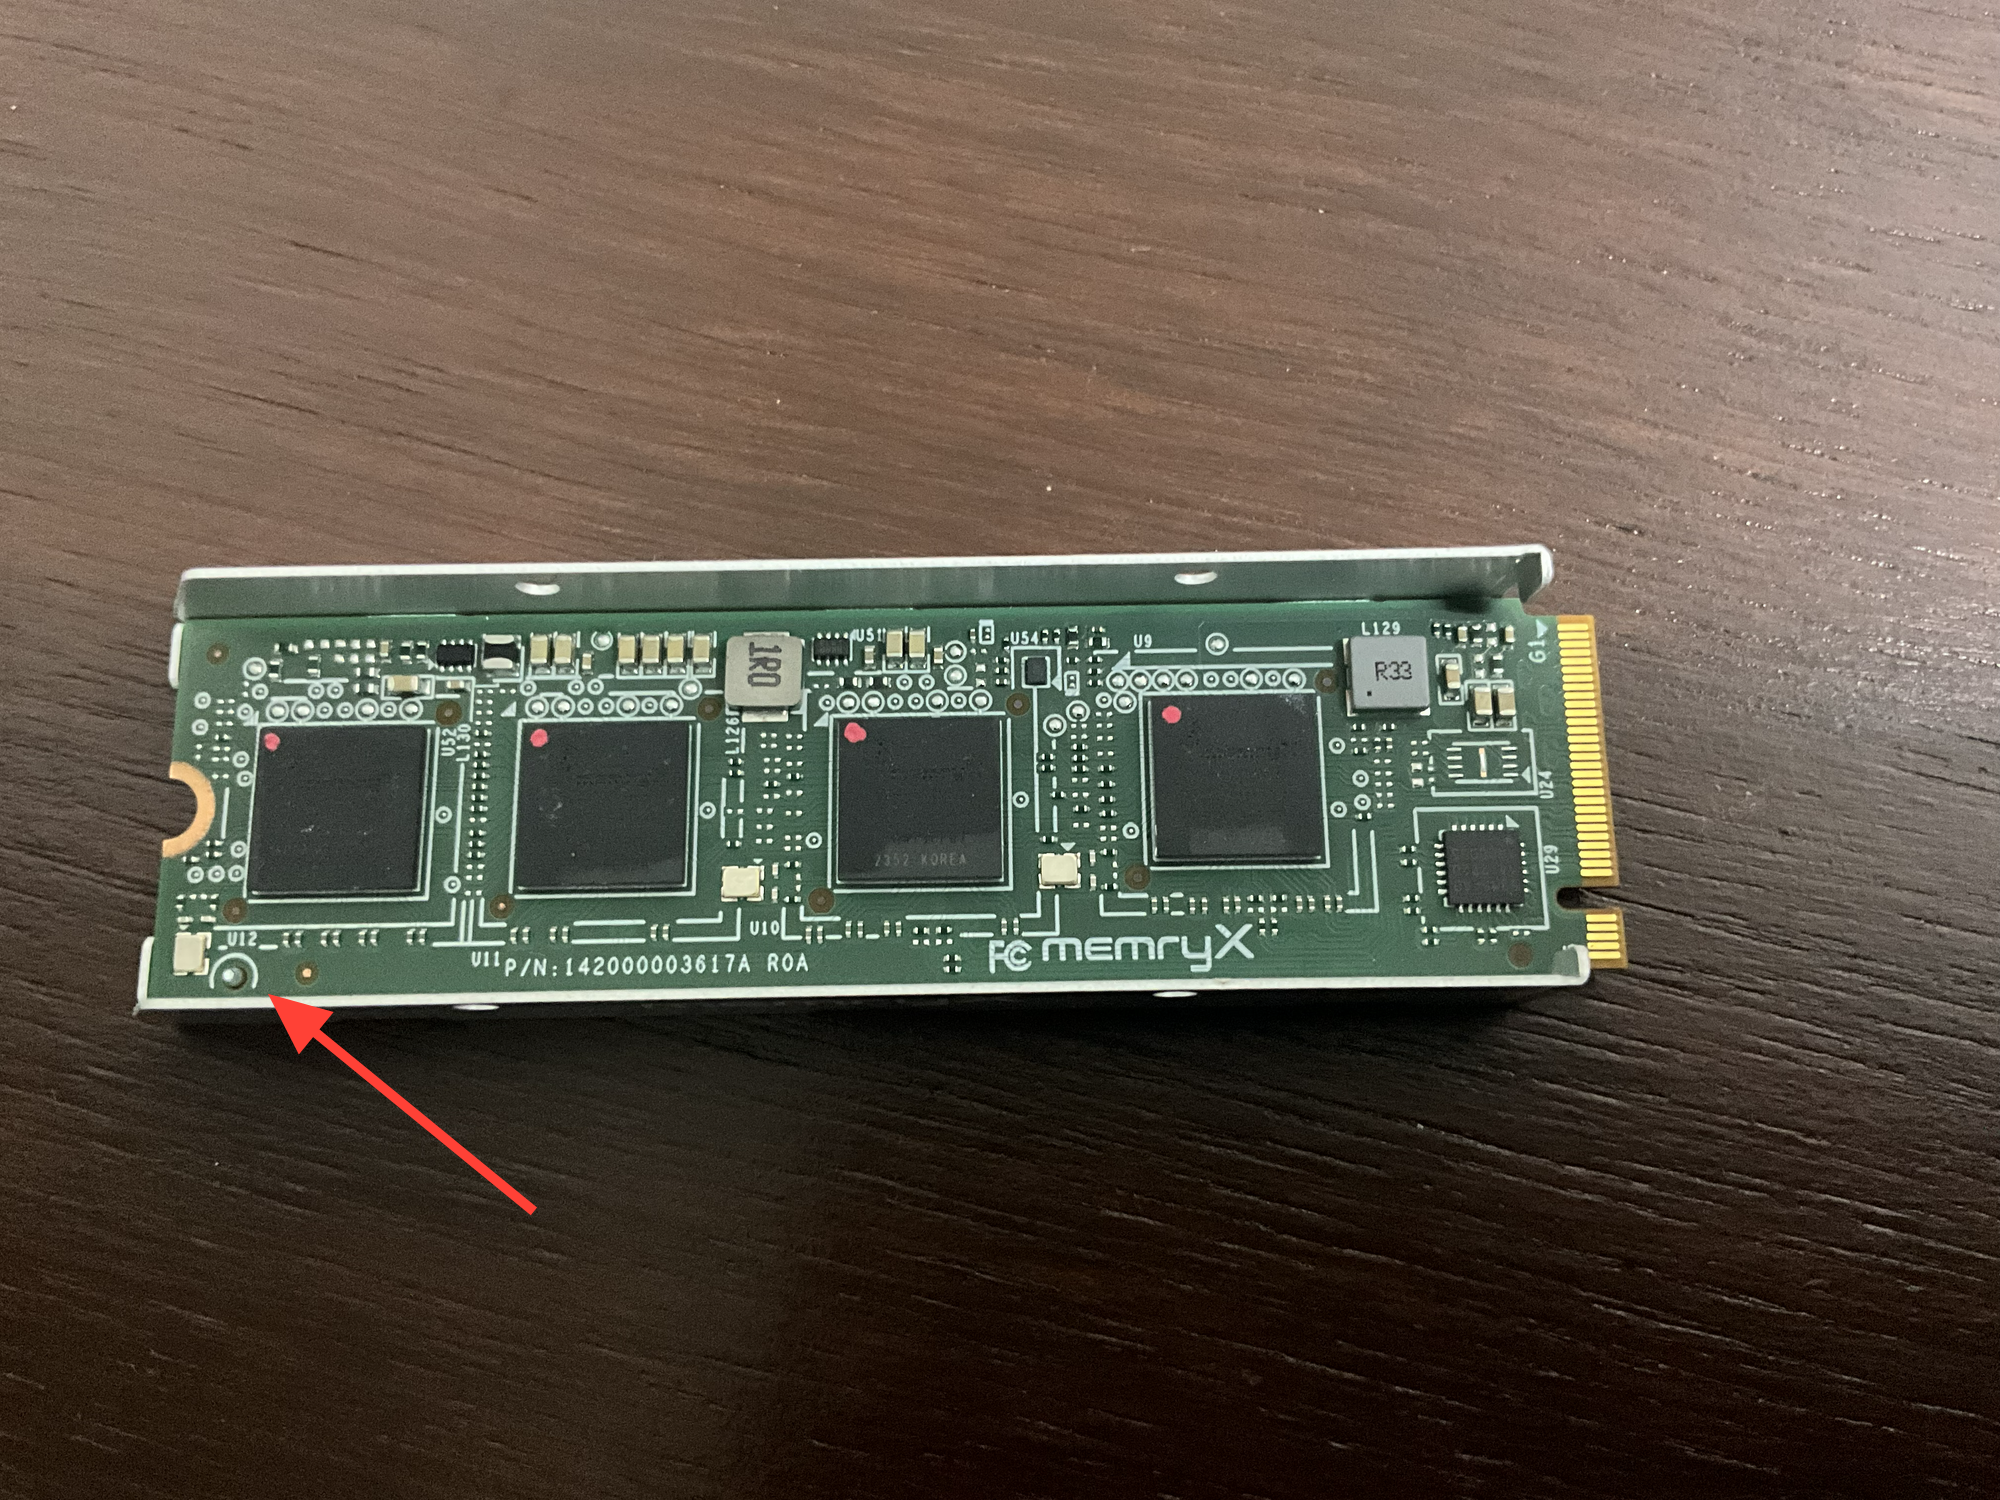
Place the accelerator on top of the gray heatsink bracket, facing upward. Make sure the small alignment post on the bracket fits securely inside the circular opening on the accelerator board.
Place the heatsink on top of the accelerator, making sure that the screw holes on the bracket align perfectly with the holes on the heatsink.
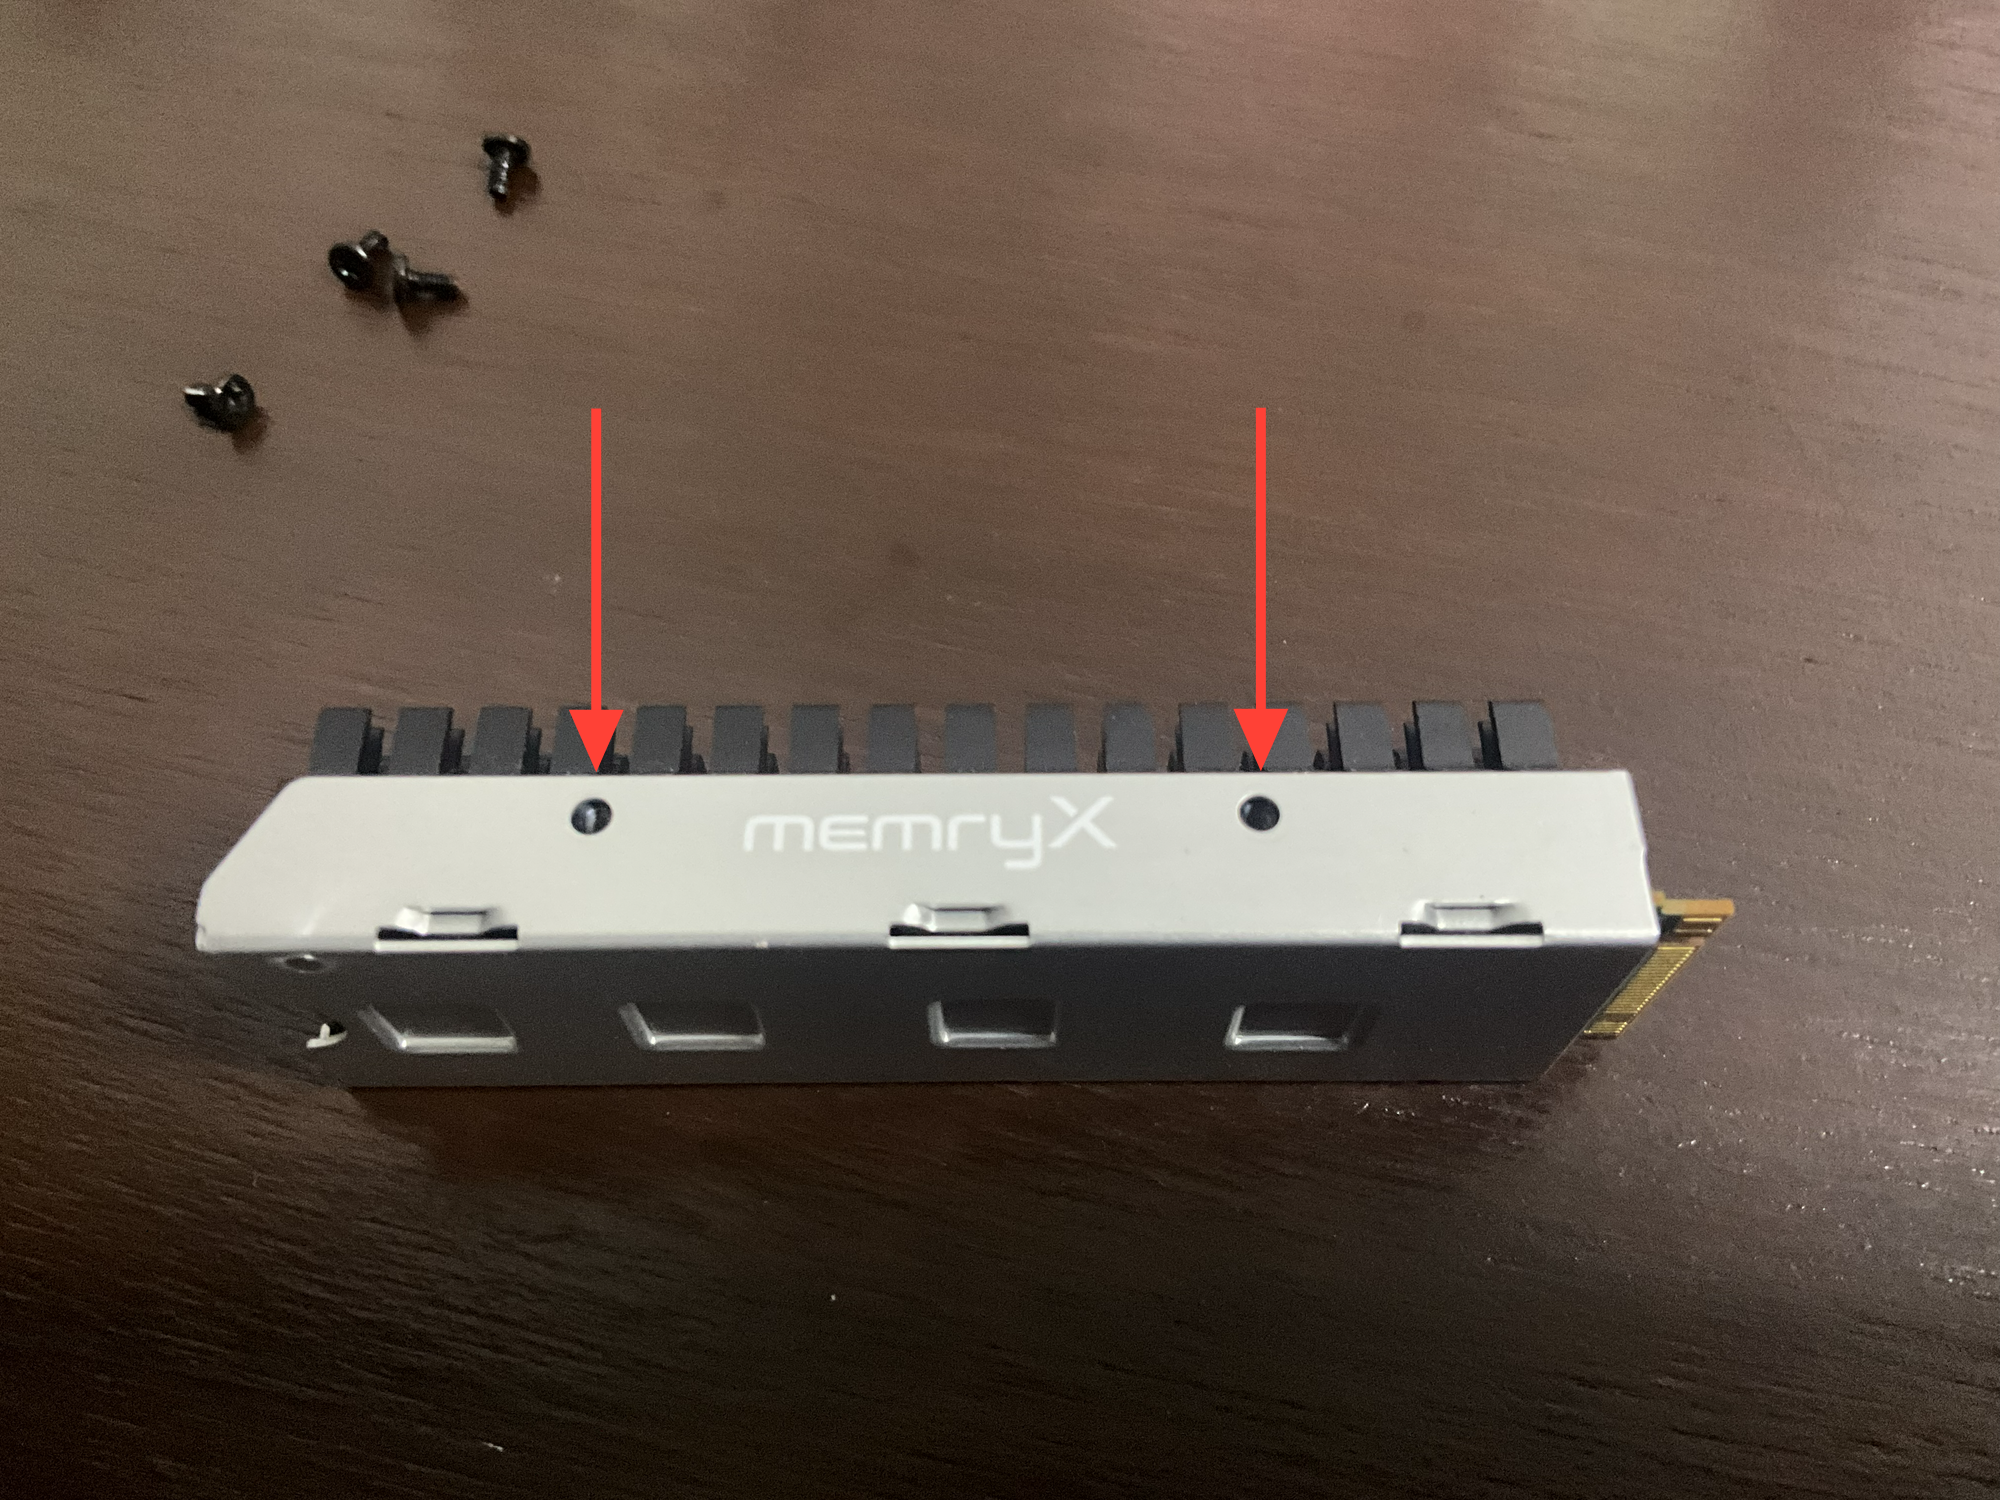
Insert the four black screws and tighten them gently. Avoid overtightening the screws. If you encounter unusual resistance, stop and realign the heatsink and bracket.
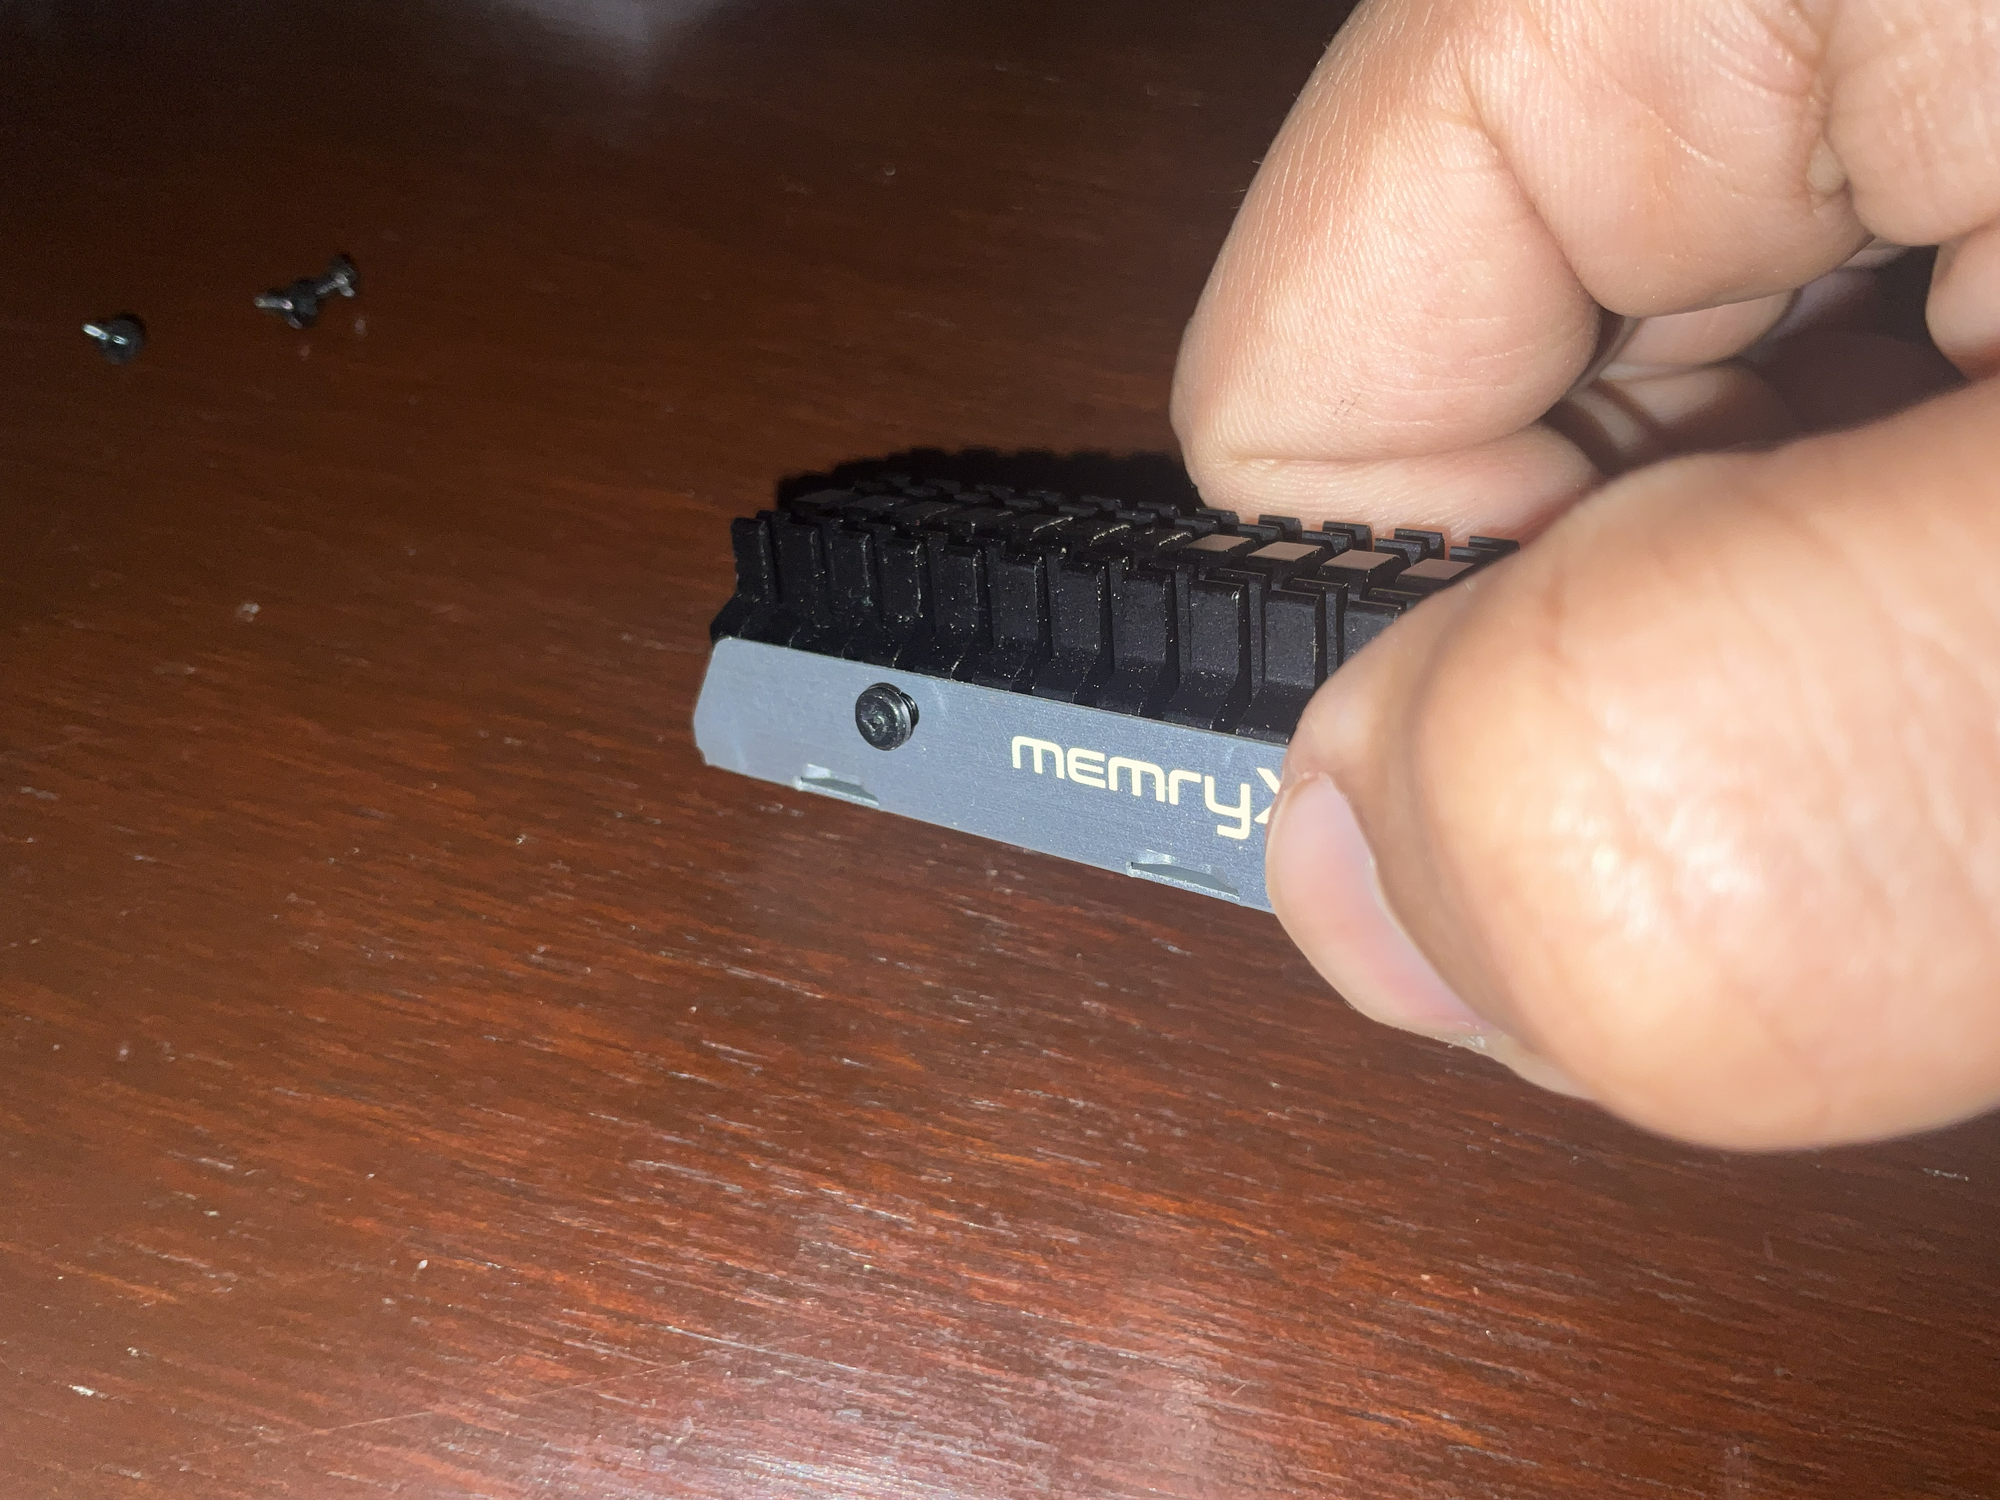
The accelerator is now ready for installation. Let us move to the next step.
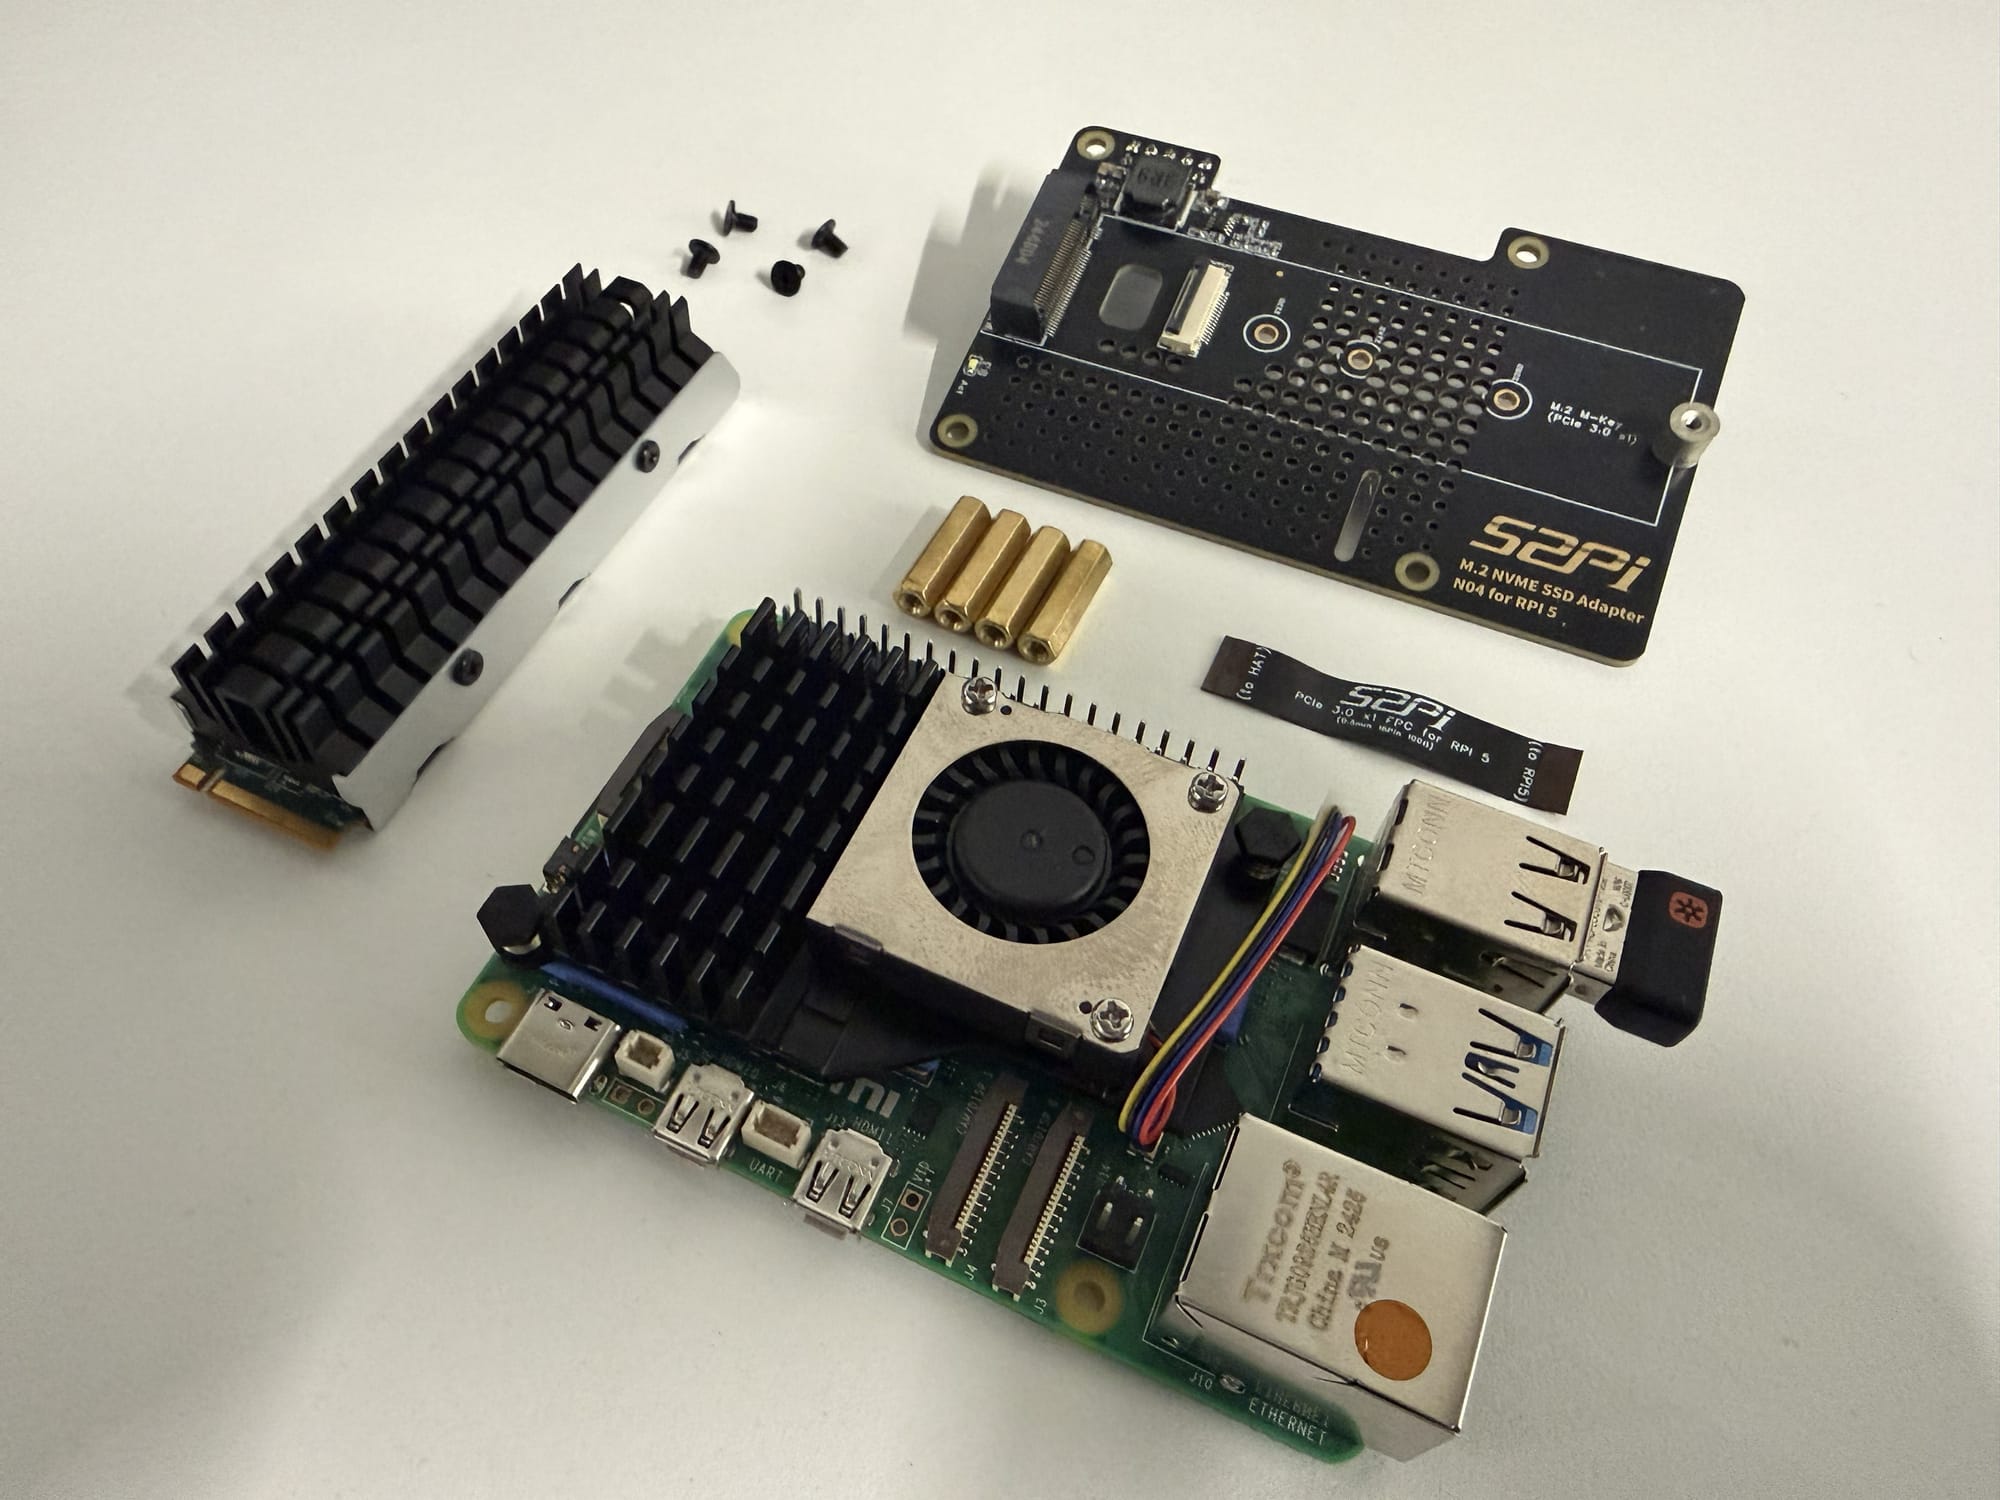
2: Install the Raspberry Pi HAT
Take the four black screws included with the HAT and insert them into the designated mounting holes.
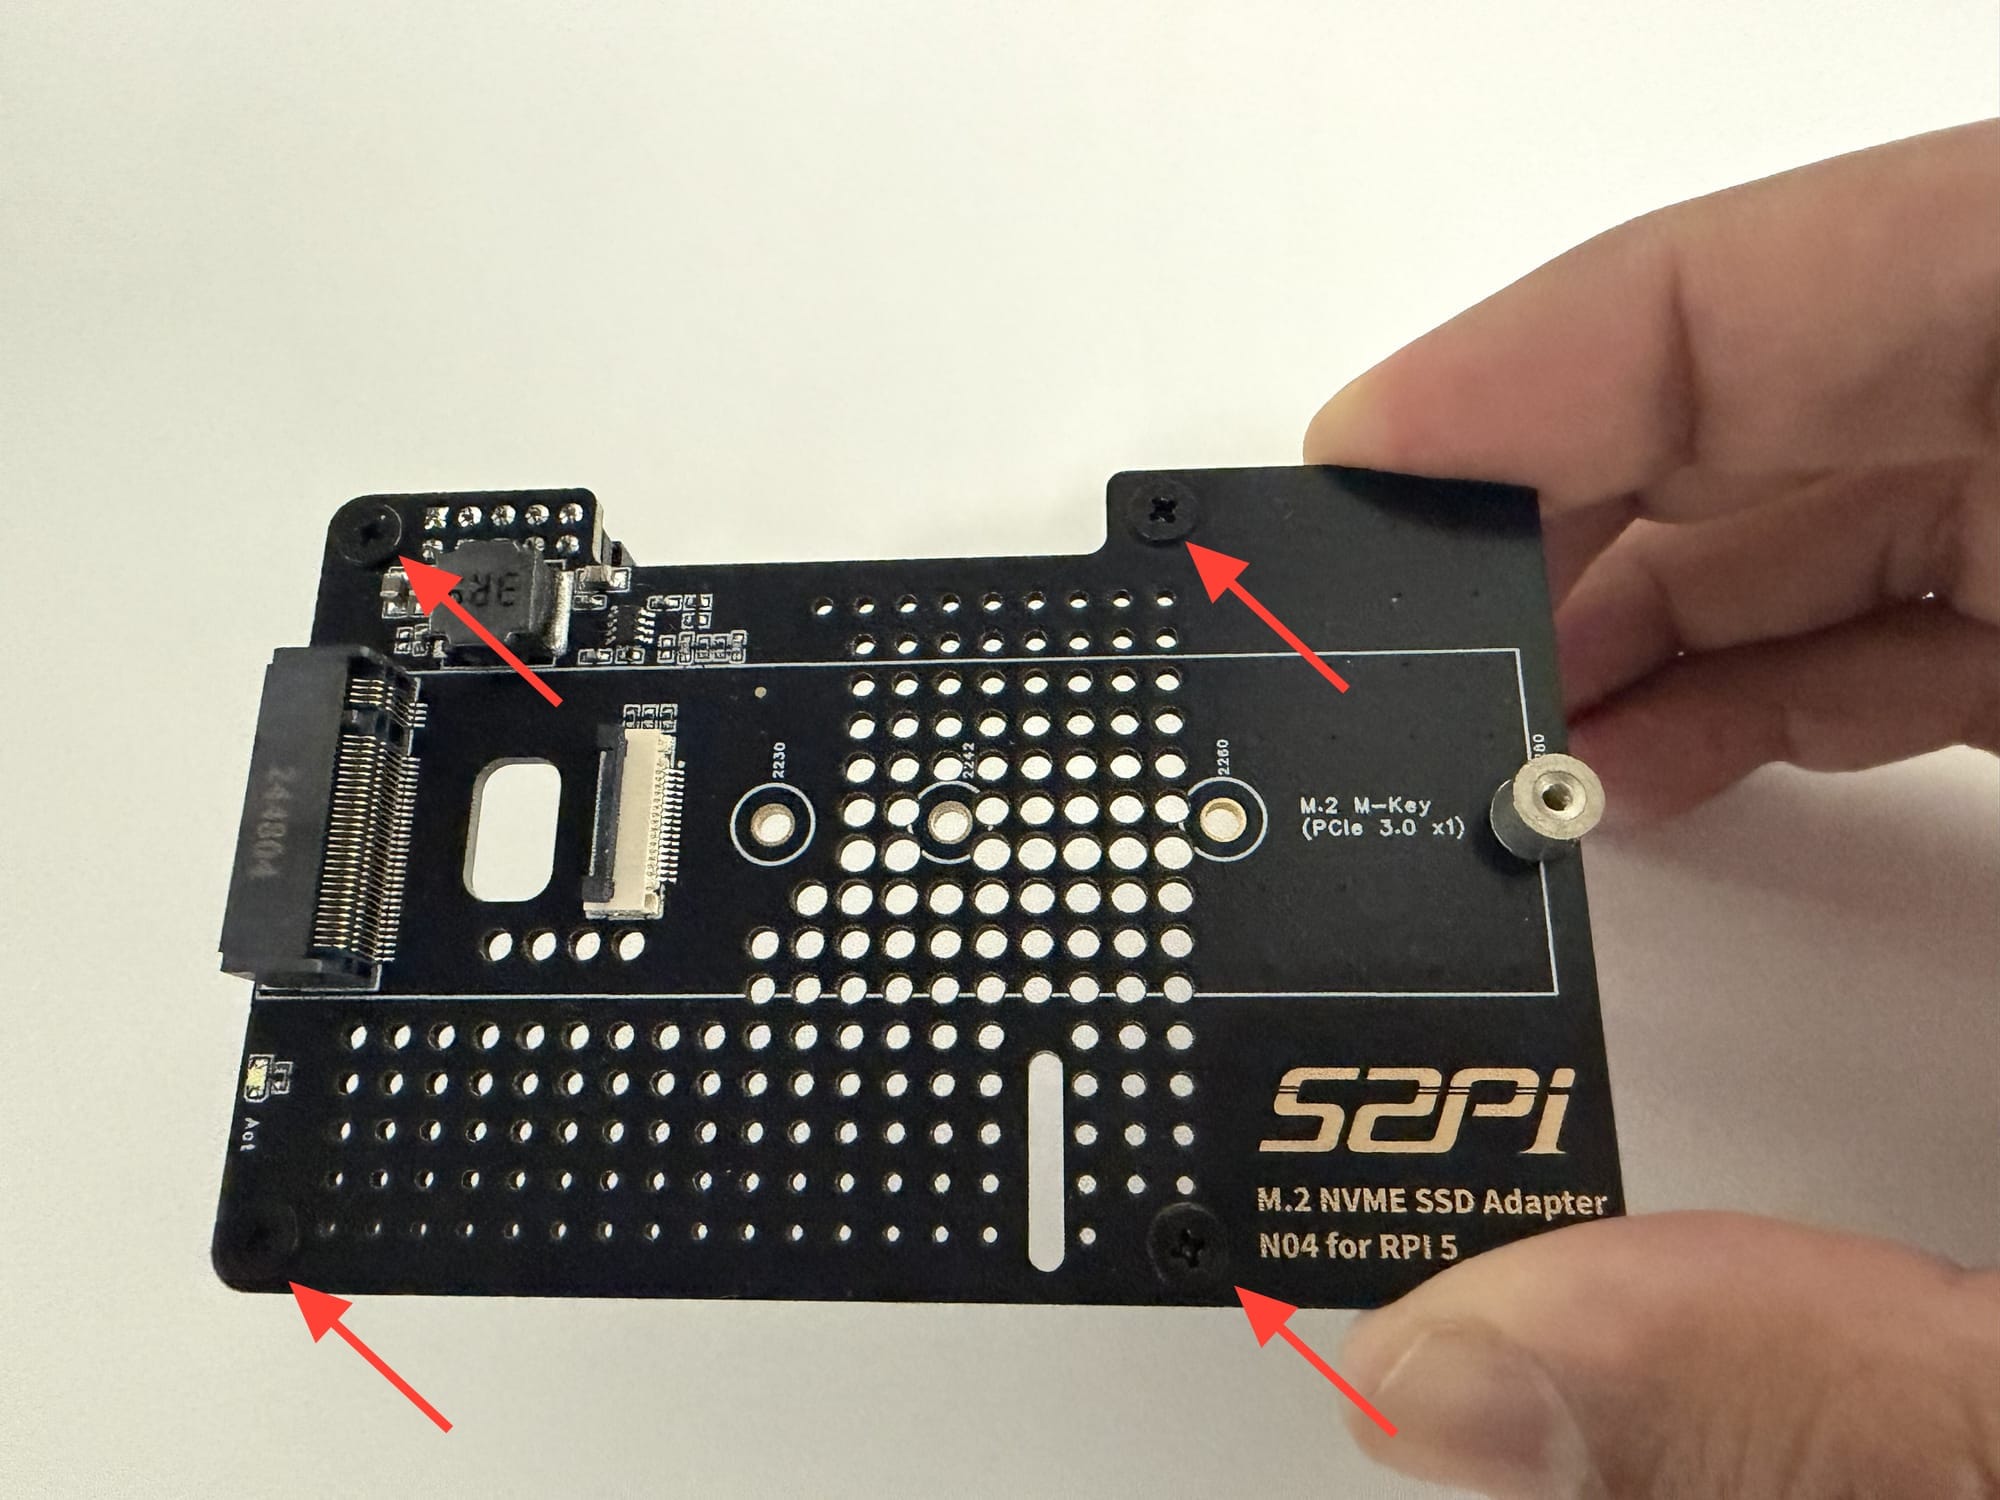
Secure the screws using the brass standoffs.
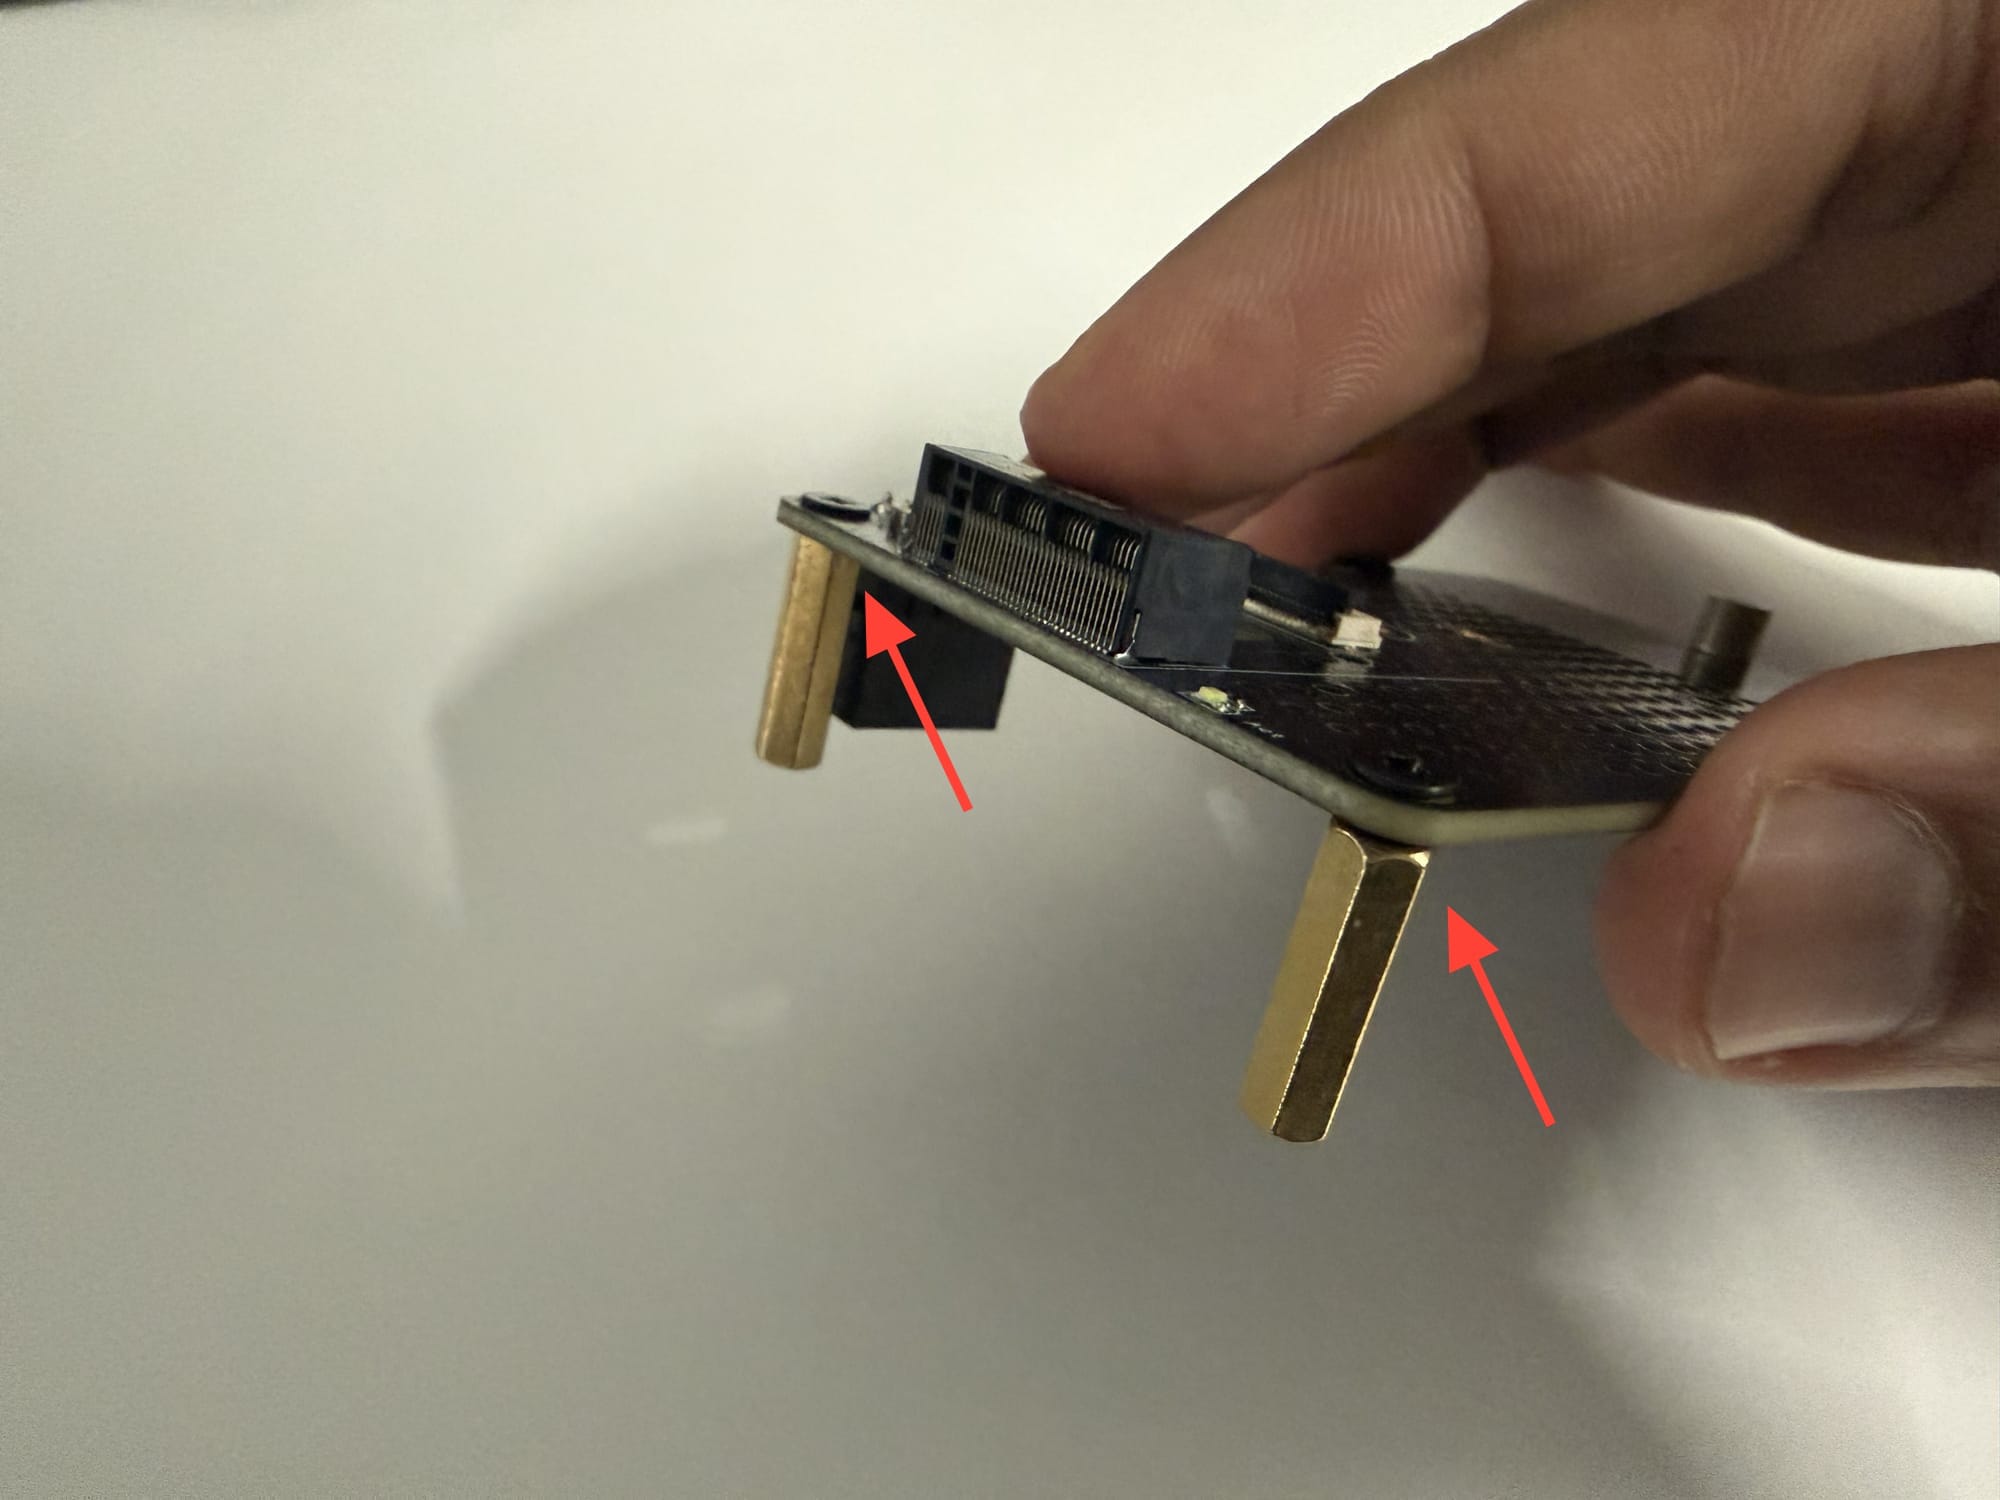
Repeat this process for all four screws.
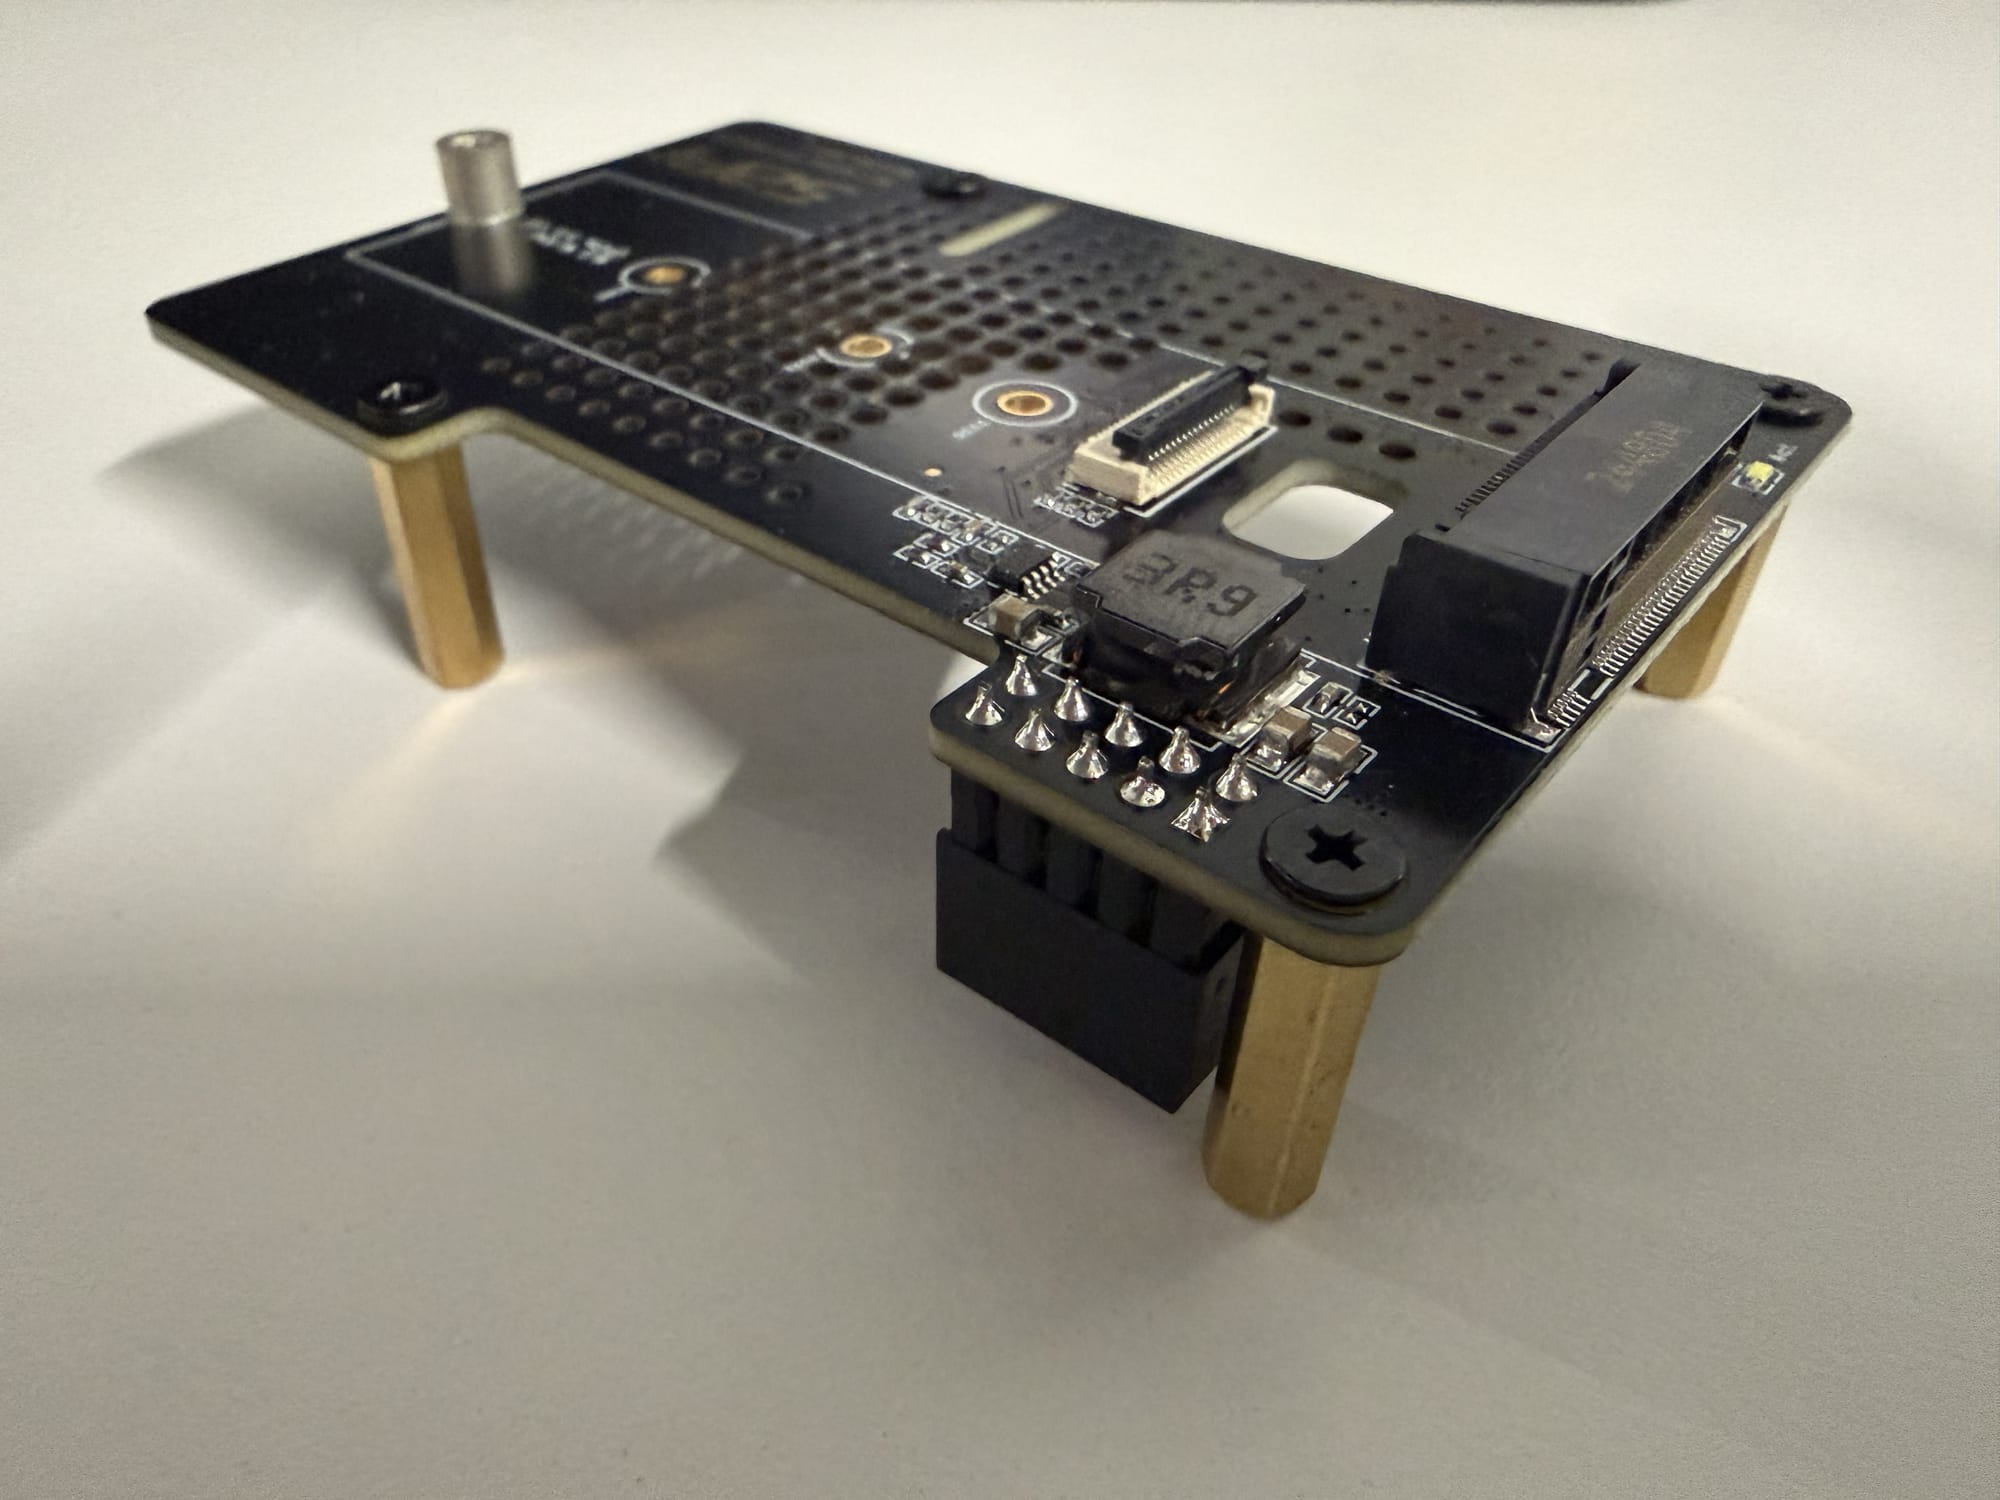
Take the black PCIe ribbon cable that will connect the HAT to the Raspberry Pi’s PCIe port.
1. "To RPi"
2. "To HAT"
Be careful not to reverse the cable. The end labeled “To RPi” must connect to the Raspberry Pi. Also, make sure the printed markings face away from the Raspberry Pi.
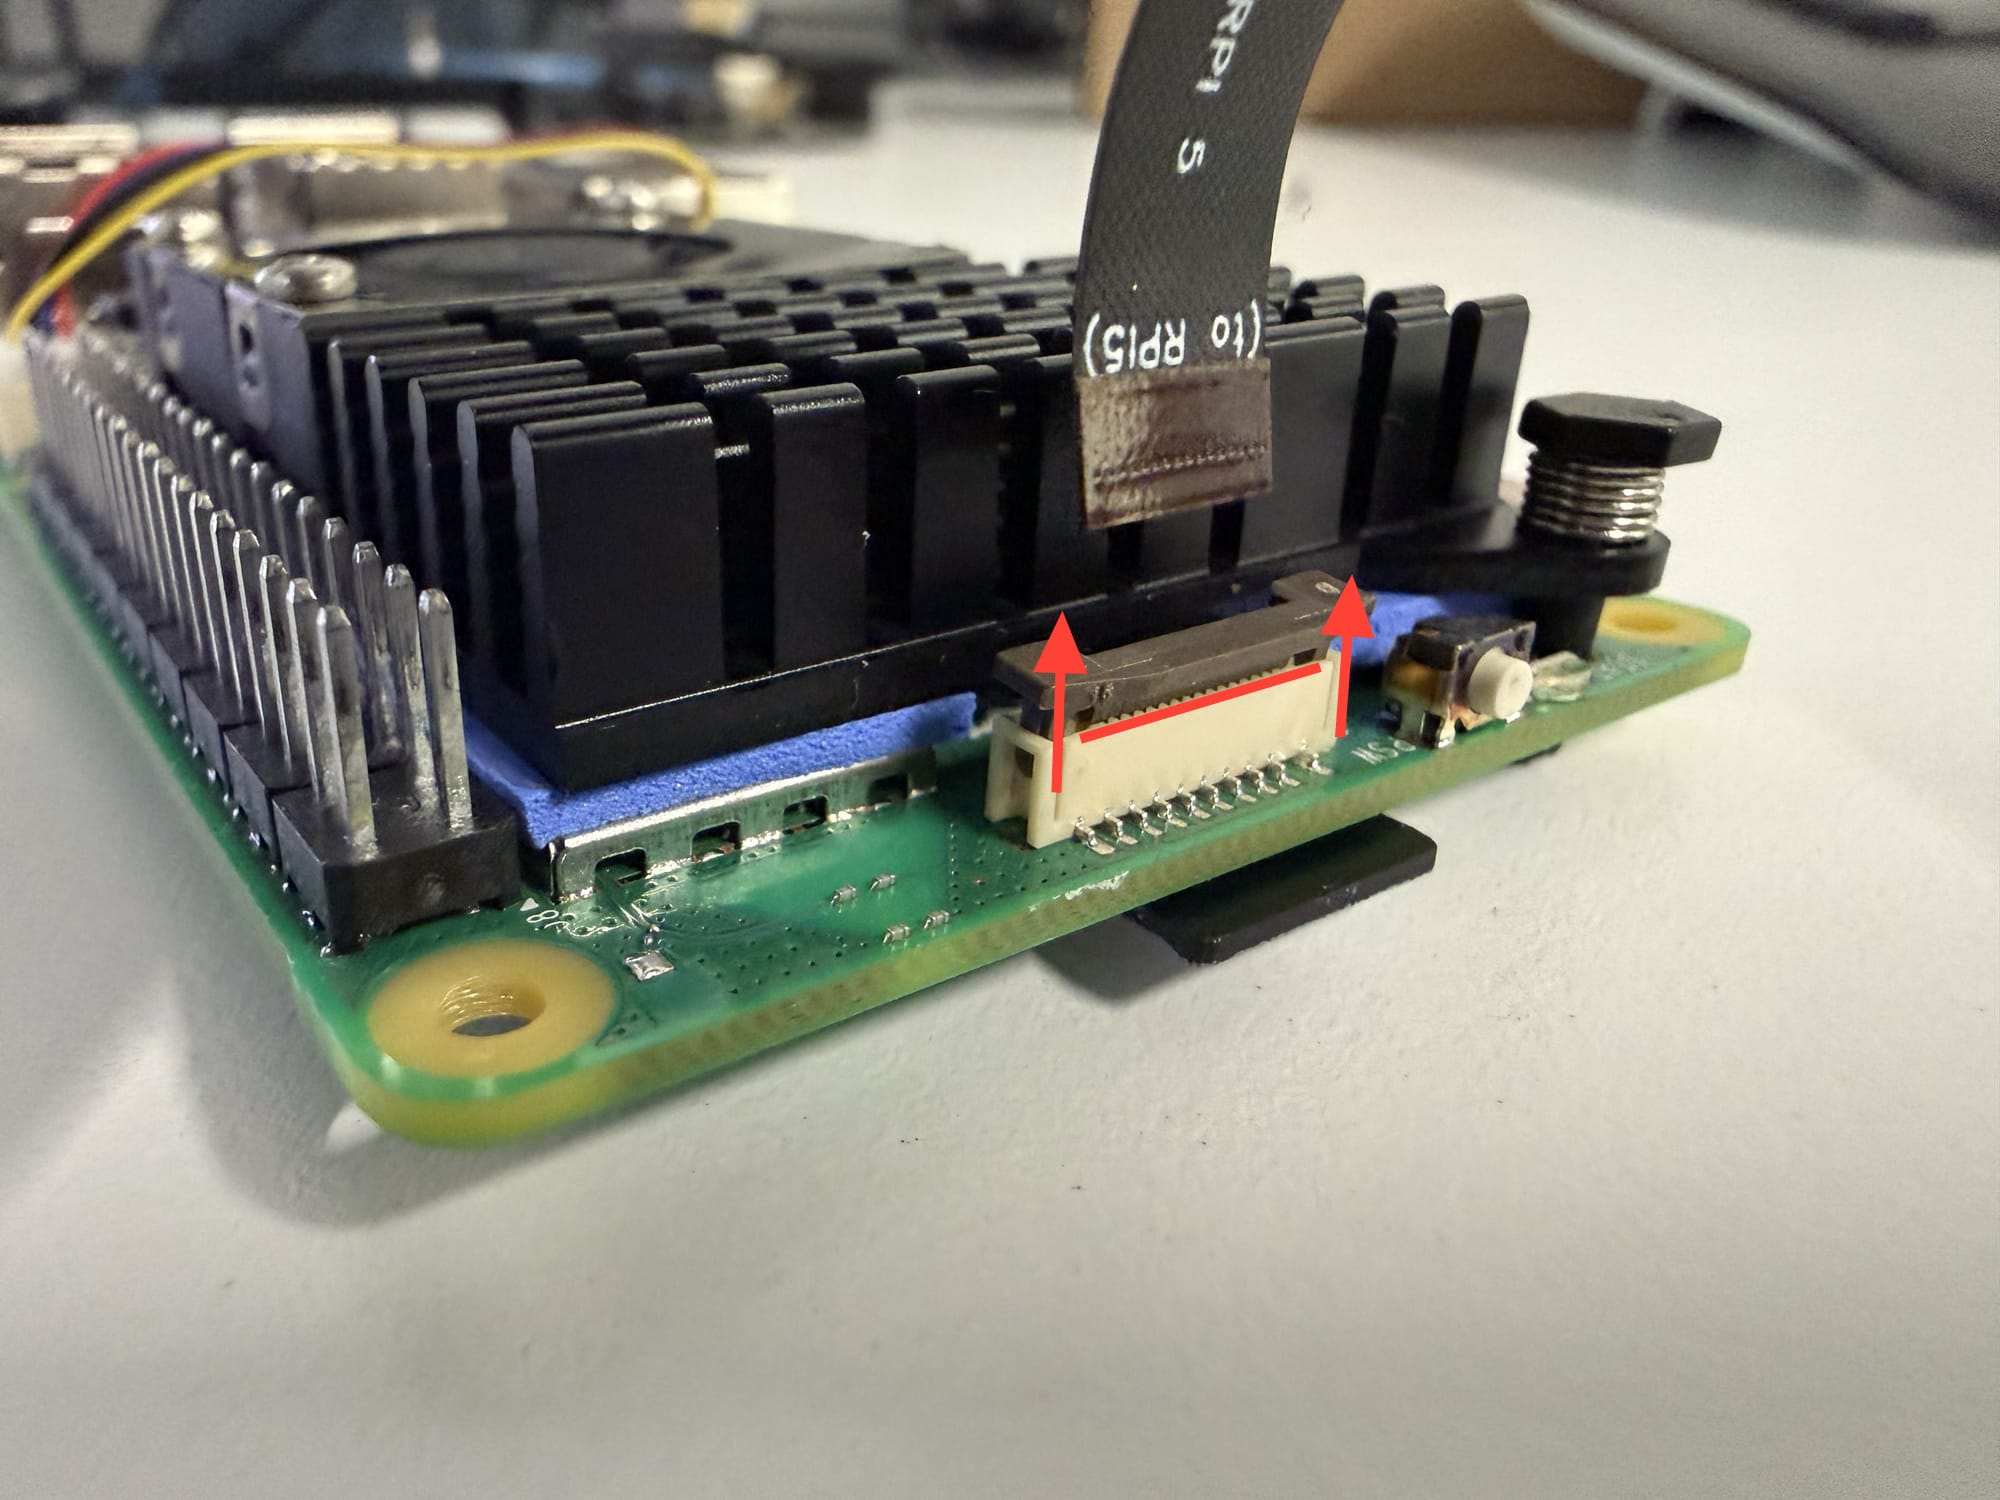
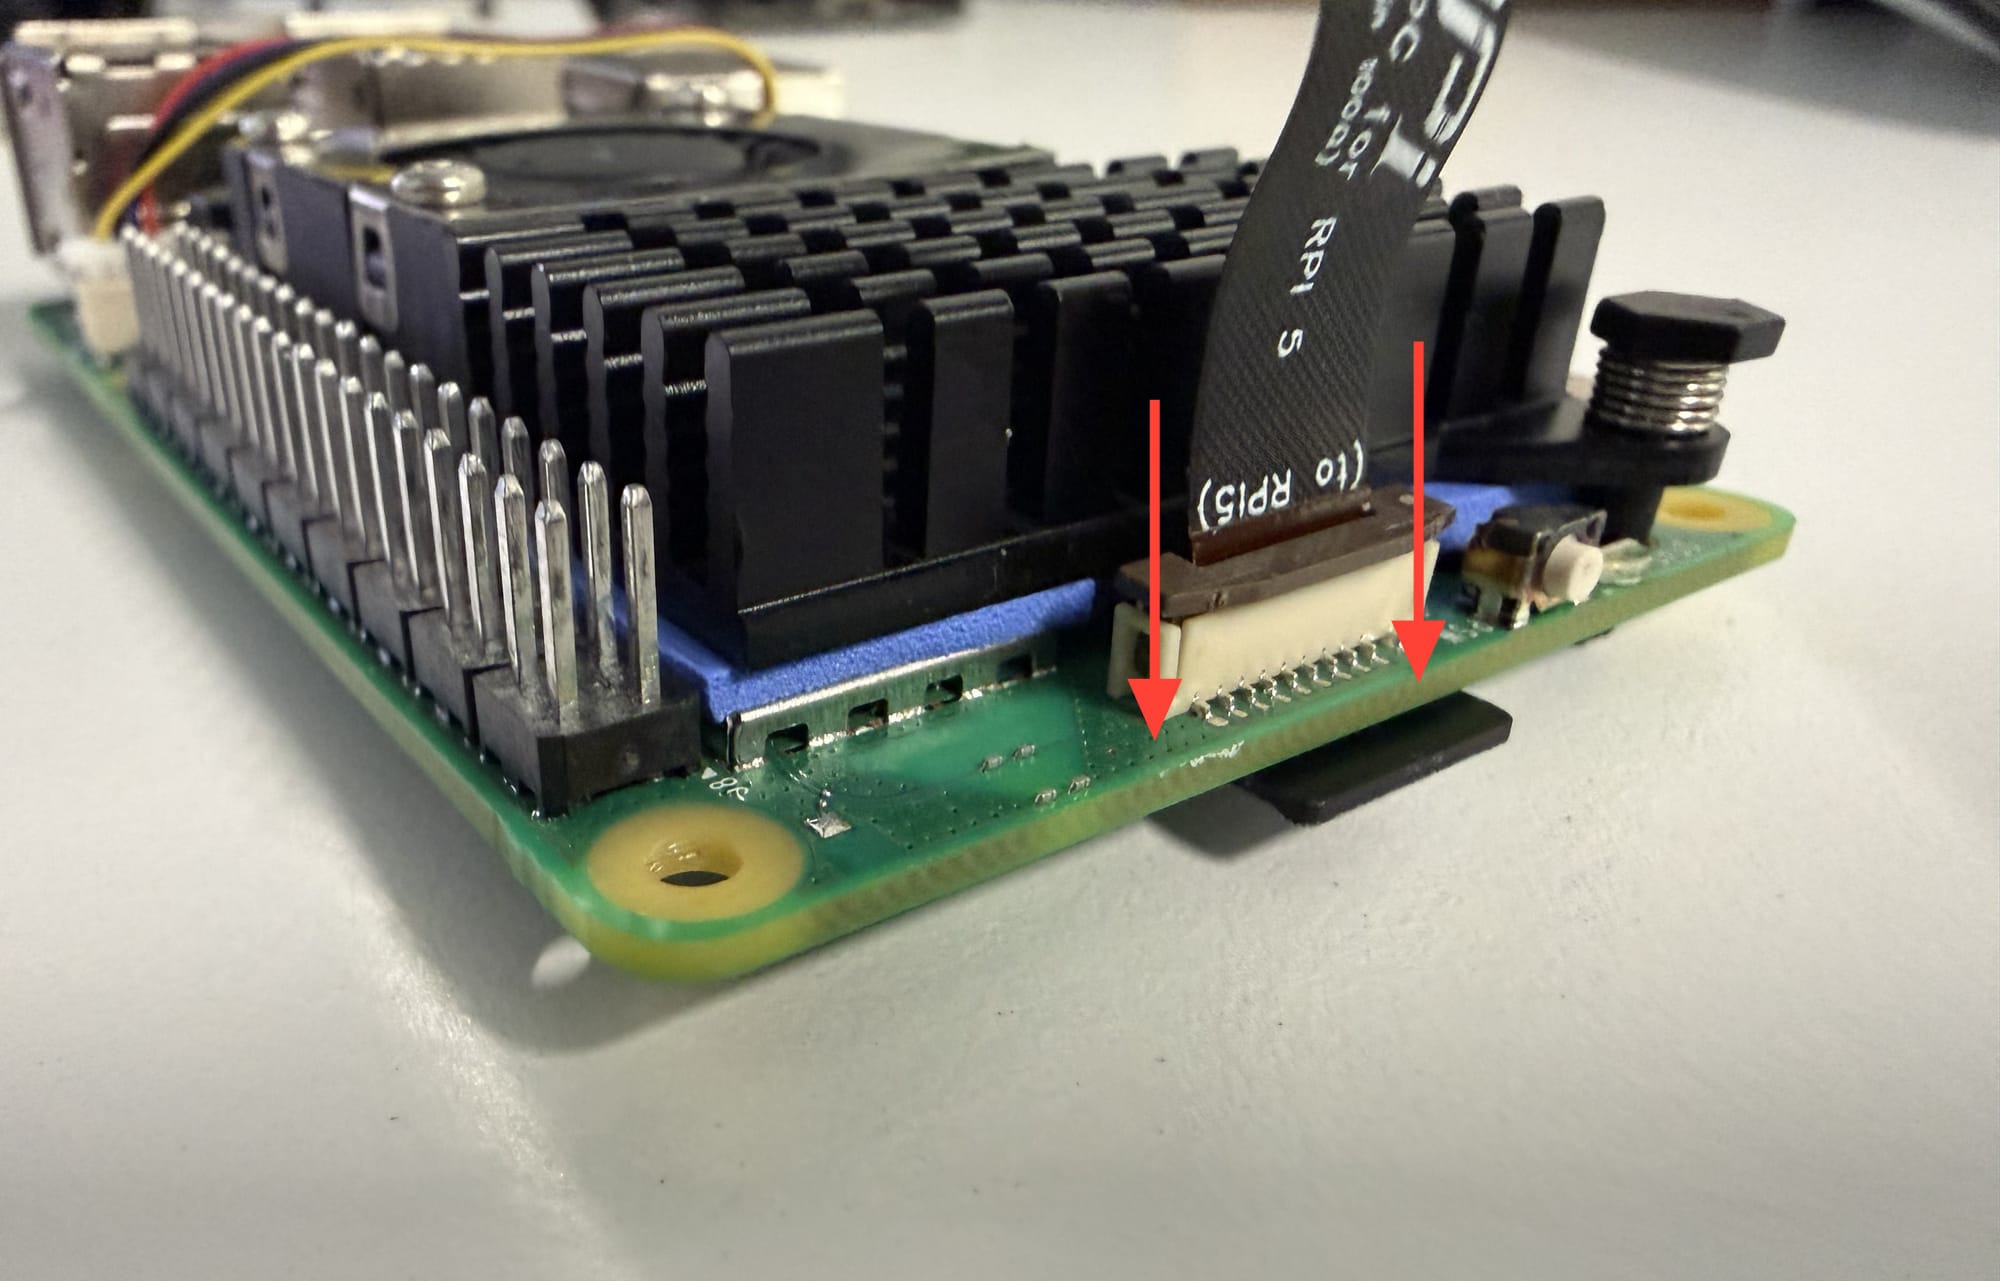
Insert the ribbon cable with the markings facing the microSD card.
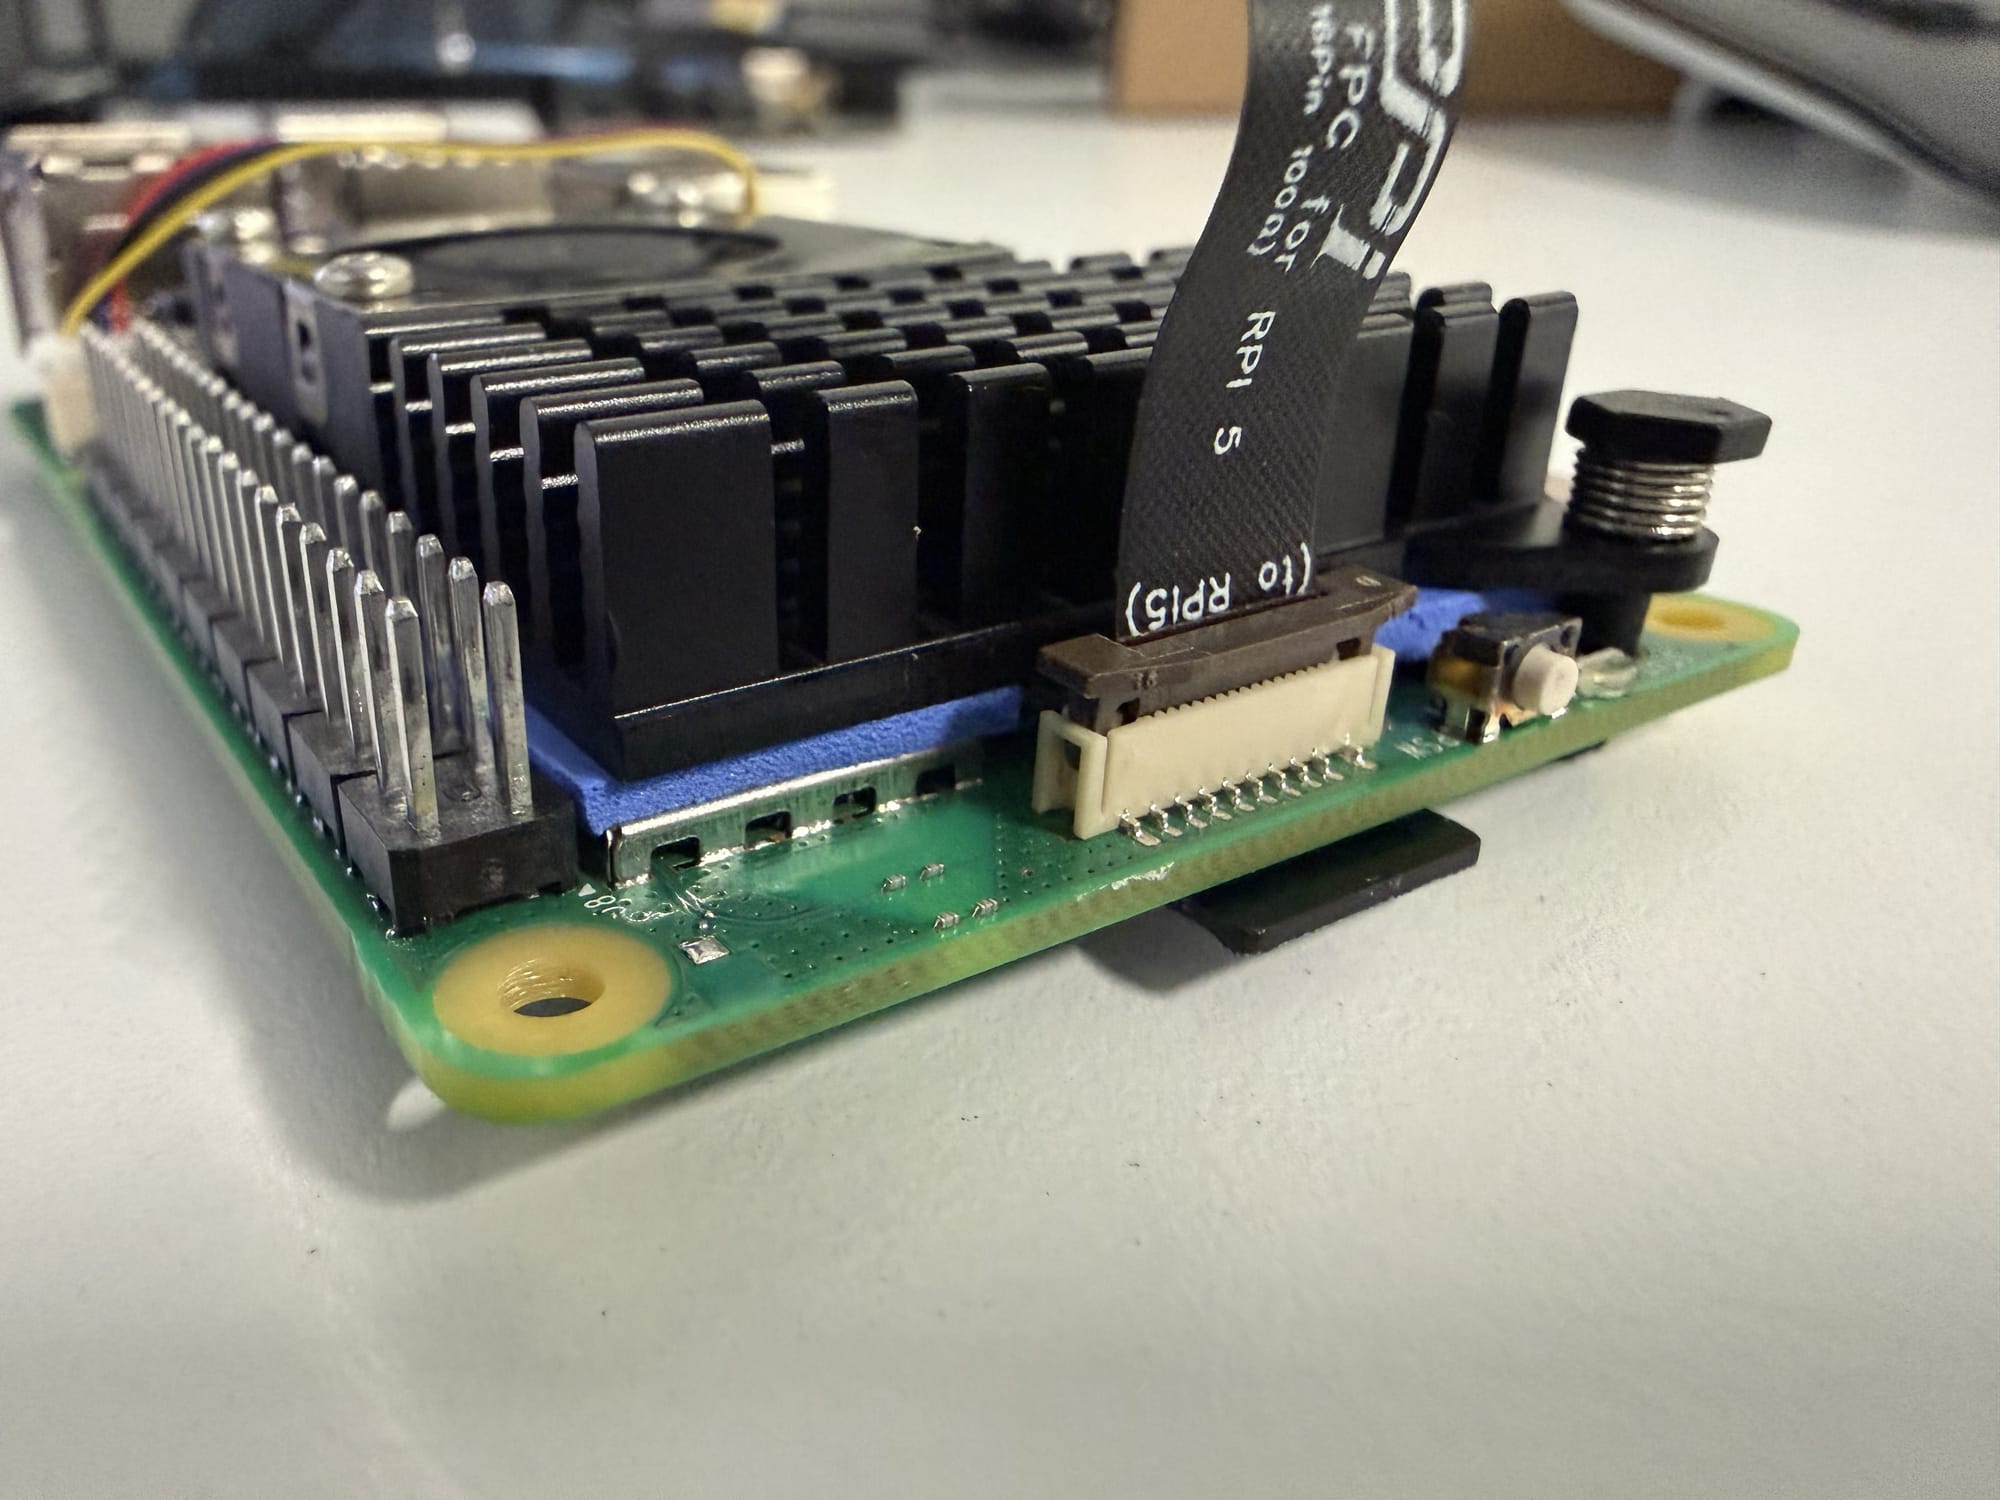
Gently push the brown locking tab downward to secure the ribbon cable in place.
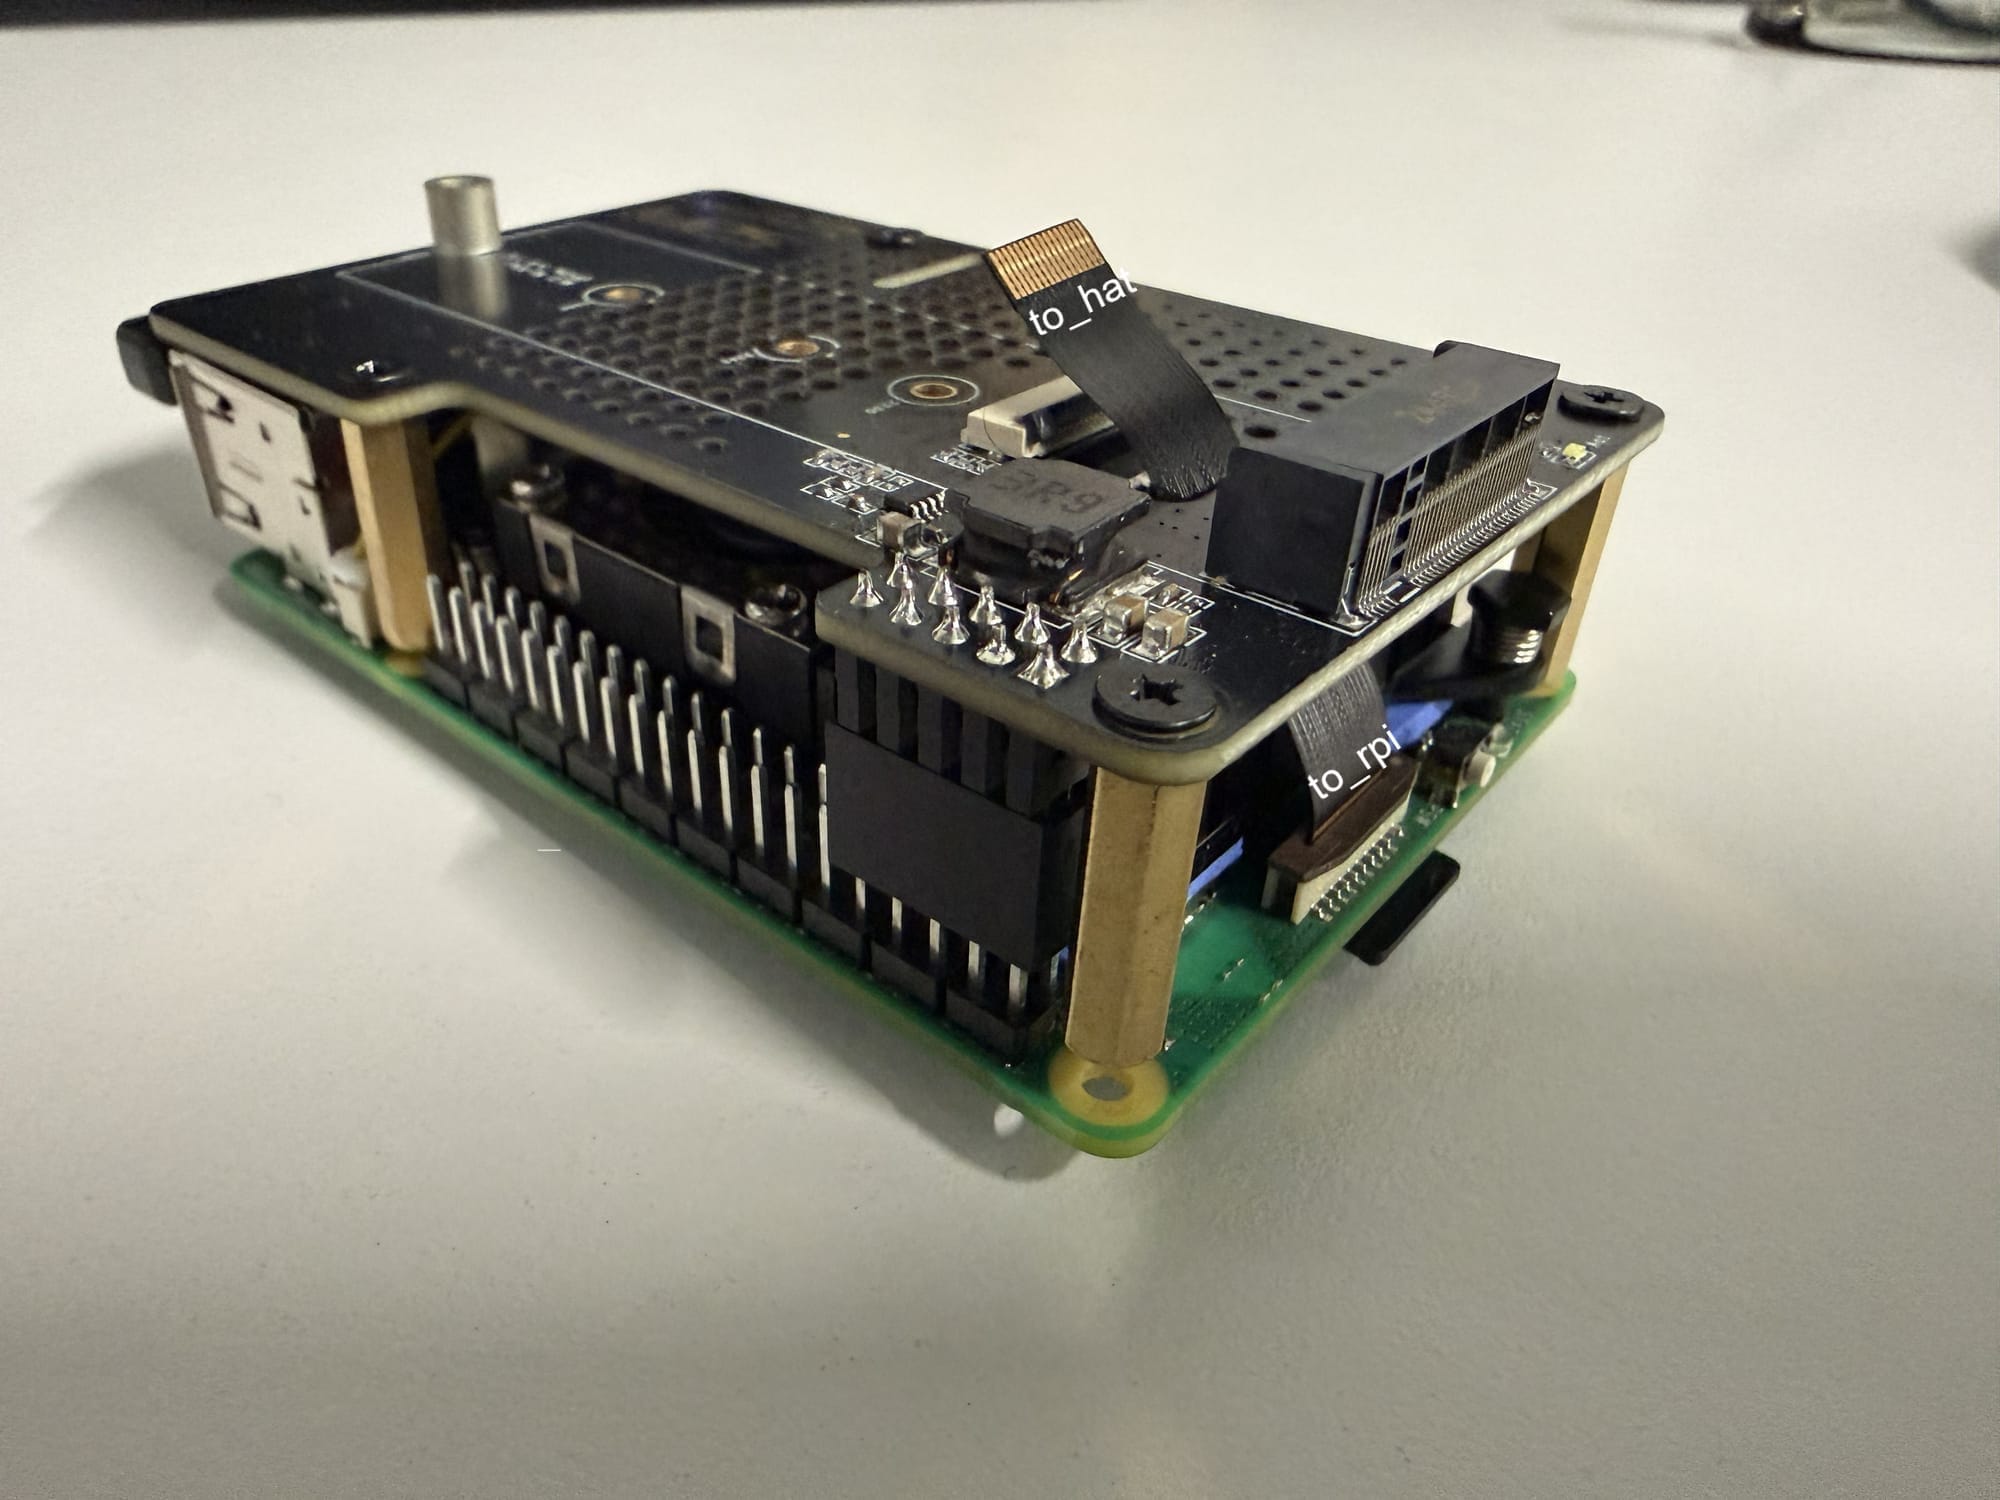
You can now position the HAT on top of the Raspberry Pi. Before securing it, guide the other end of the ribbon cable through the opening in the HAT. Make sure the Raspberry Pi GPIO header is aligned correctly, as shown in the picture.
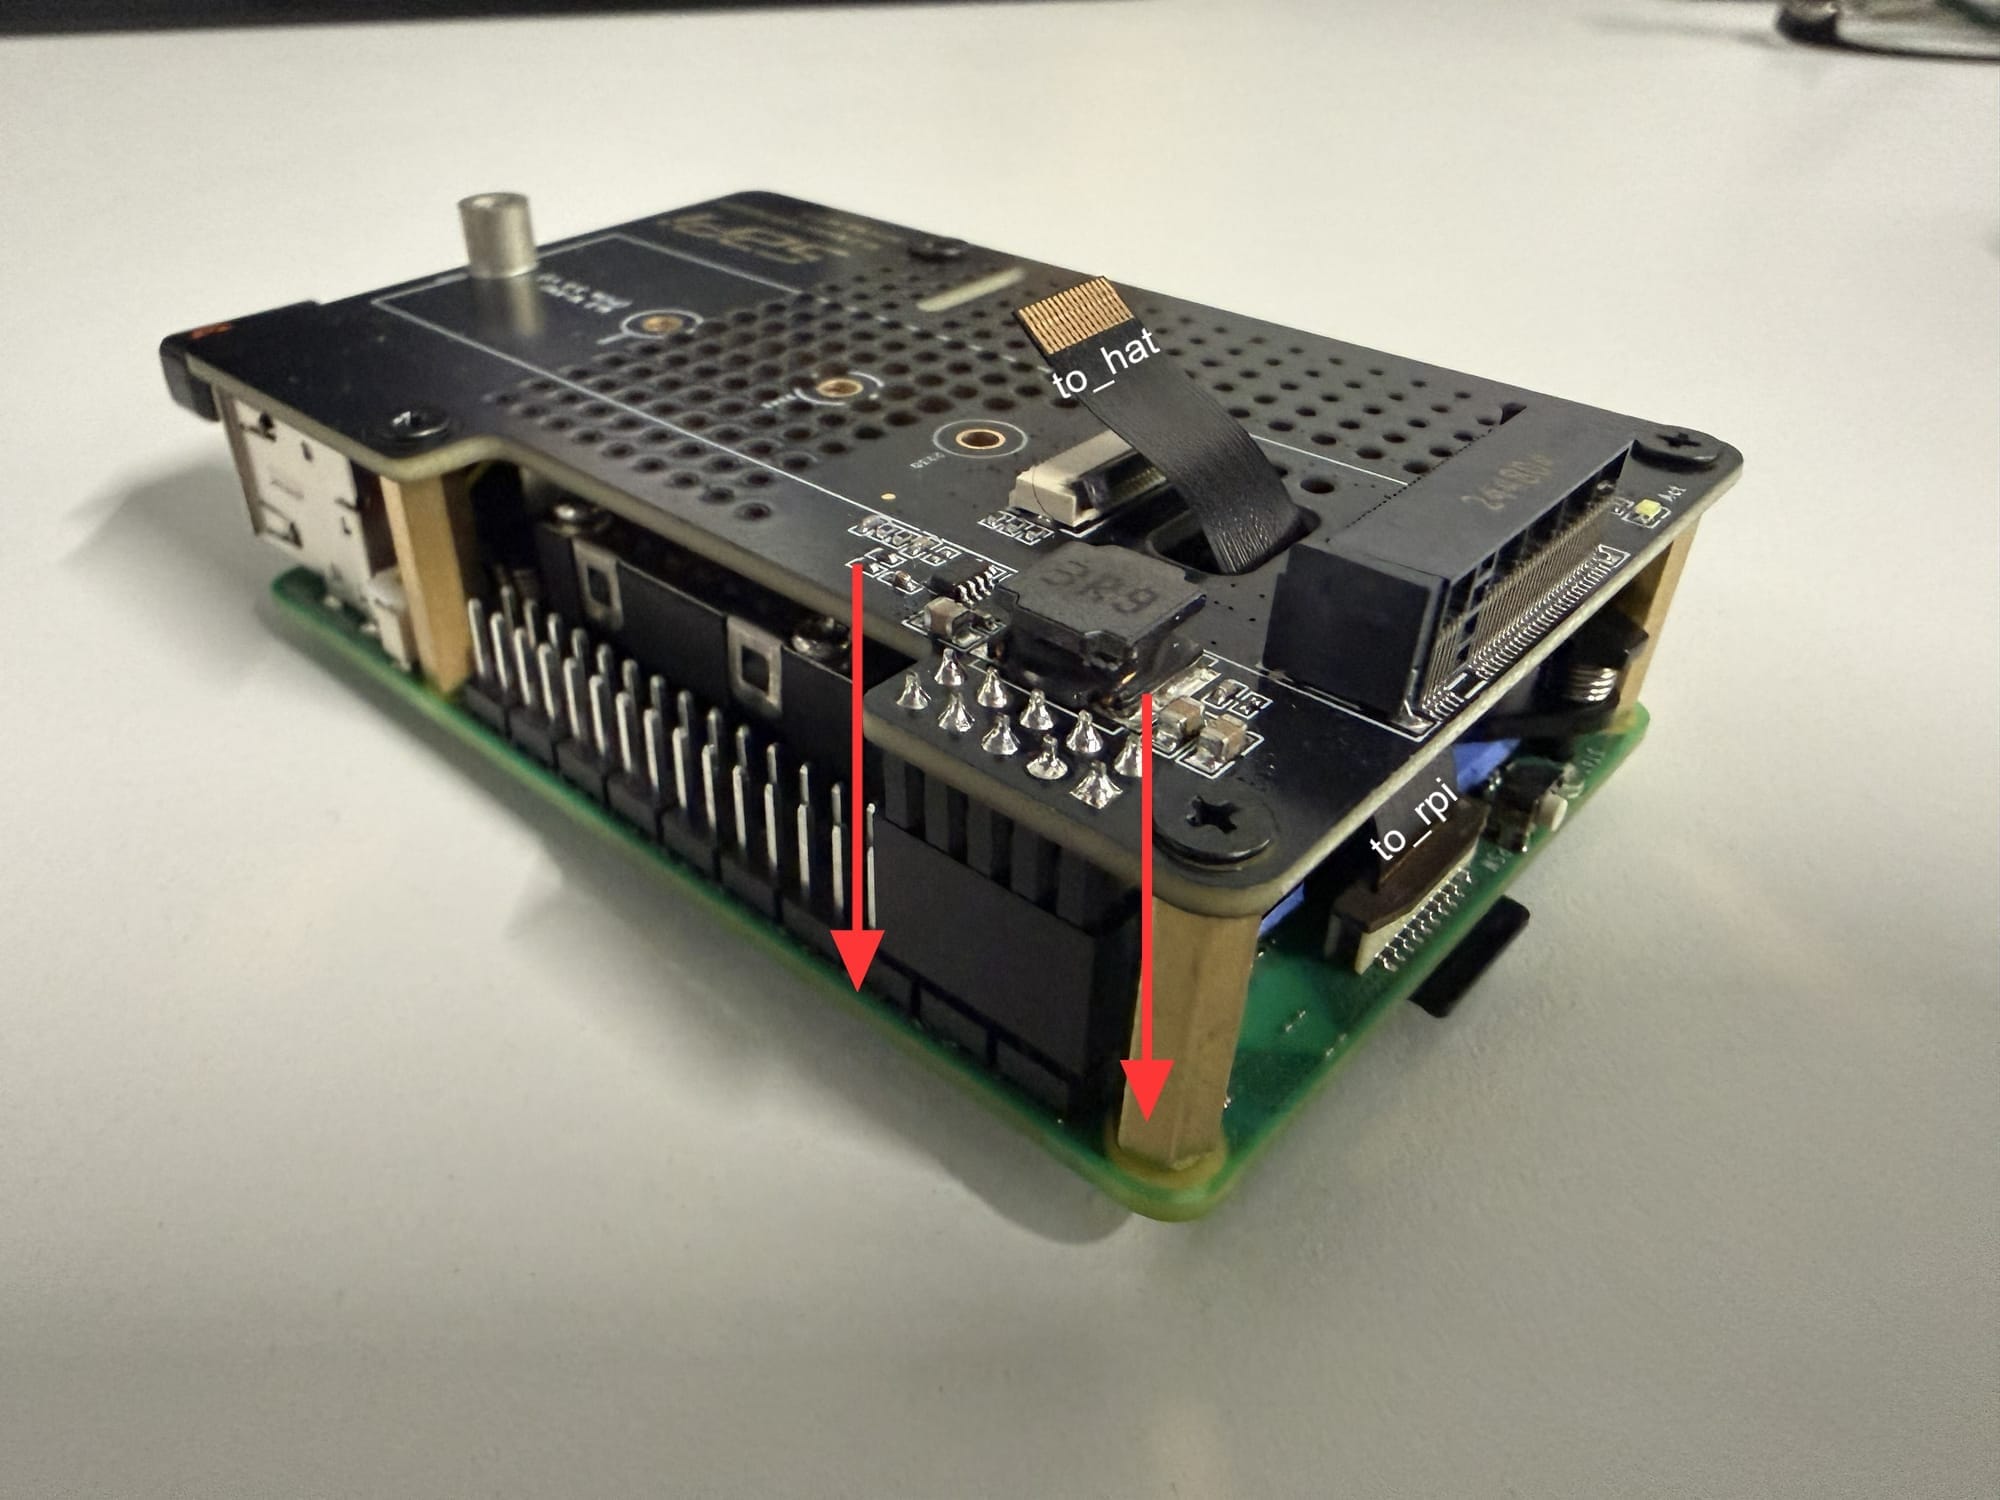
Once you have verified that the Raspberry Pi’s mounting holes are aligned with the brass standoffs and that the GPIO pins are inserted correctly, gently press the HAT into place.
On top of the HAT, there is a small gray locking tab. Gently lift it to open the ribbon-cable connector.
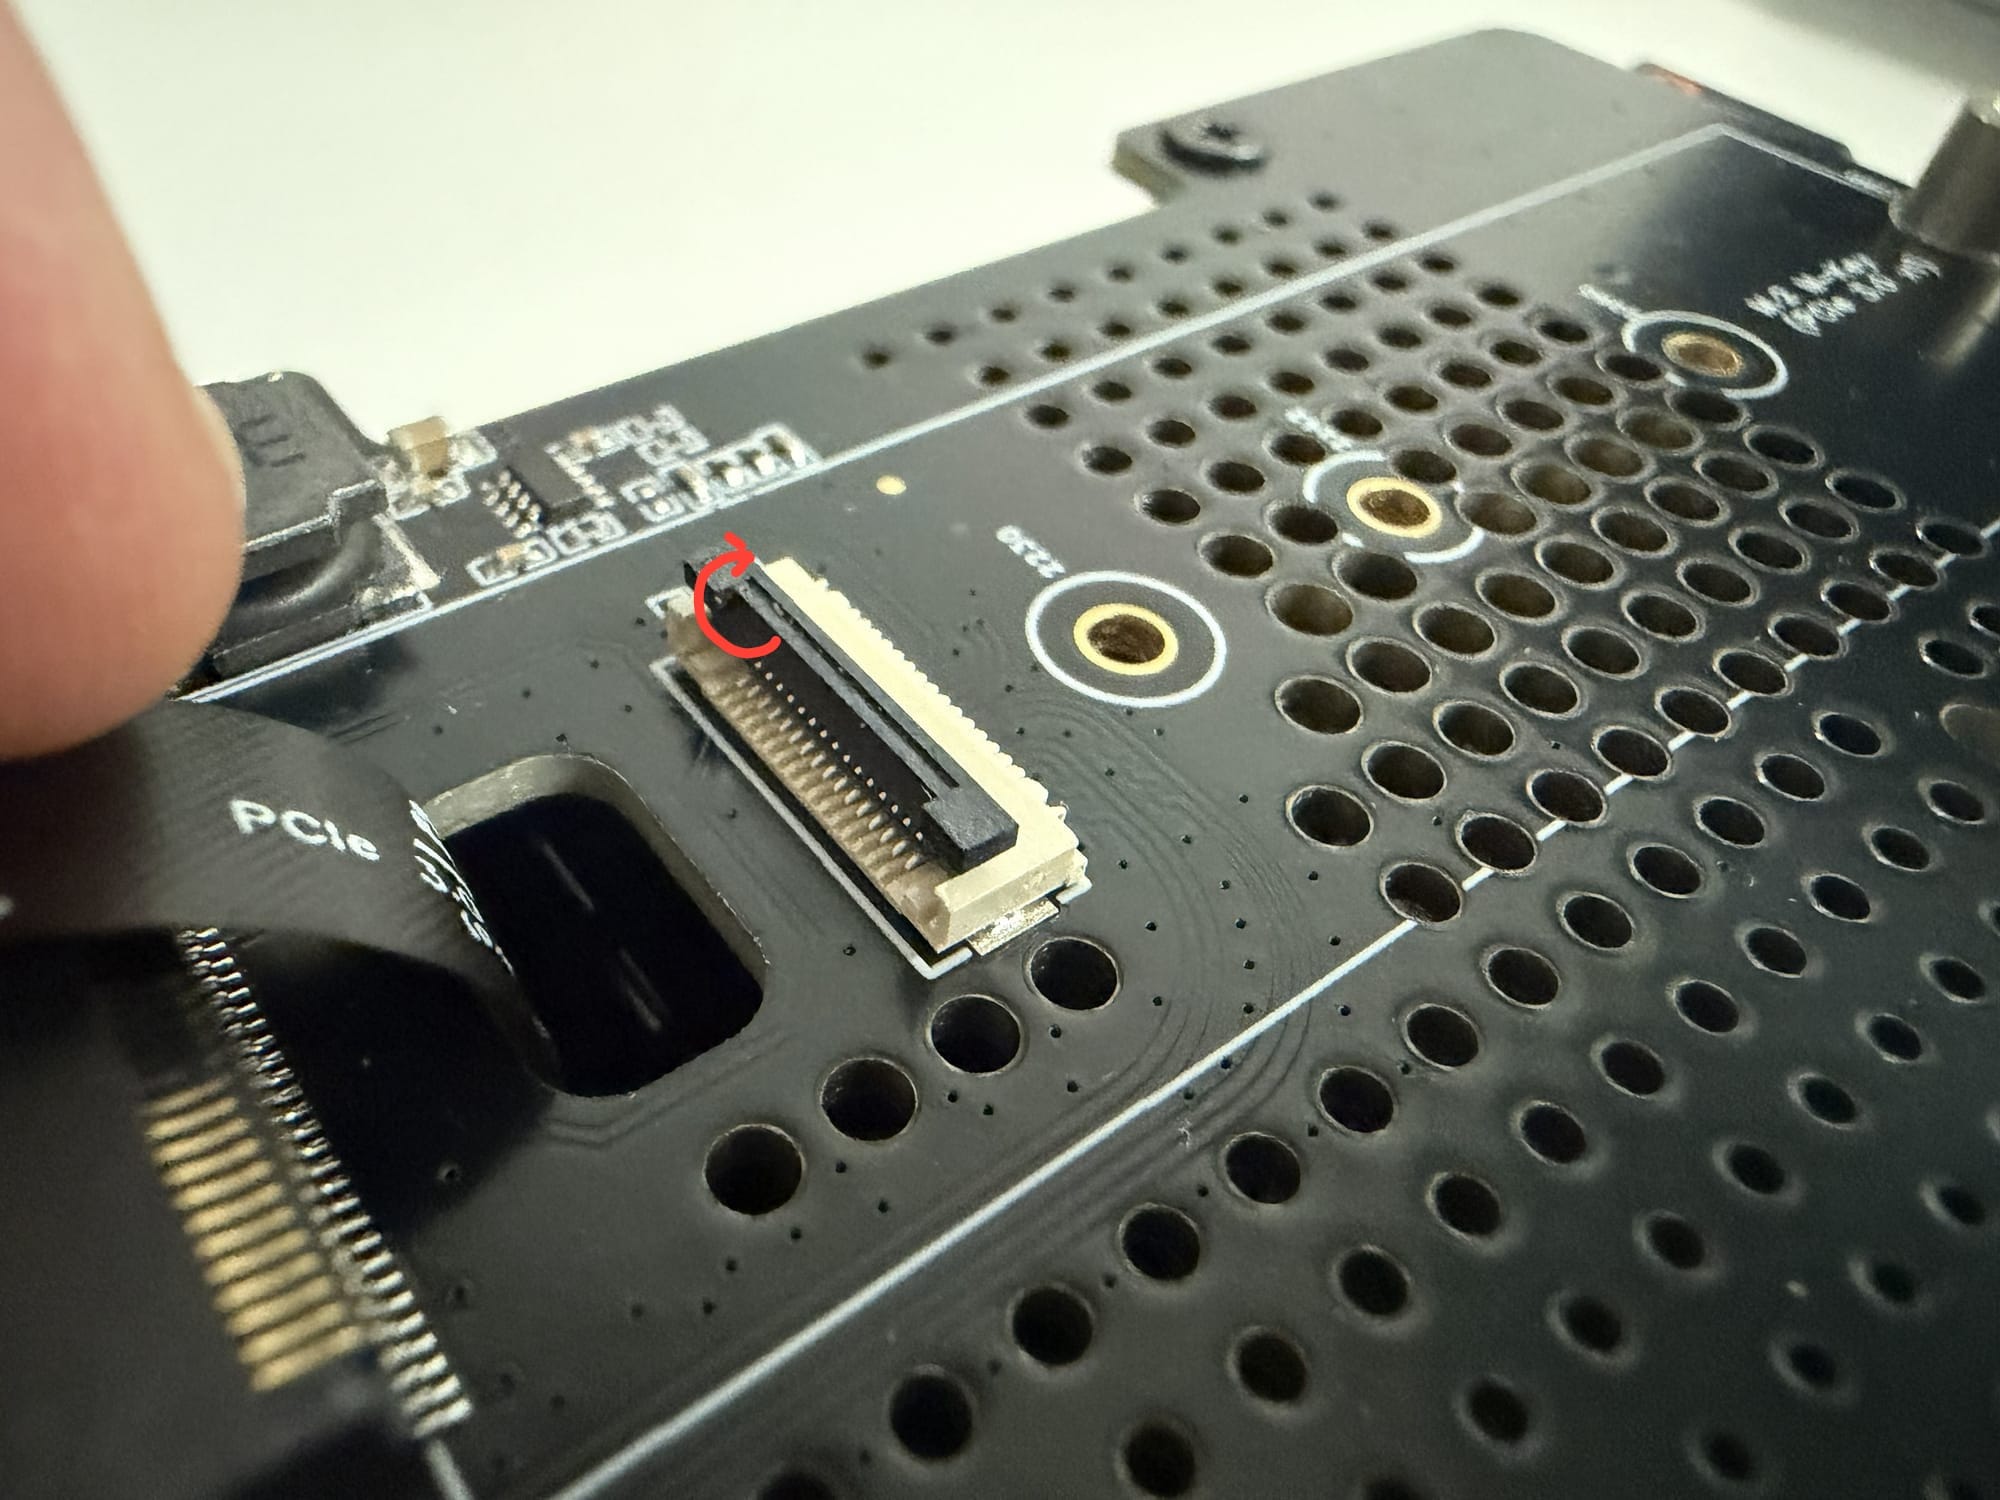
Insert the other end of the ribbon cable into the connector. Move it gently until it is fully and securely inserted.
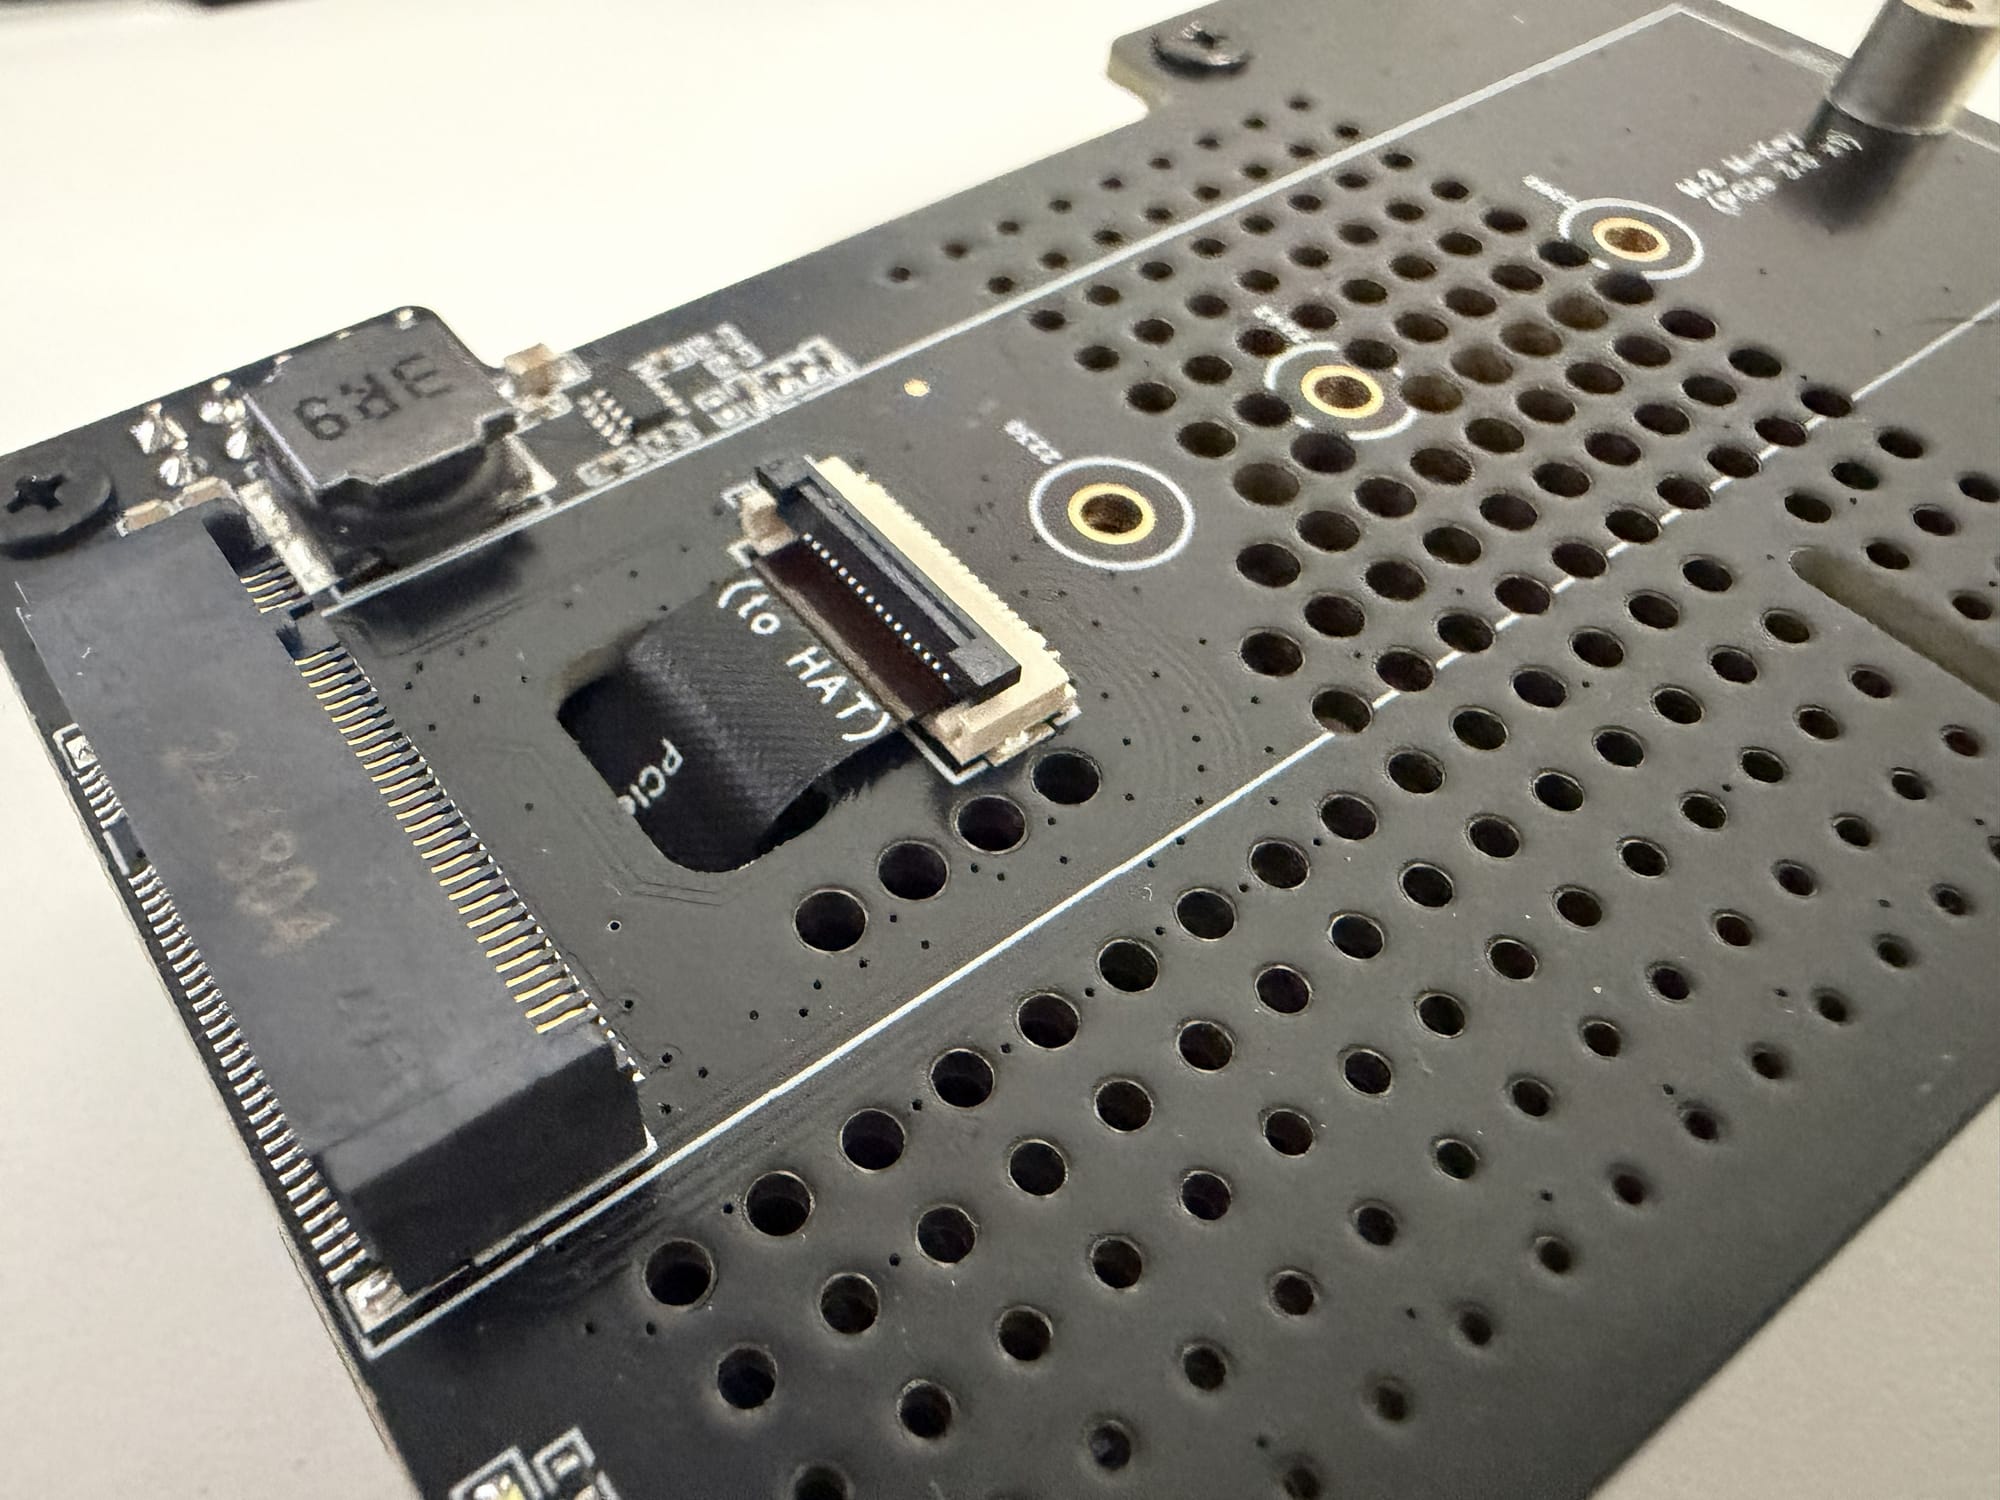
Push the gray locking tab downward to secure the ribbon cable in place.
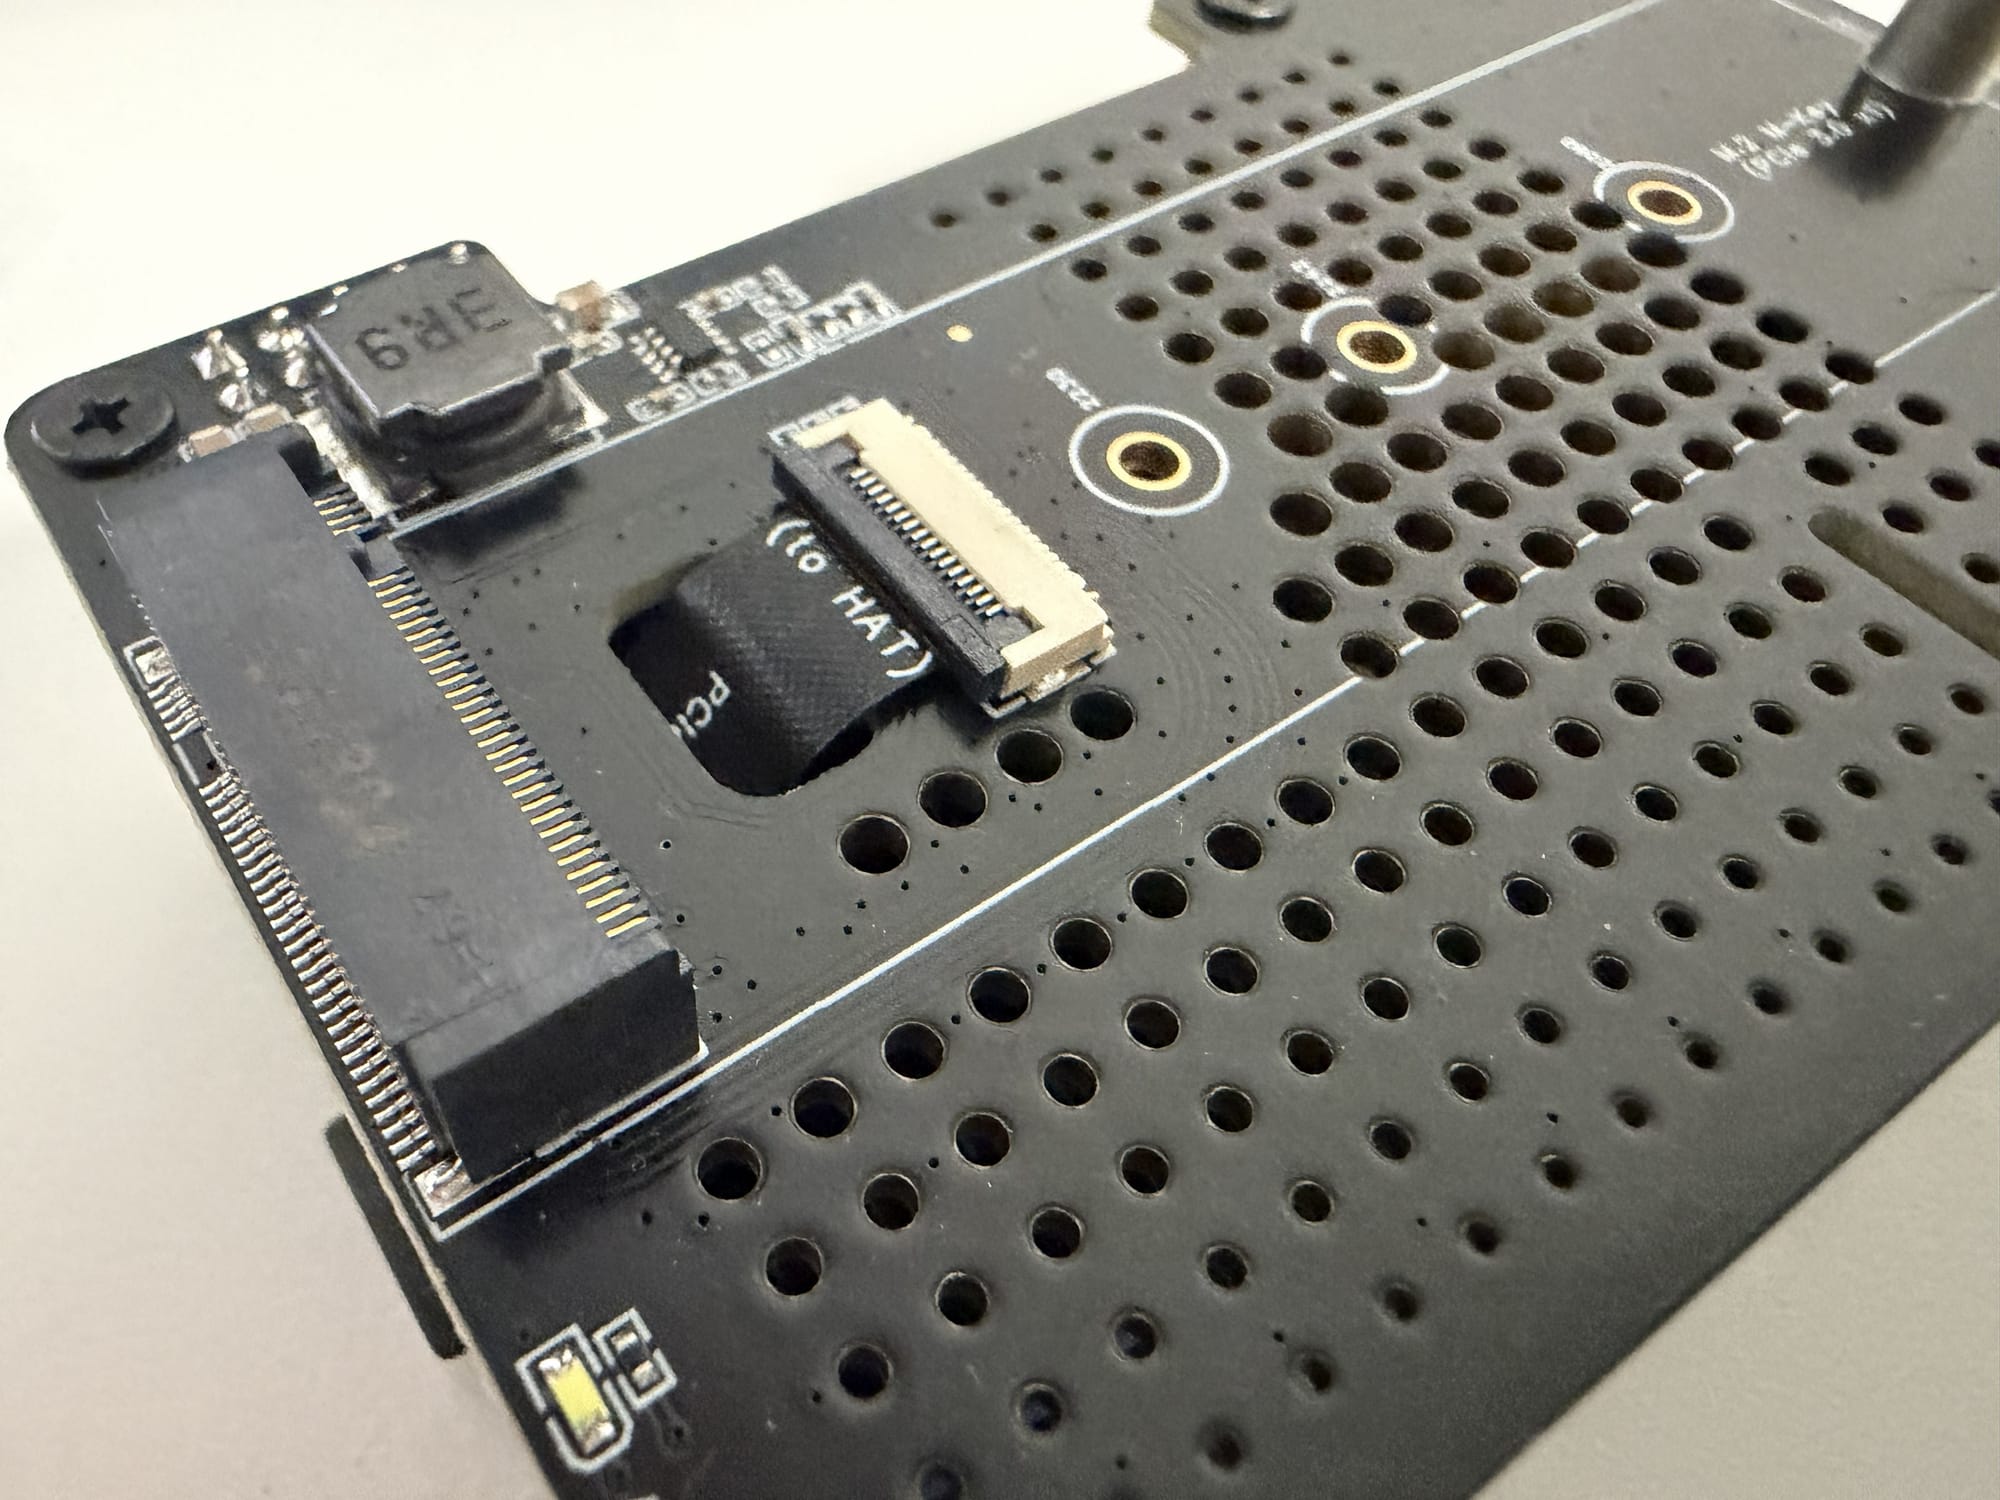
Take the MX3 module assembly and insert it into the M.2 slot.
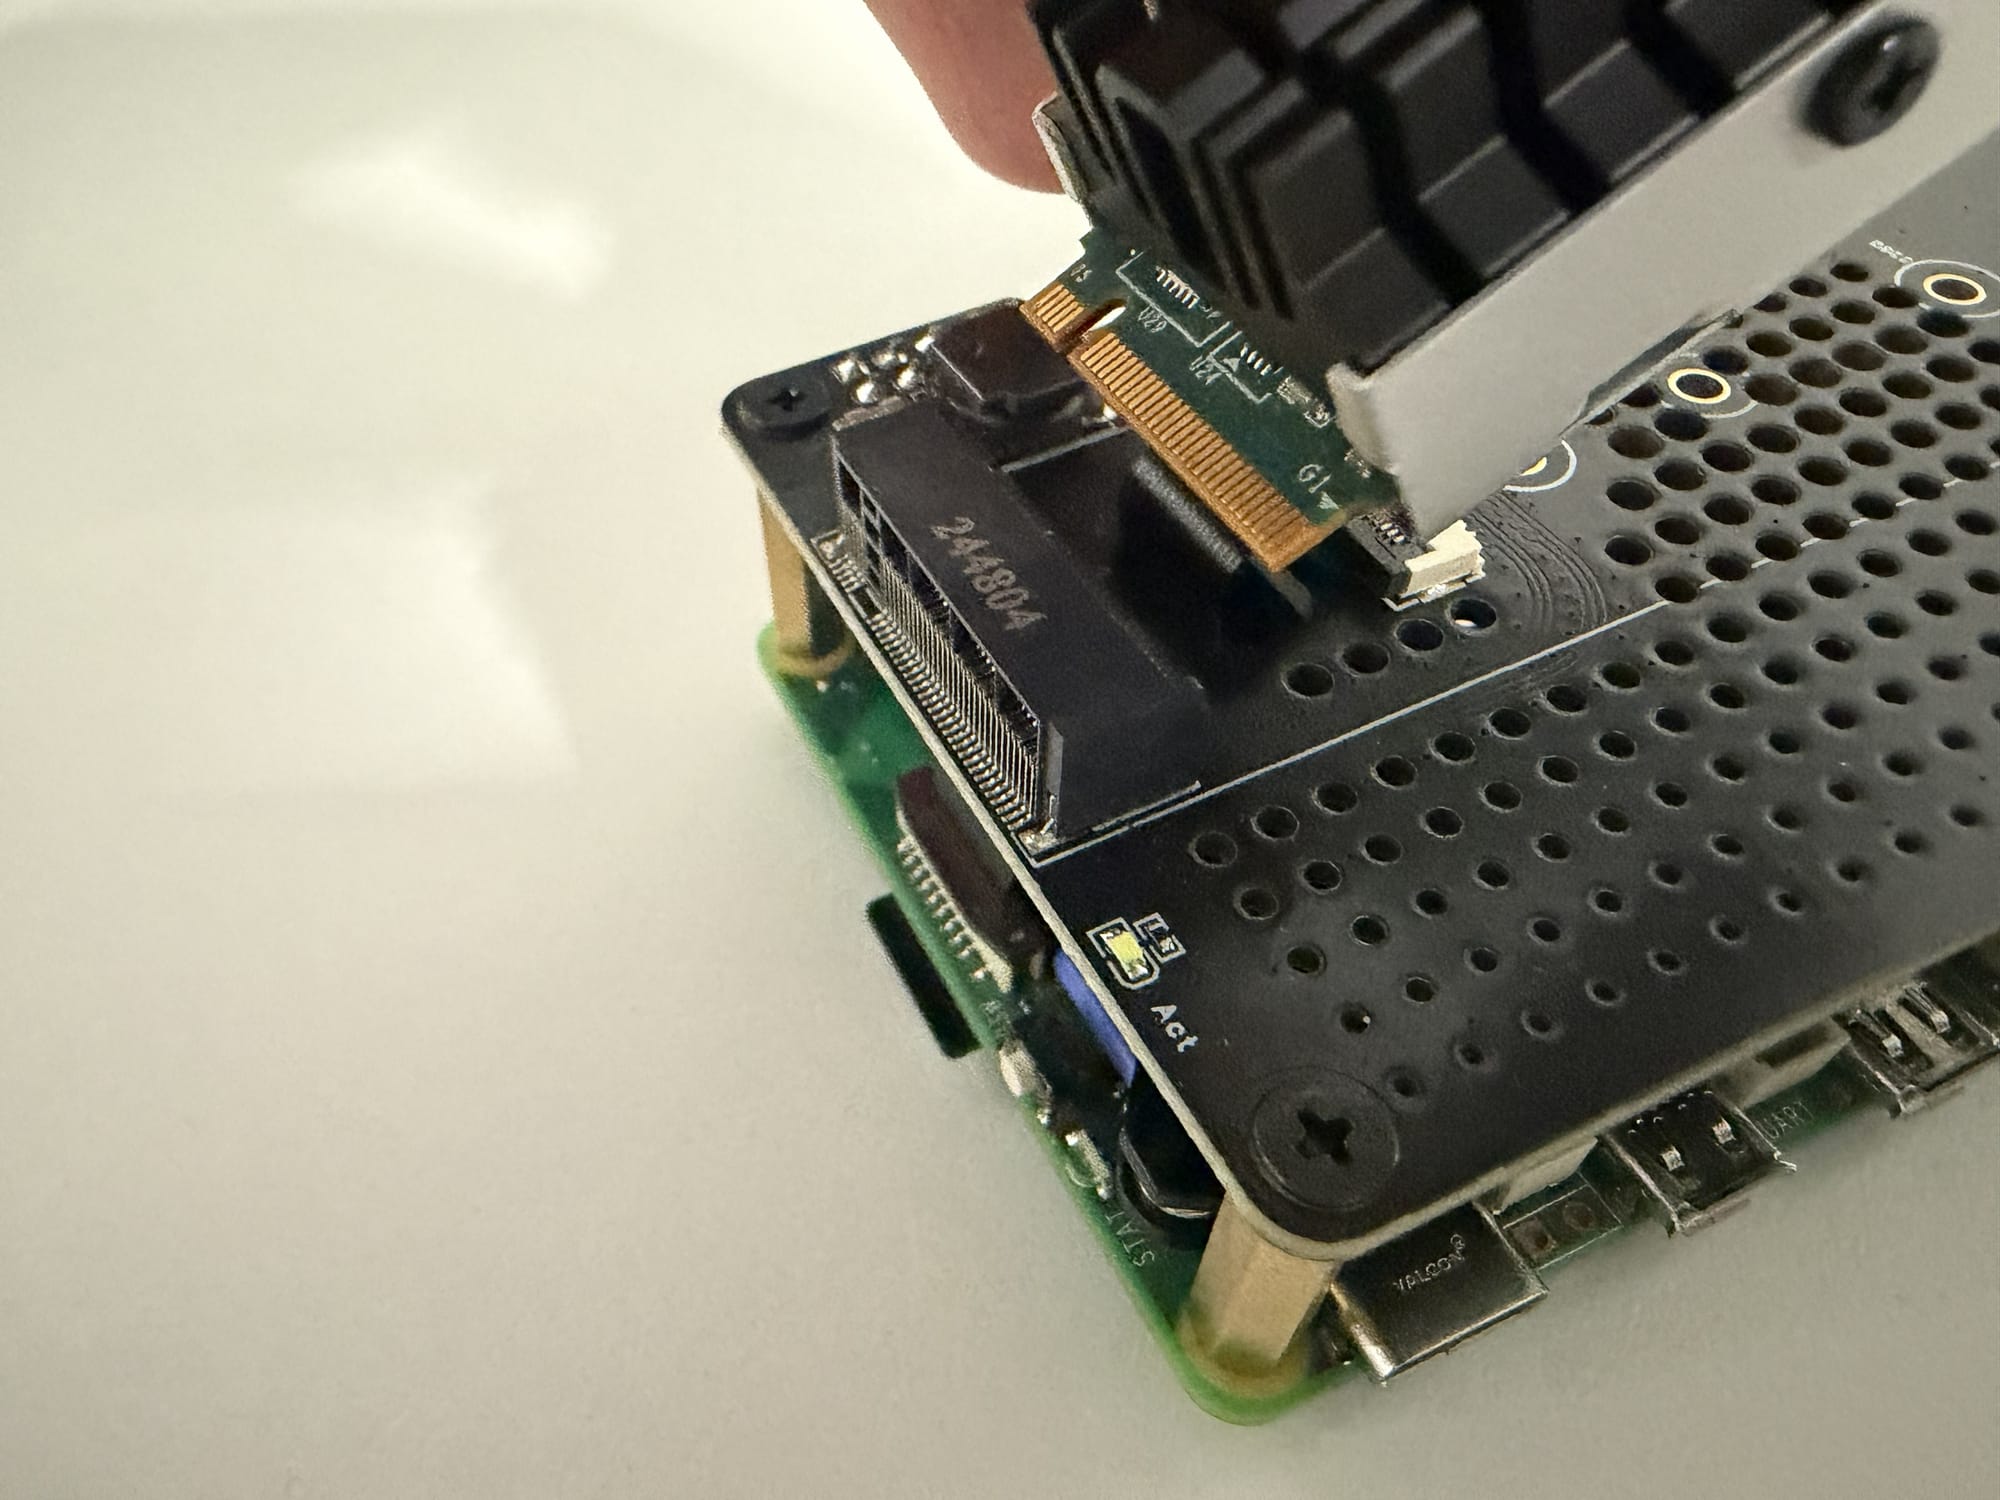
Insert the module at approximately a 35-degree angle.
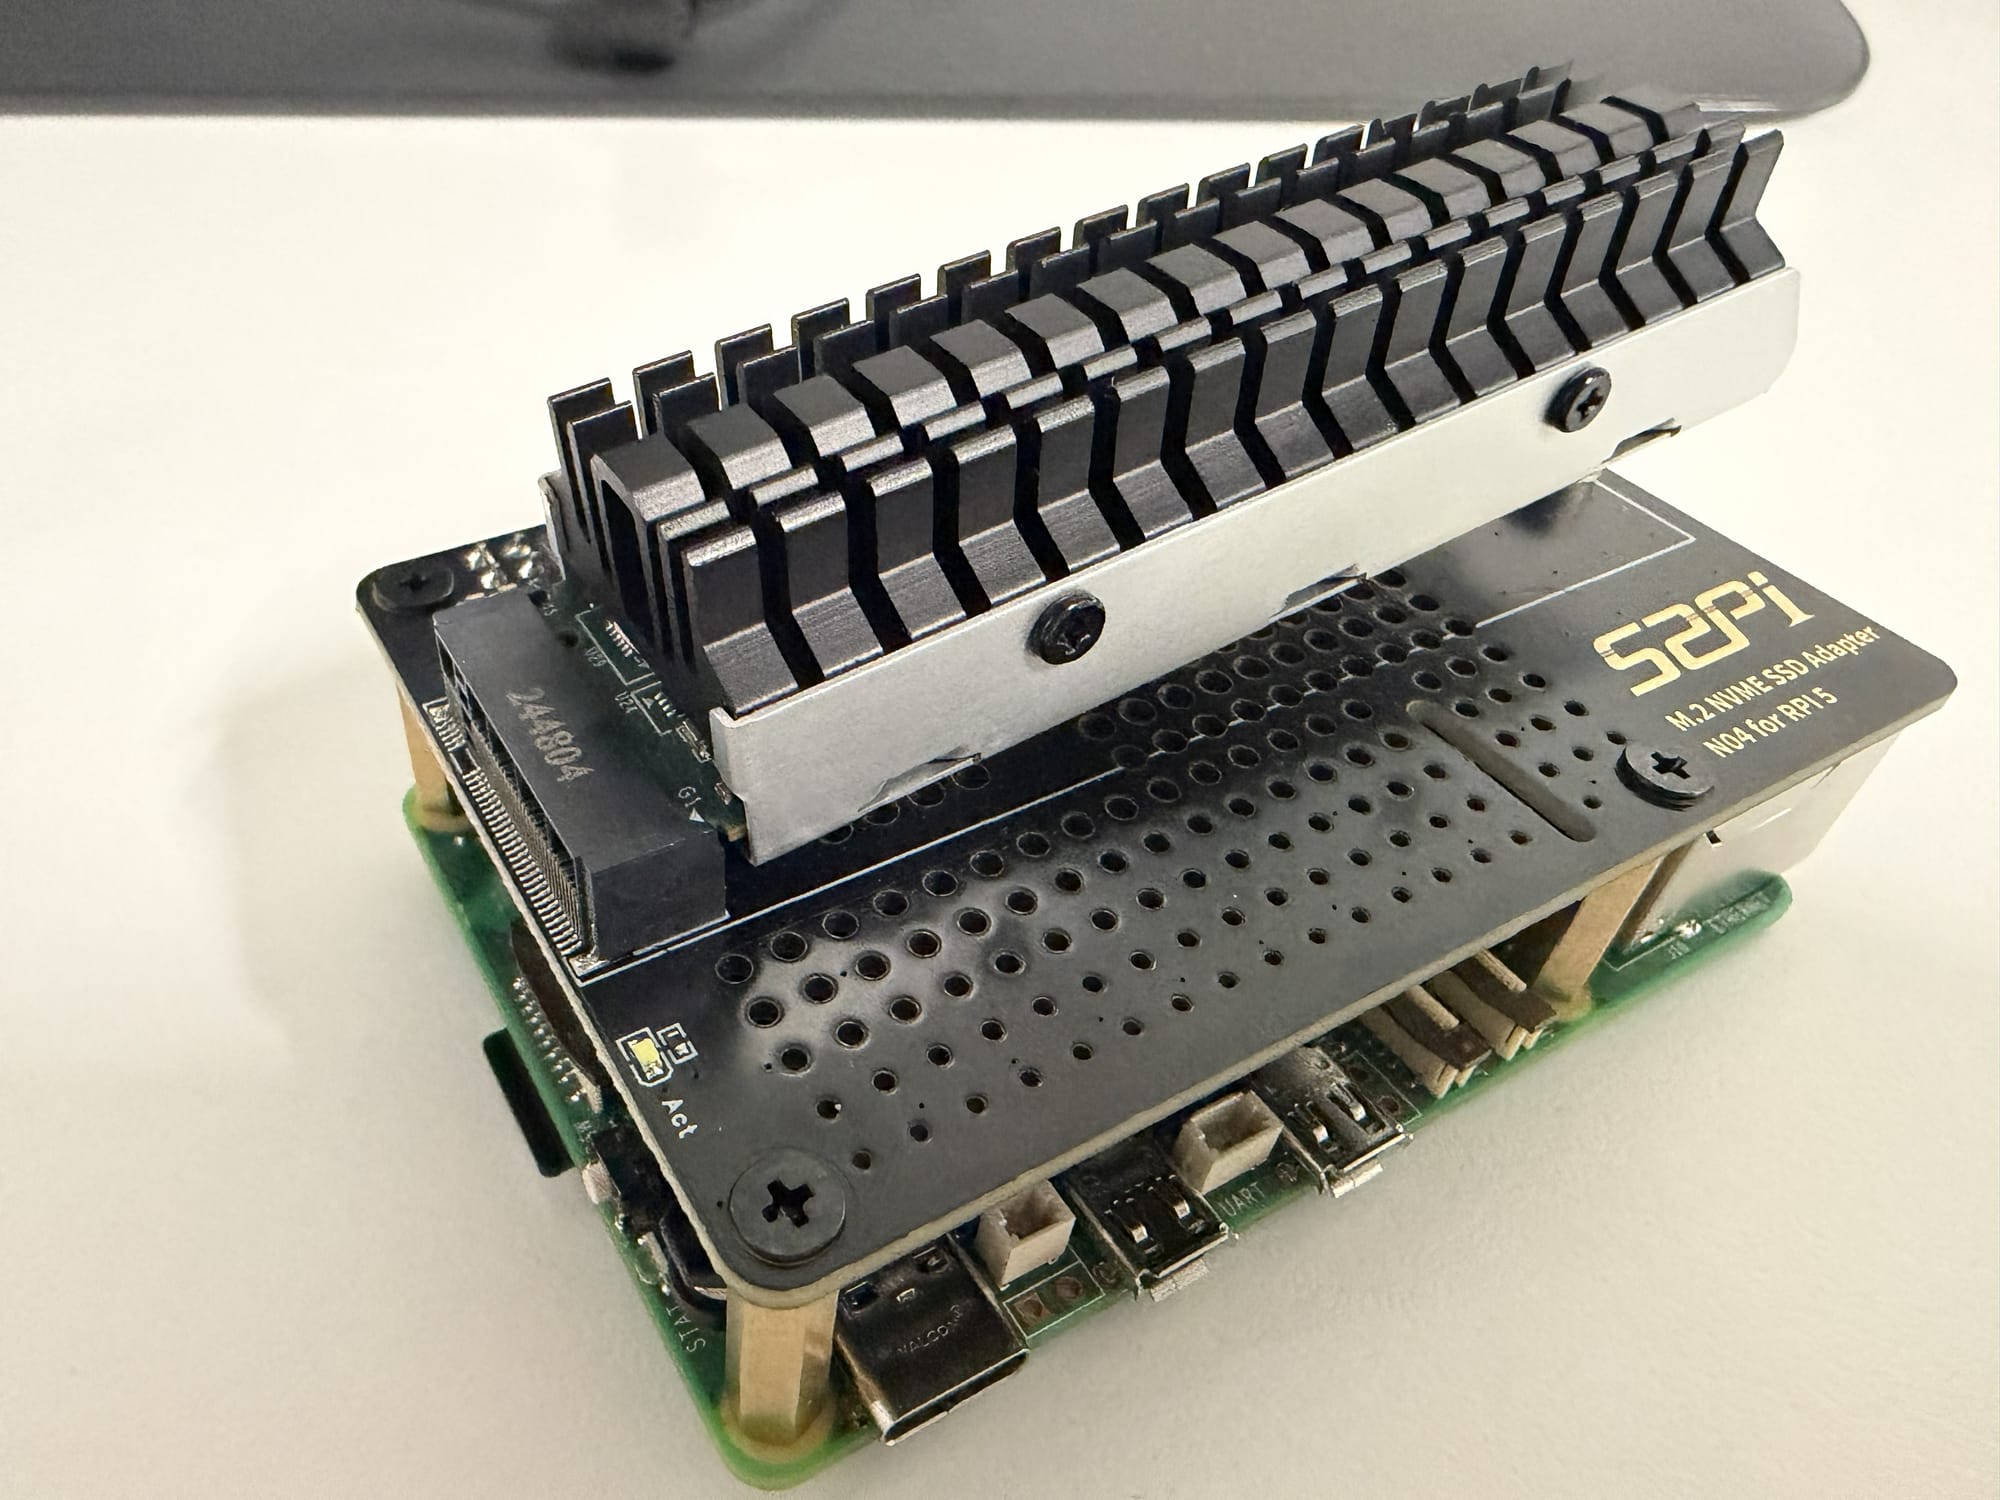
Gently lower the opposite end of the module until its mounting hole aligns with the corresponding hole on the PCB.
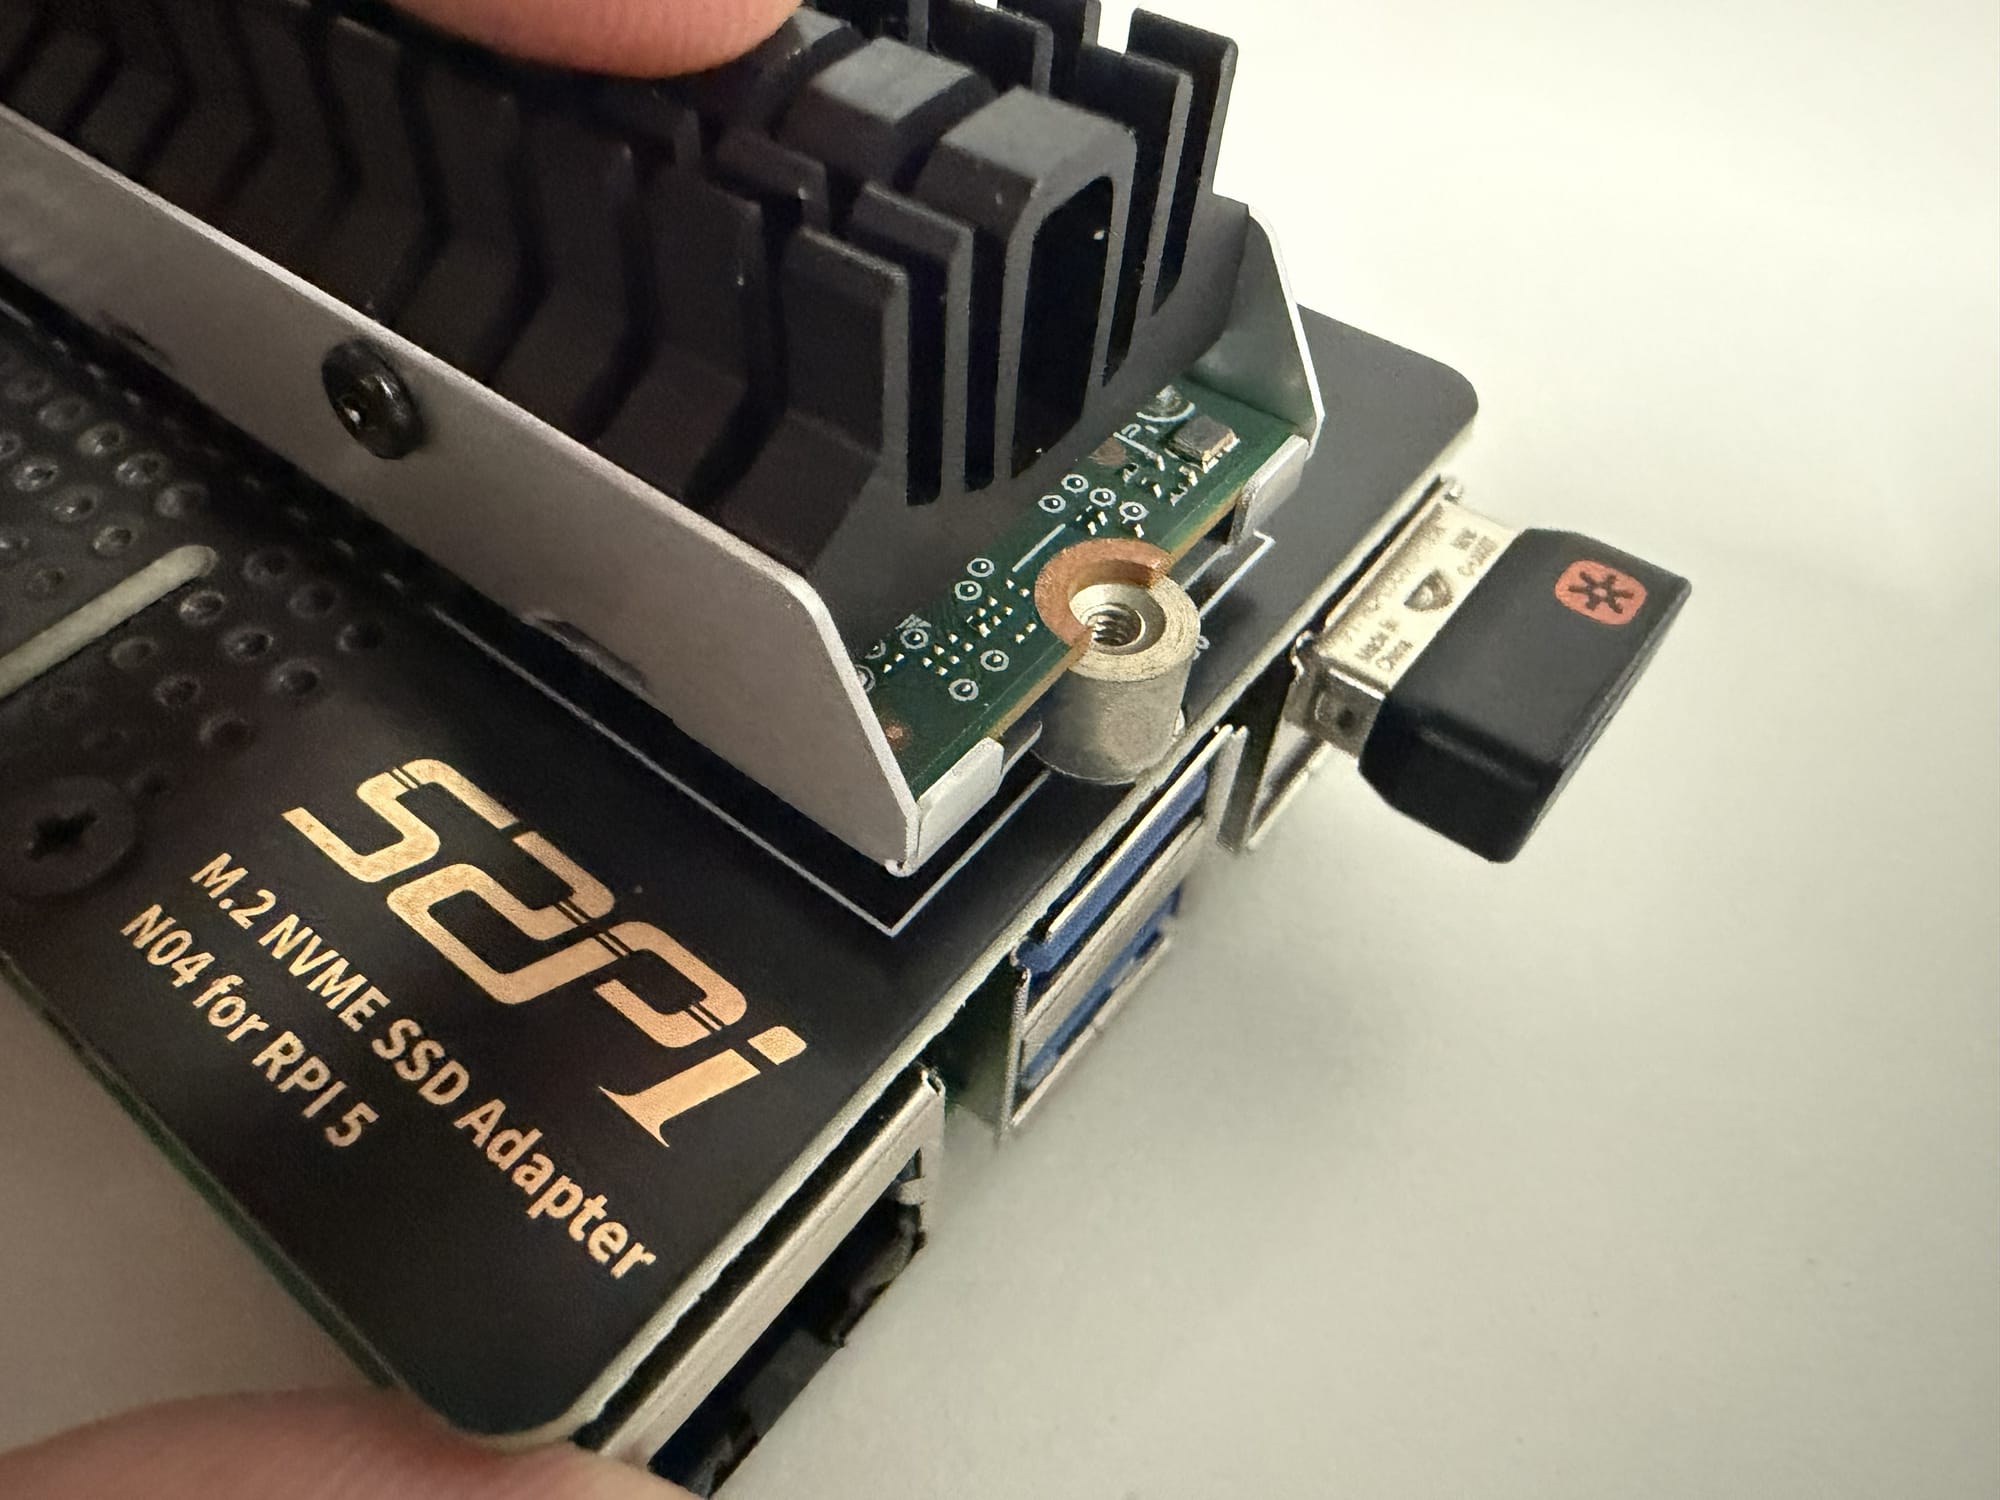
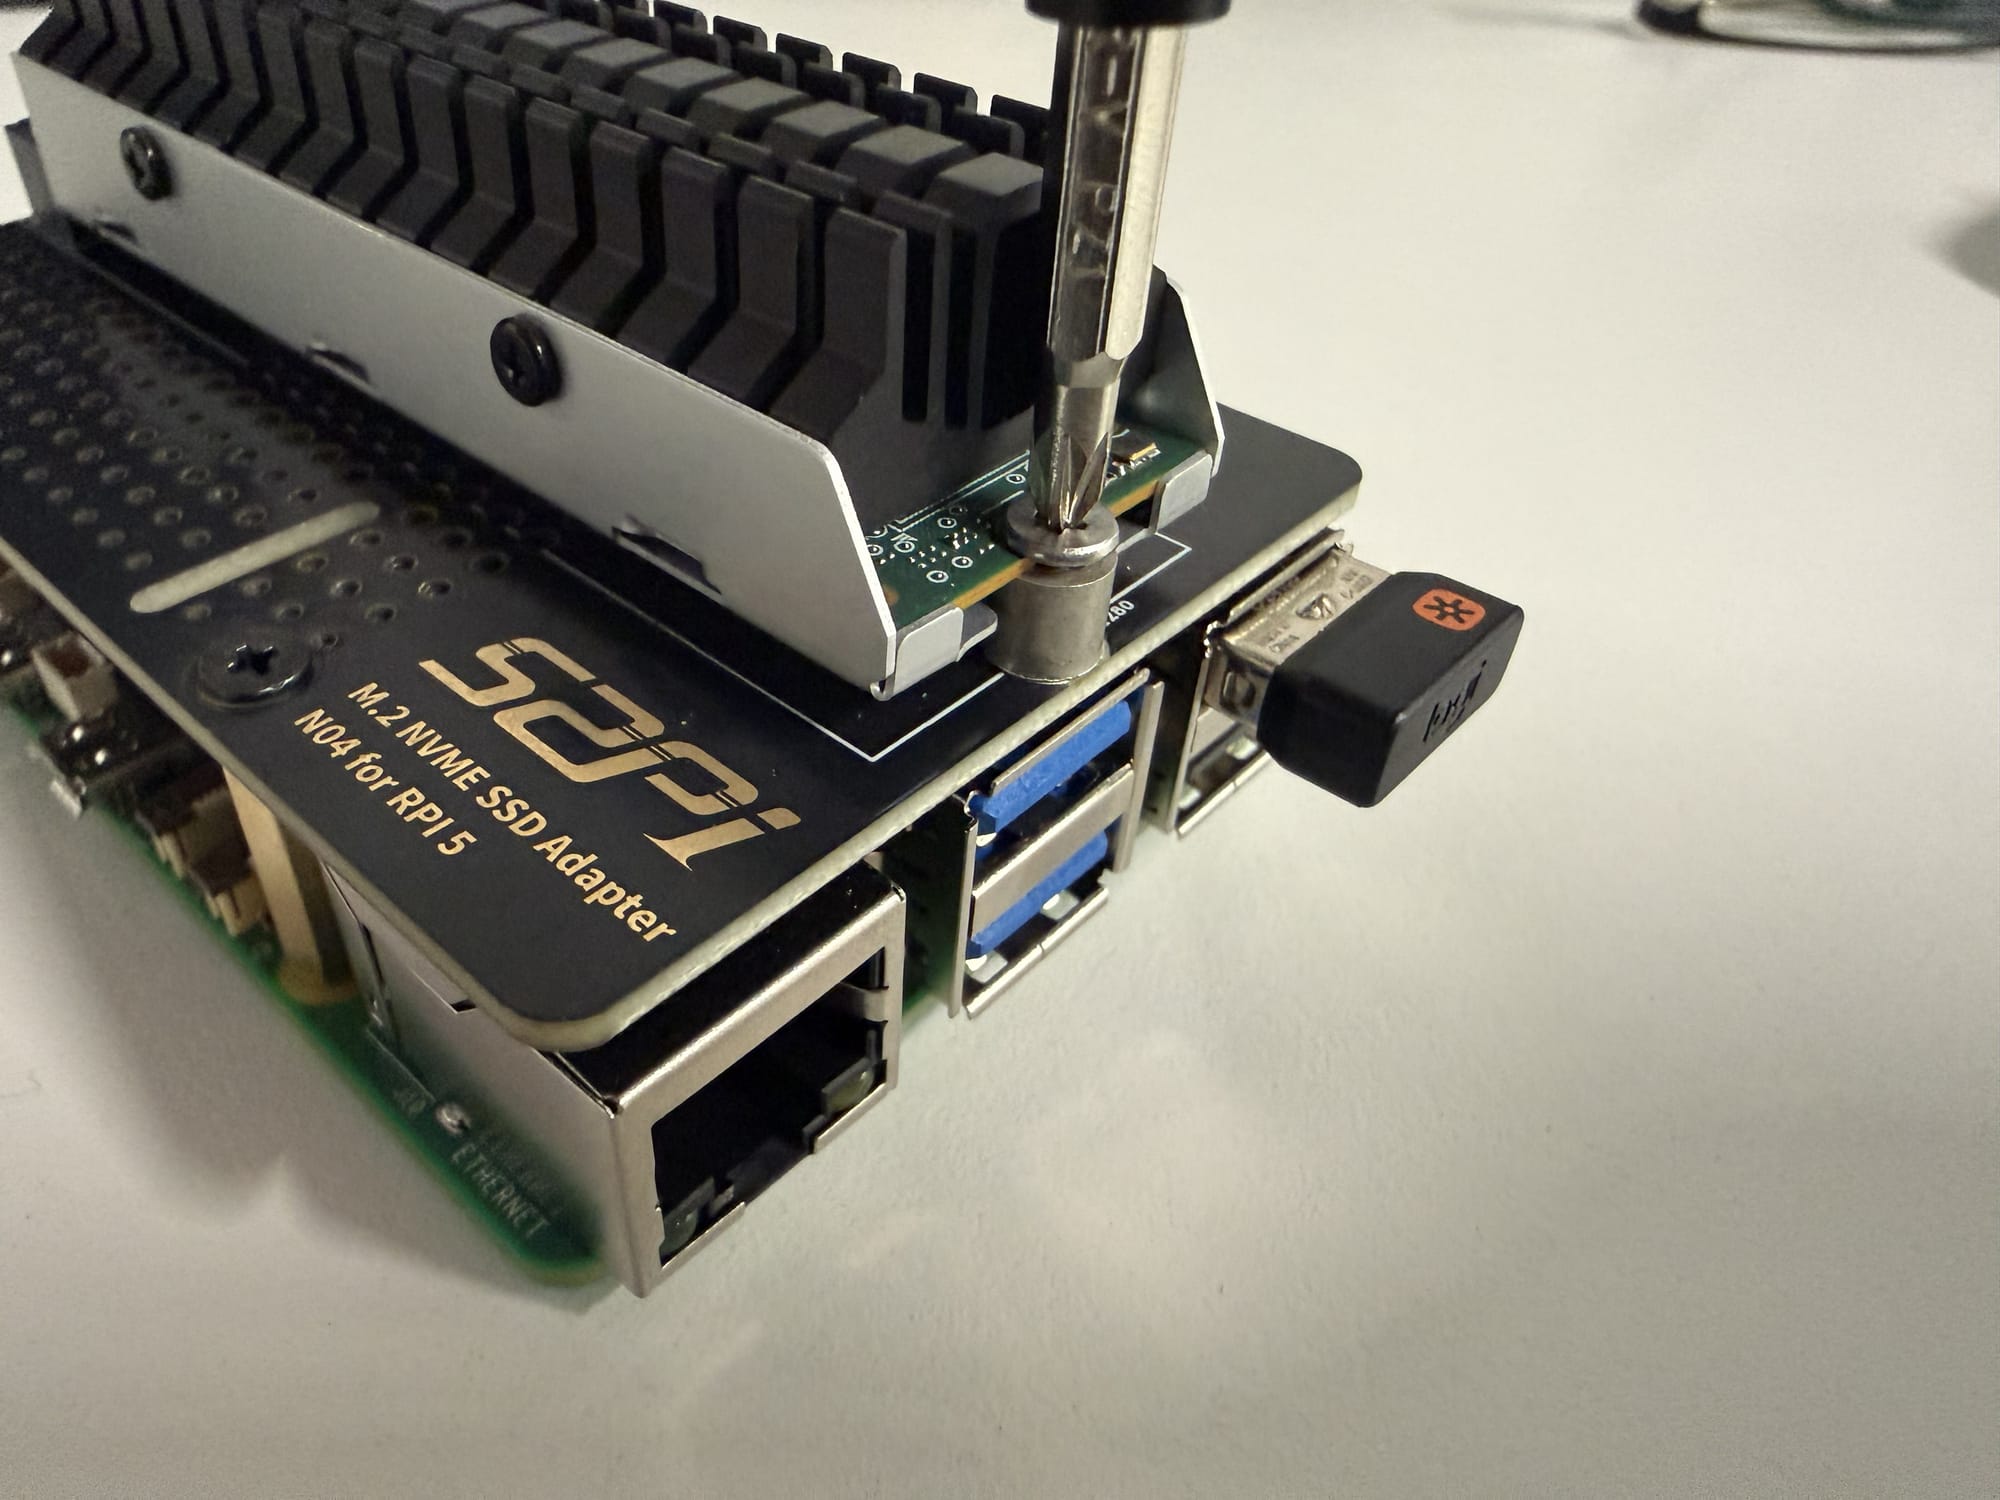
Finally, secure the module using the M.2 screw included with either the accelerator or the HAT.
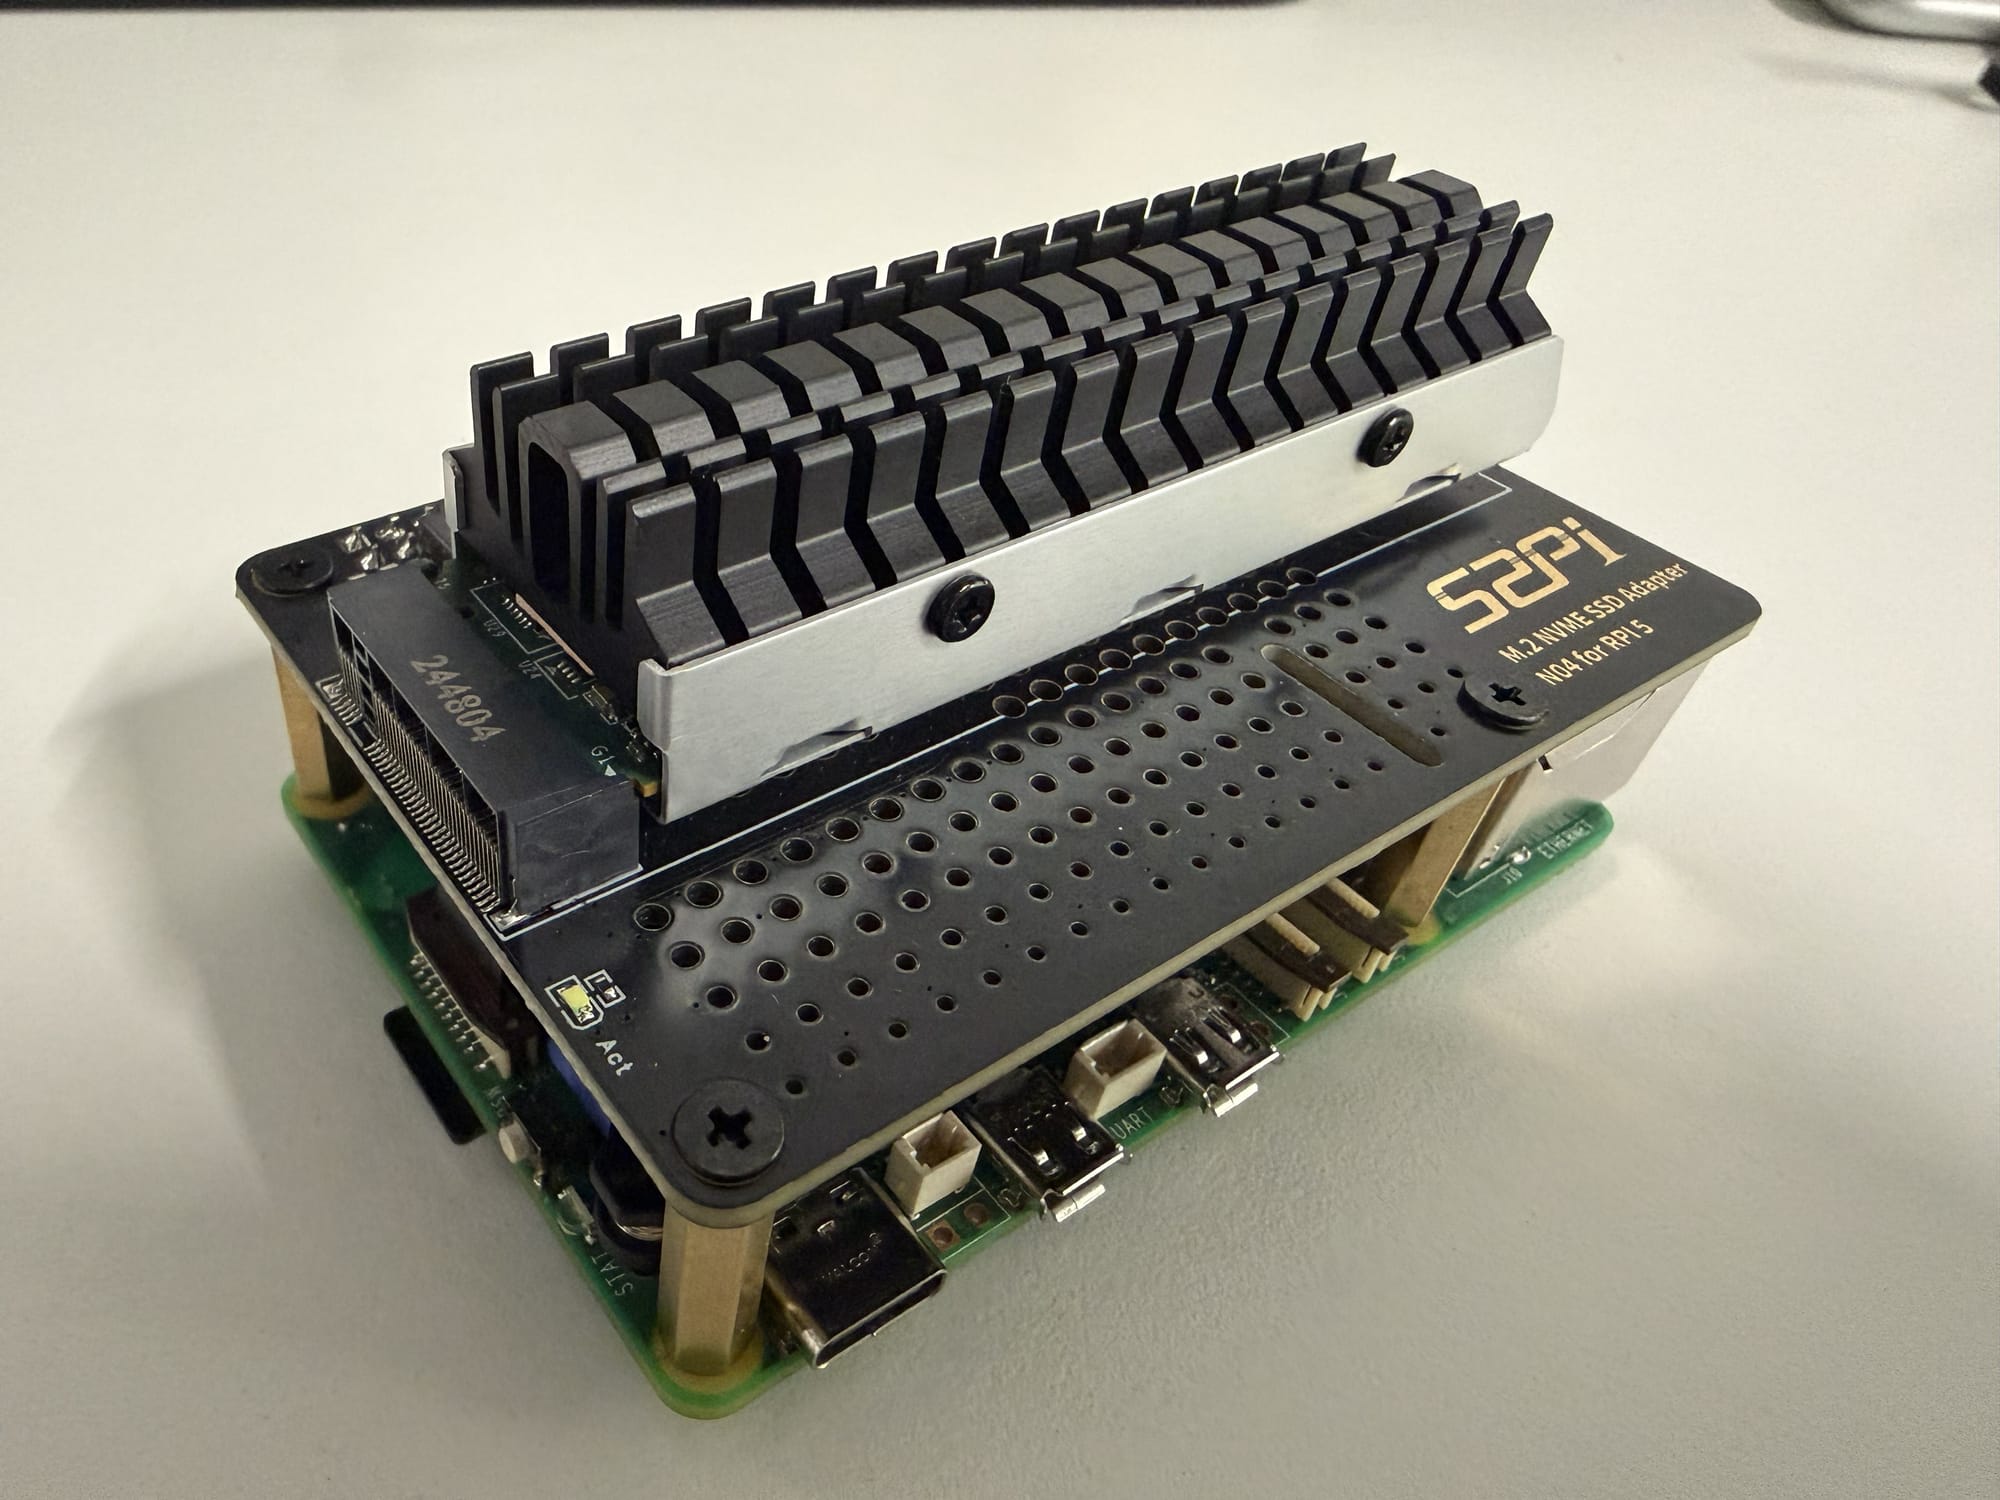
Great job! The MemryX MX3 accelerator is now successfully mounted on the Raspberry Pi.
4. Installing MemryX Software
In the previous section, we installed the MemryX MX3 accelerator on the Raspberry Pi 5 using an M.2 HAT.
Before we can begin running AI applications, we need to install the required MemryX drivers, runtime libraries, and SDK tools. In this section, we will walk through the complete software installation process.
Because Raspberry Pi OS is a Linux-based operating system, we will use the command line for the remaining steps.
1: Installing runtime (Linux)
Connect the monitor, mouse, keyboard, and power supply, and then turn on the Raspberry Pi.
Open a terminal by clicking the terminal icon in the upper-left corner of the desktop or by pressing Ctrl+Alt+T.
Begin by updating the Raspberry Pi package lists and installed software. Enter your password if prompted.
sudo apt update
sudo apt full-upgrade -y
sudo reboot
After the Raspberry Pi restarts, open a terminal again. Install the kernel headers required by the driver:
sudo apt-get install linux-headers-$(uname -r)
Add the MemryX signing key:
wget -qO- https://developer.memryx.com/deb/memryx.asc | sudo tee /etc/apt/trusted.gpg.d/memryx.asc >/dev/null
Add the MemryX software repository:
echo 'deb https://developer.memryx.com/deb stable main' | sudo tee /etc/apt/sources.list.d/memryx.list >/dev/null
Update the package list and install the MemryX drivers and runtime libraries. If prompted, enter y to confirm the installation.
sudo apt-get update && sudo apt-get install memx-drivers memx-accl
After the installation is complete, run the following command to configure the board-specific settings:
sudo mx_arm_setup
When prompted, select Raspberry Pi 5 and press Enter.
Reboot the system so that the changes can take effect:
sudo reboot
cat /sys/memx0/temperature
The accelerator may begin thermal throttling at 100°C. Make sure the system has adequate cooling, particularly when operating in a hot environment, such as a server room.
After the Raspberry Pi restarts, verify that the MemryX driver is installed by checking its version:
apt policy memx-drivers
You should see output similar to the following: Installed: 2.2.1-3
MemryX also provides plugins and utility libraries that simplify application development. Many tutorials and sample applications rely on these additional components.
The download is approximately 1.4 GB and may take some time to complete.
sudo apt-get install memx-accl-plugins memx-utils-gui
The runtime installation is now complete. Next, we will install the MemryX SDK tools.
2: Installing MemryX tools
uv to install Python 3.12 and create a compatible virtual environment.Begin by installing uv:
curl -LsSf https://astral.sh/uv/install.sh | sh
Load uv into the current terminal session:
source $HOME/.local/bin/env
Install Python 3.12 and create a virtual environment:
# install 3.12
uv python install 3.12

# Create the environment and include pip
uv venv --seed --python 3.12 ~/mx

# activate the venv
source ~/mx/bin/activate

# Upgrade the packaging tools
python -m pip install --upgrade pip wheel

# clear shell's command lookup cache
hash -r
Next, install the system dependencies required by the MemryX SDK tools. The download is approximately 111 MB.
sudo apt-get update && sudo apt-get install libhdf5-dev python3-dev cmake python3-venv build-essential
After the dependencies have been installed, install the MemryX Python package. The download is approximately 2.2 GB.
uv pip install --index-url https://developer.memryx.com/pip --extra-index-url https://pypi.org/simple memryx
The software installation is now complete. Verify the installation by checking the MemryX Neural Compiler version:
mx_nc --version
The command should display the installed SDK version, such as: 2.2.1
5. Running a simple Computer Vision example
Now that the hardware and software are installed on the Raspberry Pi, we can begin using the MemryX MX3 accelerator.
In this section, we will run two computer vision applications to demonstrate how the accelerator works and confirm that the installation was successful.
-Raspberry Pi 5 with the accelerator and software installed using the previous steps, connected and running on screen
-Webcam
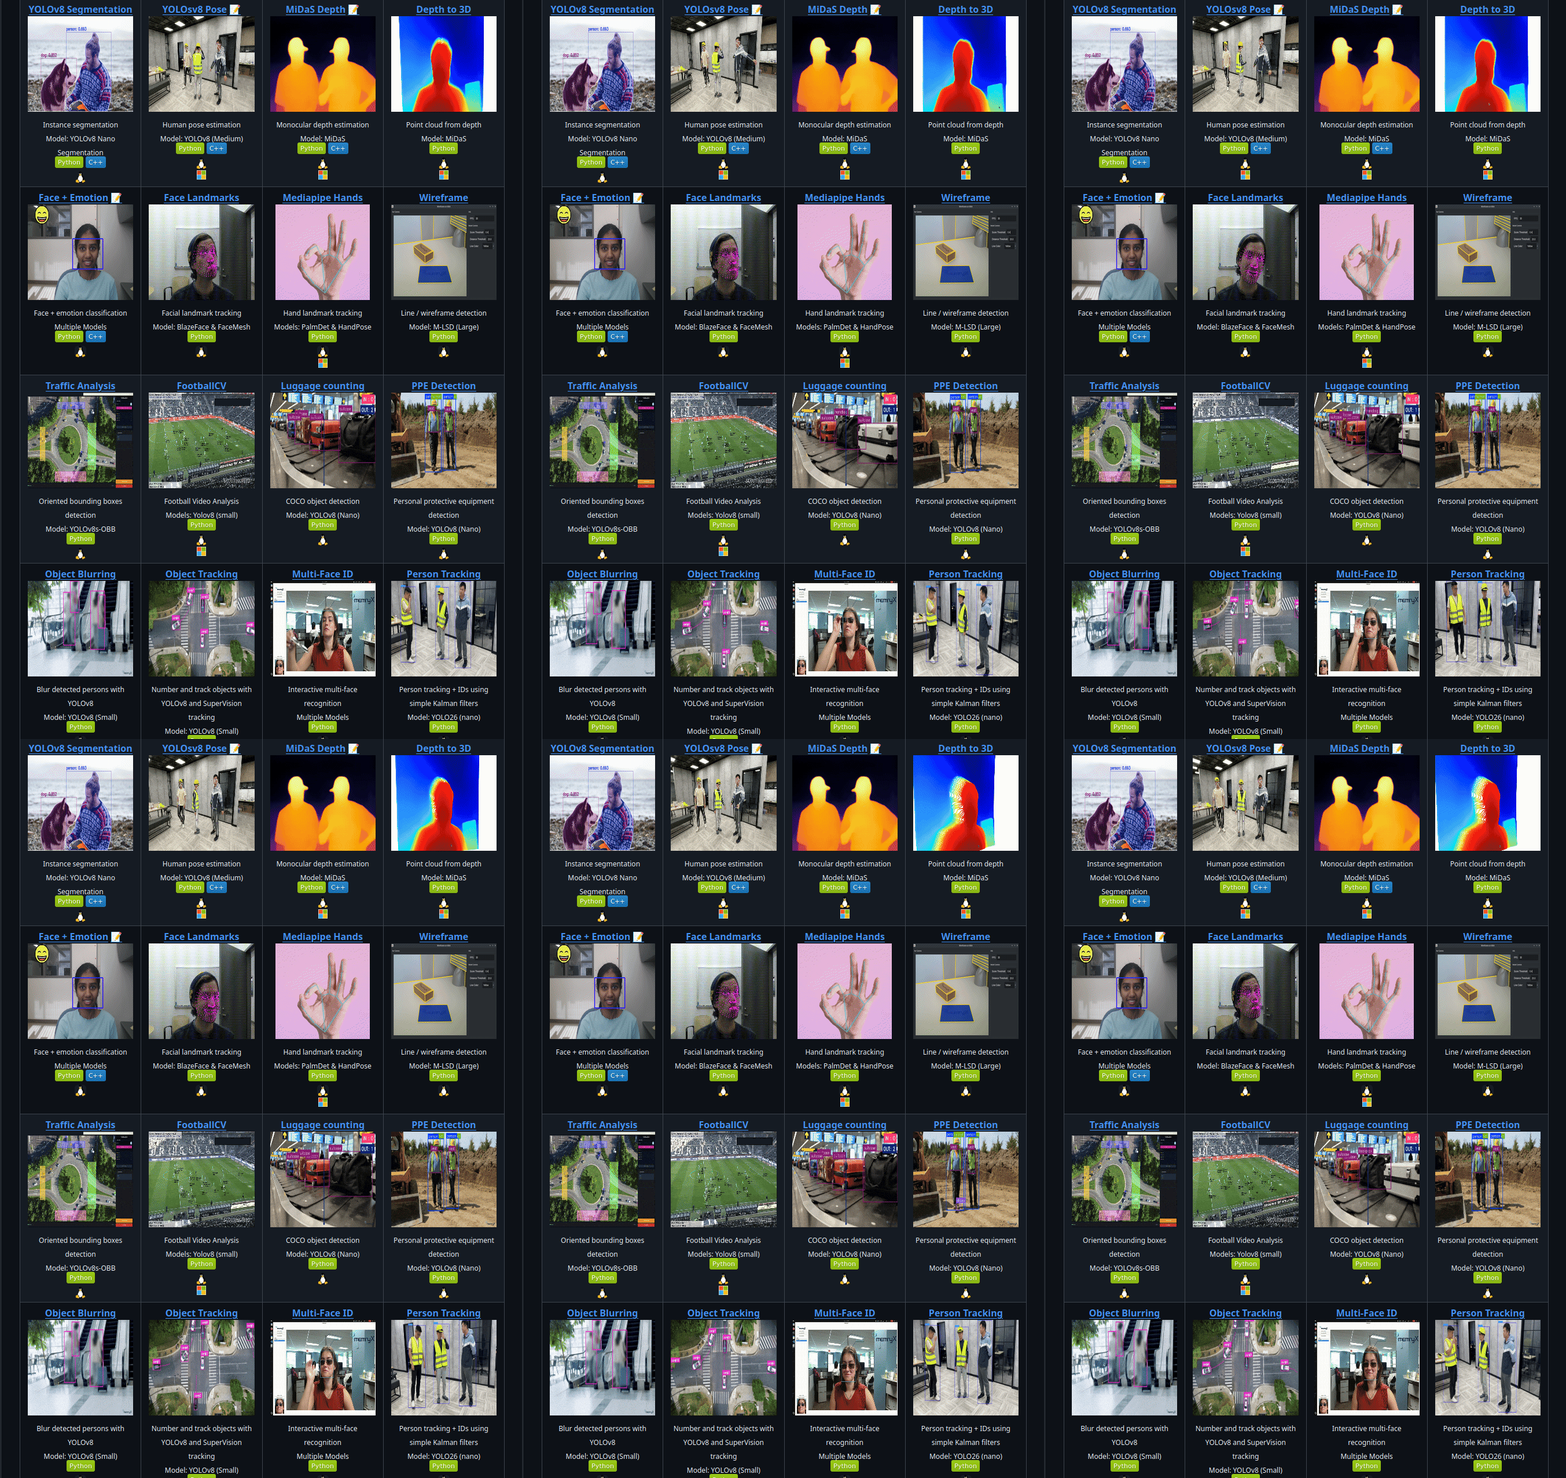
In addition to the accelerator hardware and software, MemryX provides many free, open-source examples. These examples are available in the MemryX Examples github page. Each example includes detailed instructions explaining how to download the required models, install dependencies, and launch the application.
For this guide, we will use the Mediapipe Hand Landmarks Tracking and Open-Vocab Segmentation YOLOE examples.
Before we begin, open a terminal on the Raspberry Pi and clone the complete MemryX Examples repository:
git clone --recursive https://github.com/memryx/memryx_examples.git
The complete set of examples is now available in the memryx_examples directory.
source ~/mx/bin/activate
1: Mediapipe Hand Landmarks Tracking
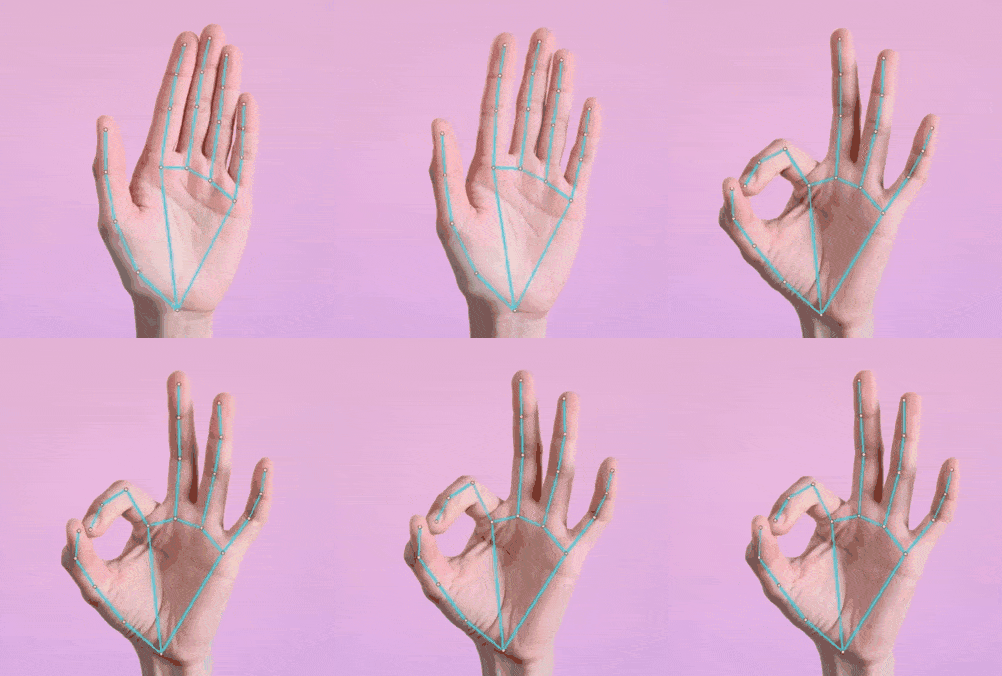
This example captures a live video stream, sends the frames to the MemryX accelerator, detects hands, highlights their landmarks, and displays the annotated video on the screen.
The example is simple to run and demonstrates many possibilities for gesture-controlled applications.
Begin by navigating to the example directory:
cd
cd memryx_examples/video_inference/mediapipe_hands/
Install OpenCV:
uv pip install opencv-python==4.11.0.86
Make a new folder, download the pre-trained models and extract it in that folder
mkdir models
wget https://developer.memryx.com/example_files/2p2/mediapipe_hands.zip
unzip mediapipe_hands.zip -d models
Just make sure to name it models.dfp and put it in the models folder
Navigate to the Python source directory:
cd src/python
Finally, connect your webcam and run the application:
python3 run.py
Once the application starts, the webcam will activate and a window will display the live video feed.
When a hand is detected, the application will highlight its landmarks. The model can also distinguish between the left and right hands.
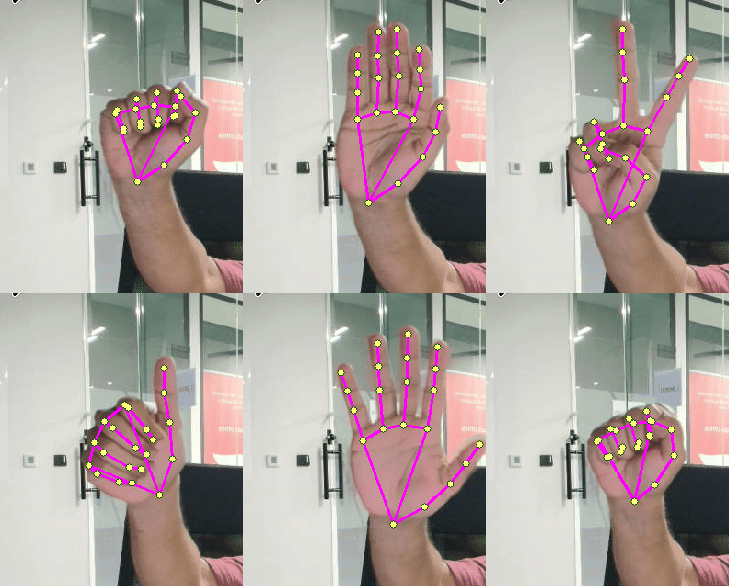
You can now open the source code, understand how the application works, and extend it with your own functionality. Later in this series, we will use this example to control a seven-segment display using hand gestures.
2: YOLOE Open-Vocabulary Segmentation
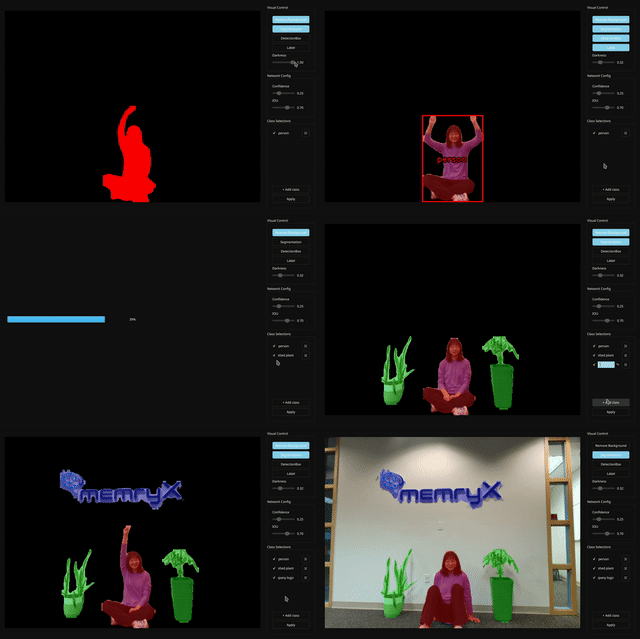
In this example, we will use YOLOE, a state-of-the-art open-vocabulary model.
The application allows you to enter the name of an object category you want to detect. It can then detect and segment matching objects in the live video stream.
This is an engaging example to experiment with, and it runs smoothly on the Raspberry Pi with the MemryX accelerator.
Navigate to the YOLOE example directory:
cd
cd memryx_examples/open_vocabulary/yoloe
Install the required dependencies:
uv pip install -r requirements.txt
Download and extract the precompiled model:
wget https://developer.memryx.com/example_files/2p2/YoloE-v8s-seg_640_640_3_onnx.zip
mkdir -p models
unzip YoloE-v8s-seg_640_640_3_onnx.zip -d models
Just make sure to name it models.dfp and put it in the models folder
Navigate to the Python source directory and launch the application:
cd src/python
python3 demo.py  # default video path /dev/video0
When the application starts, enter the name of an object class you want to detect and click “Apply.” The application will update the selected classes and briefly reconfigure the pipeline before inference resumes.
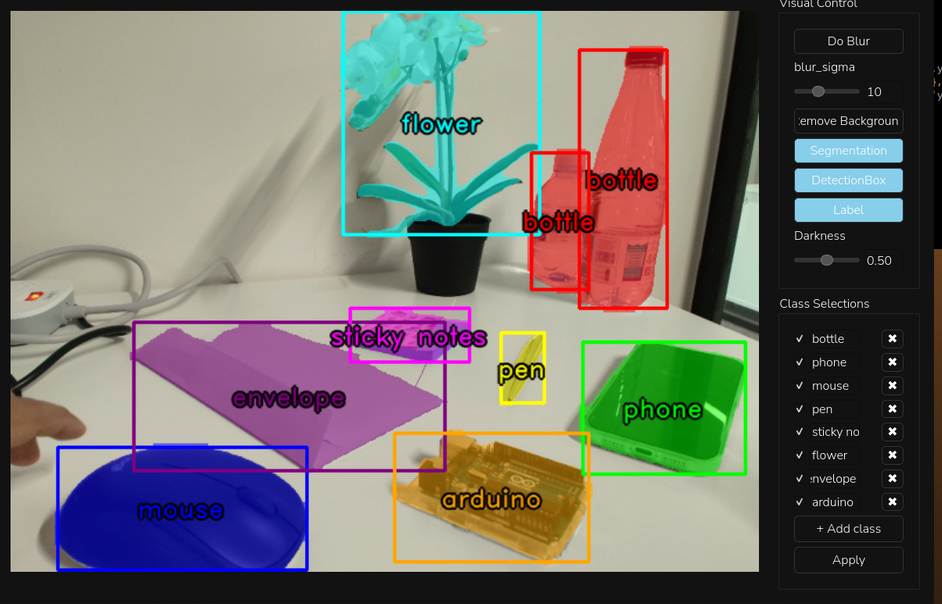
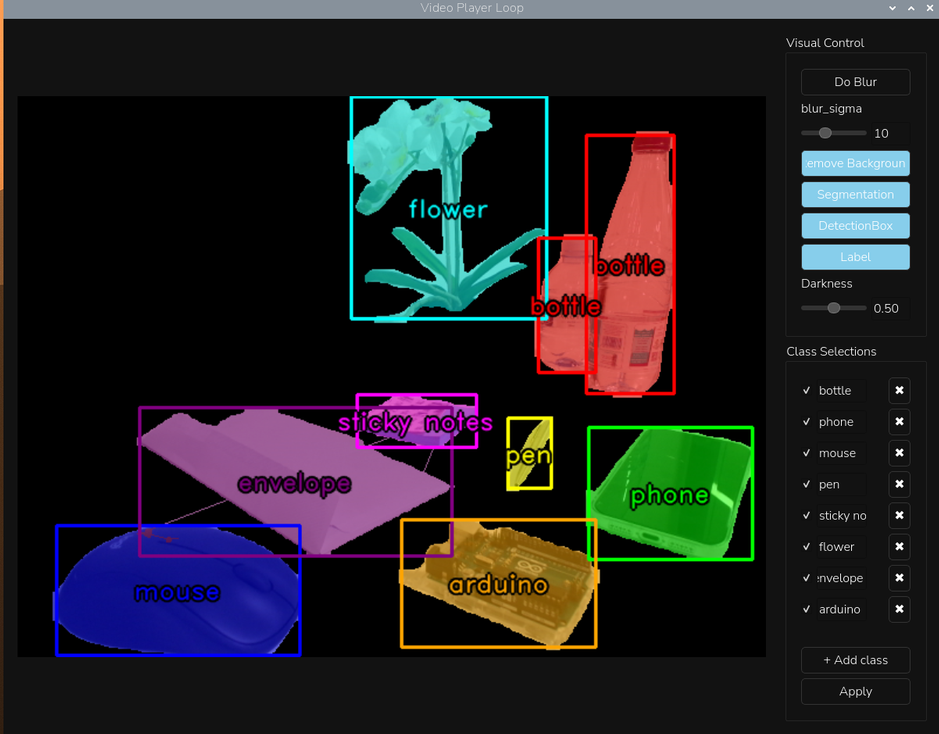
The application also provides several options, including enabling or disabling segmentation and removing the background so that only the detected objects are displayed.
6. Control an LED light using webcam
In the previous sections, we set up Raspberry Pi OS, installed the MemryX hardware and software, and ran several computer vision examples.
Now, we will use what we have learned to accomplish the main goal of this series: integrating computer vision into physical electronics projects.
As mentioned in the Introduction to this series, one of the best ways to begin working with electronic circuits is by turning an LED on and off. We will first build the circuit and test it using the Raspberry Pi’s GPIO pins. We will then add computer vision so that we can control the LED using hand gestures.
1: Blinking an LED
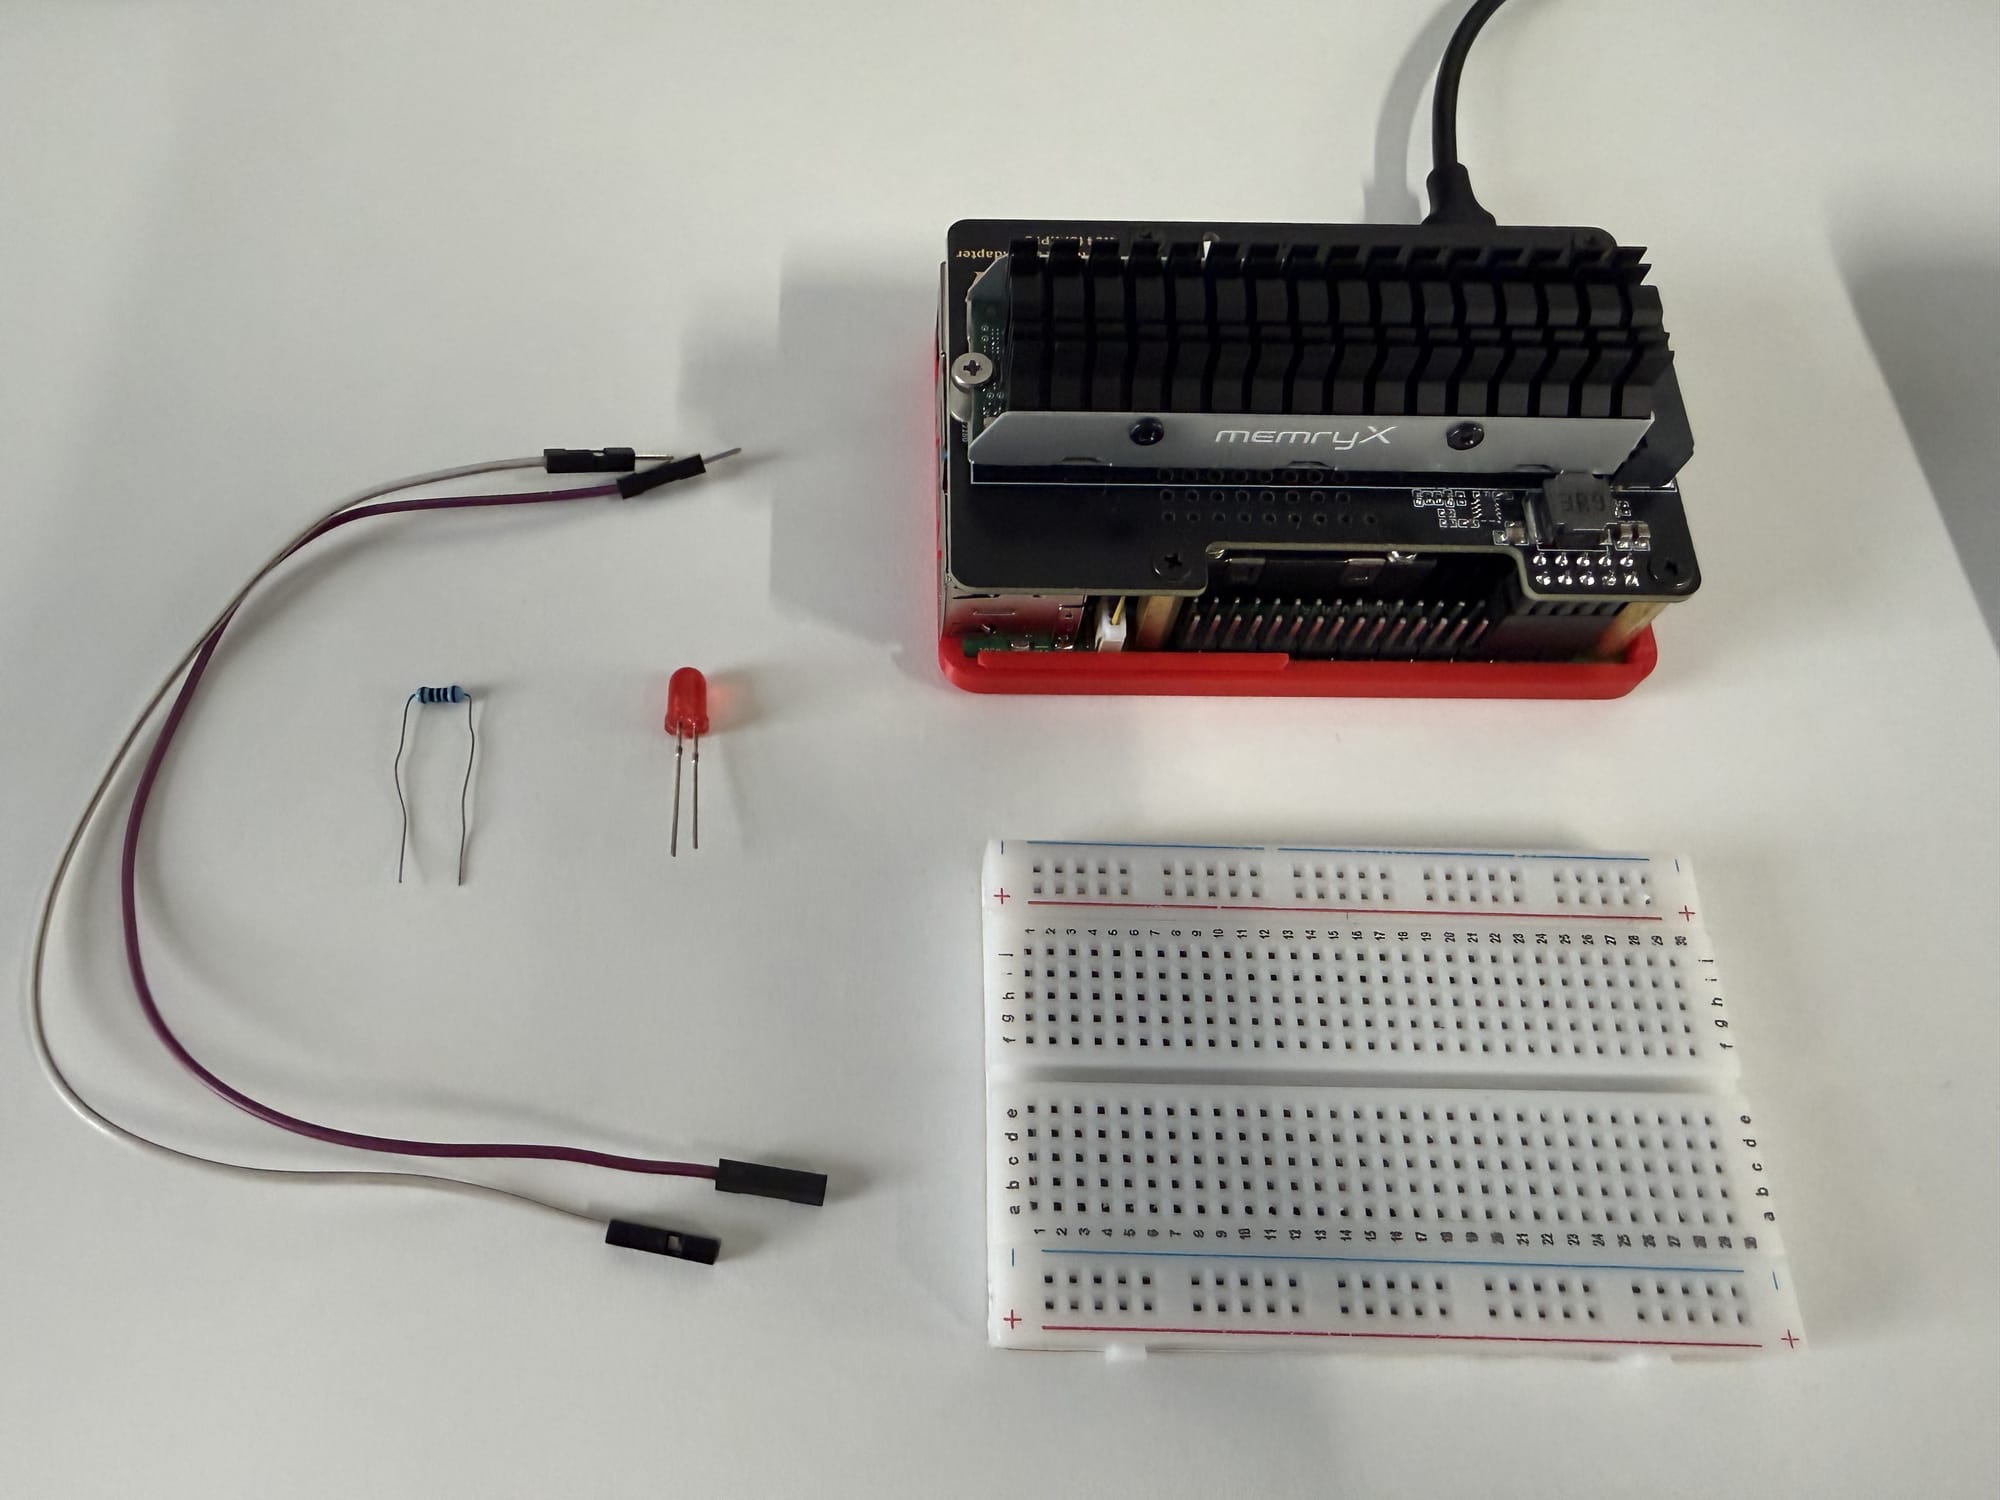
-Raspberry Pi 5
-LED with color of your choice
-Male-to-Female cable x2
-100 Ohm Resistor (Use can use any value from 100-330 Ohm)
-Breadboard
First, insert the LED into the breadboard.
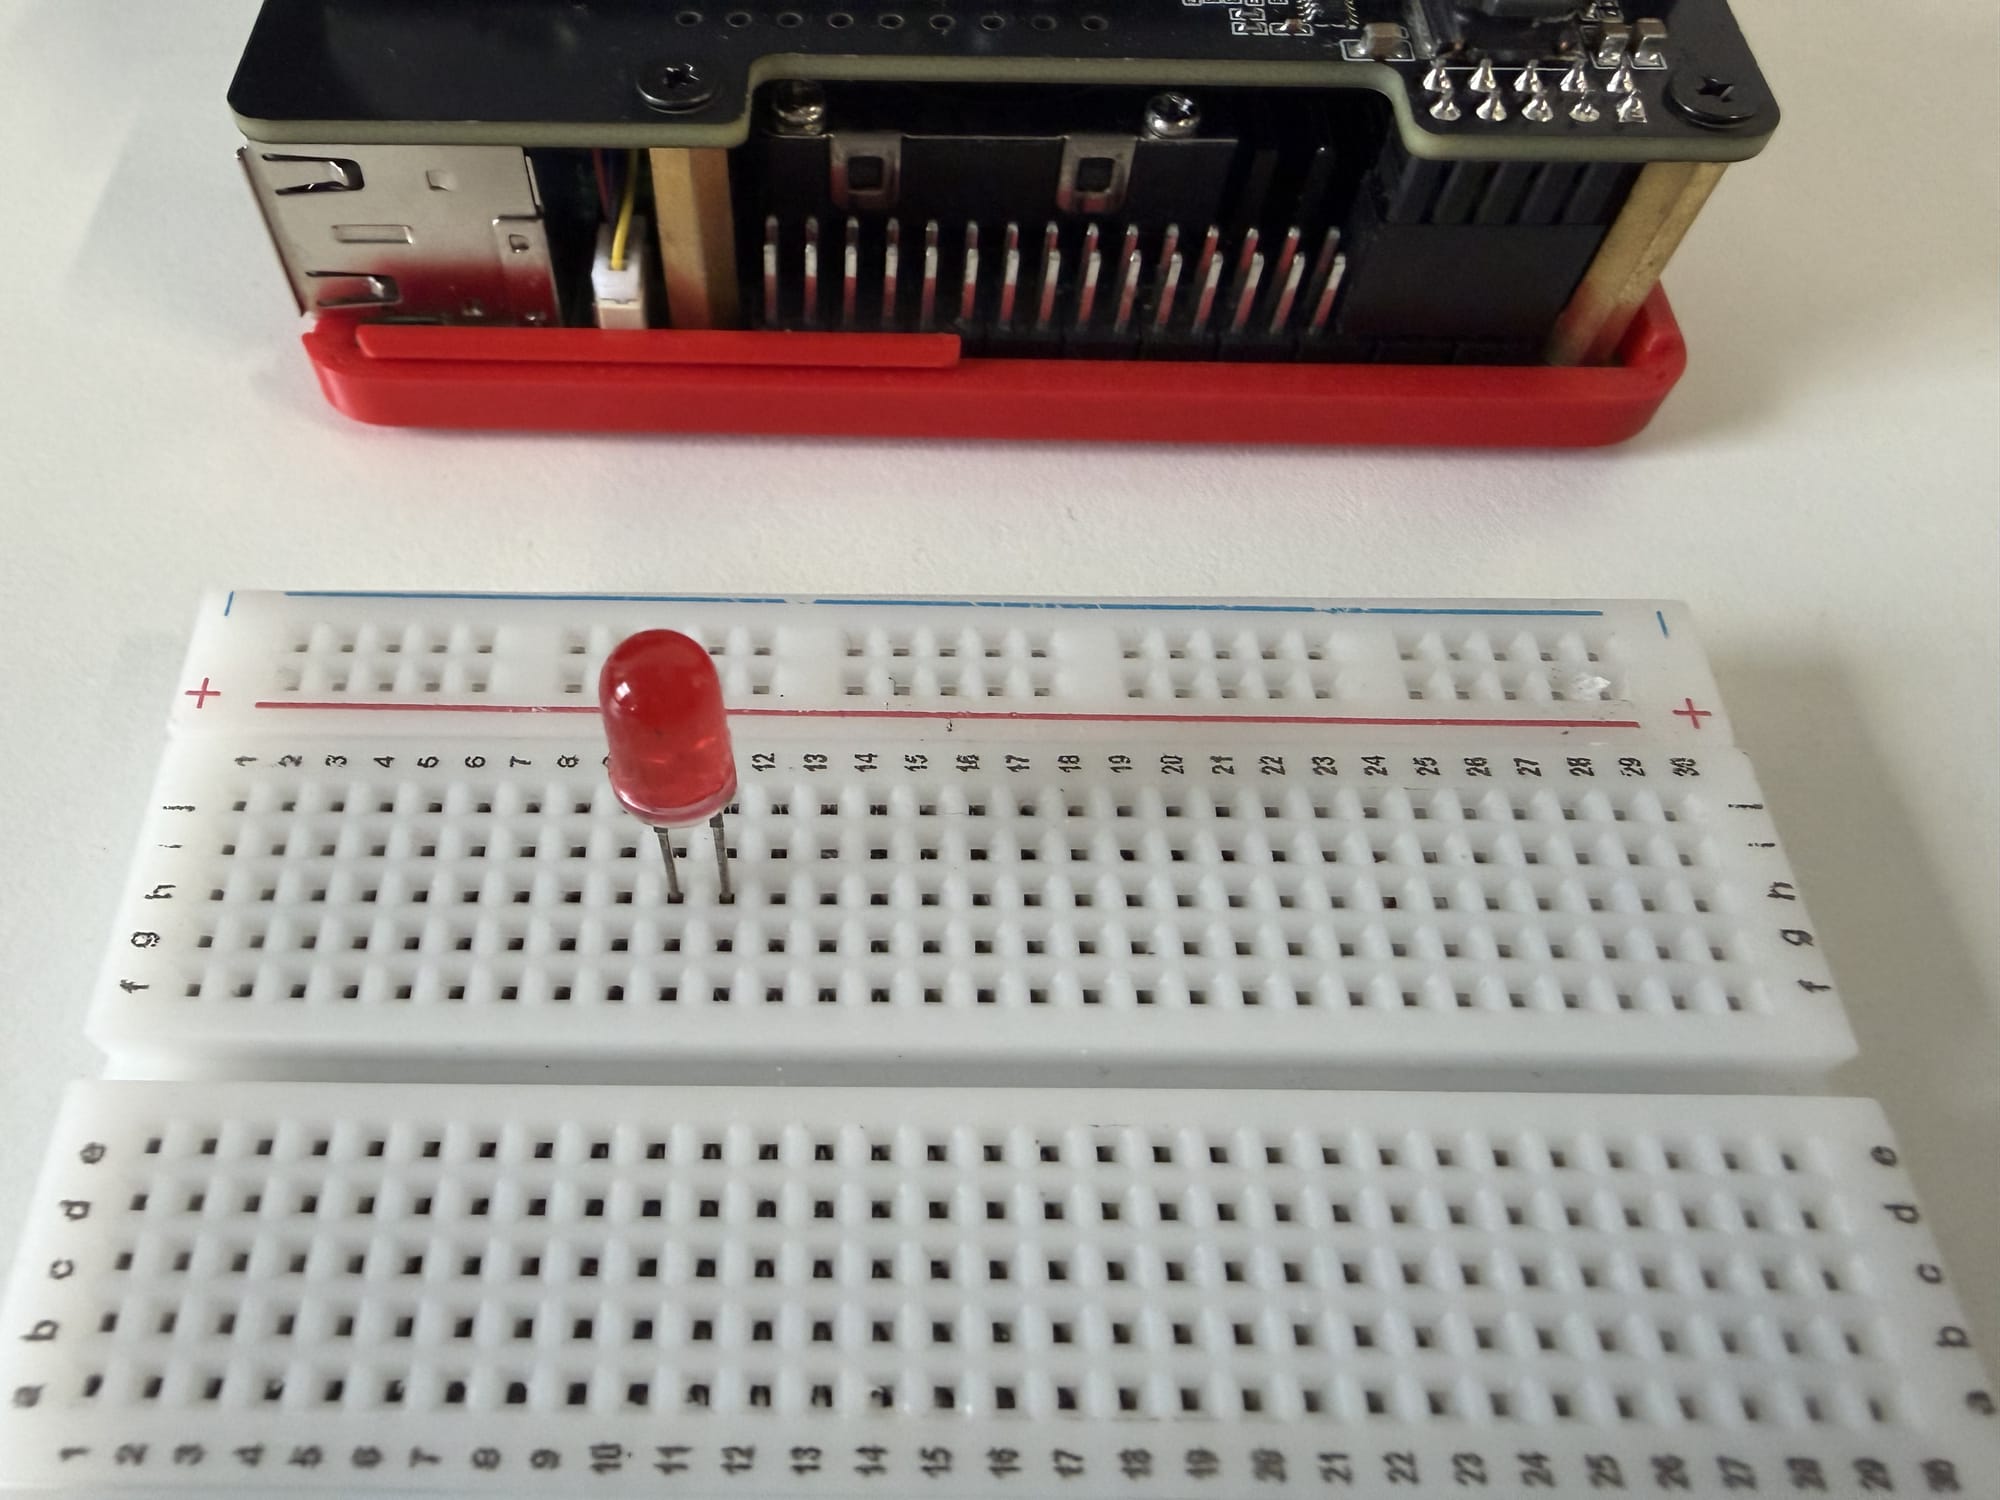
Next, connect the resistor in series with the LED’s negative leg. The LED’s longer leg is typically the positive terminal, or anode, while the shorter leg is the negative terminal, or cathode.
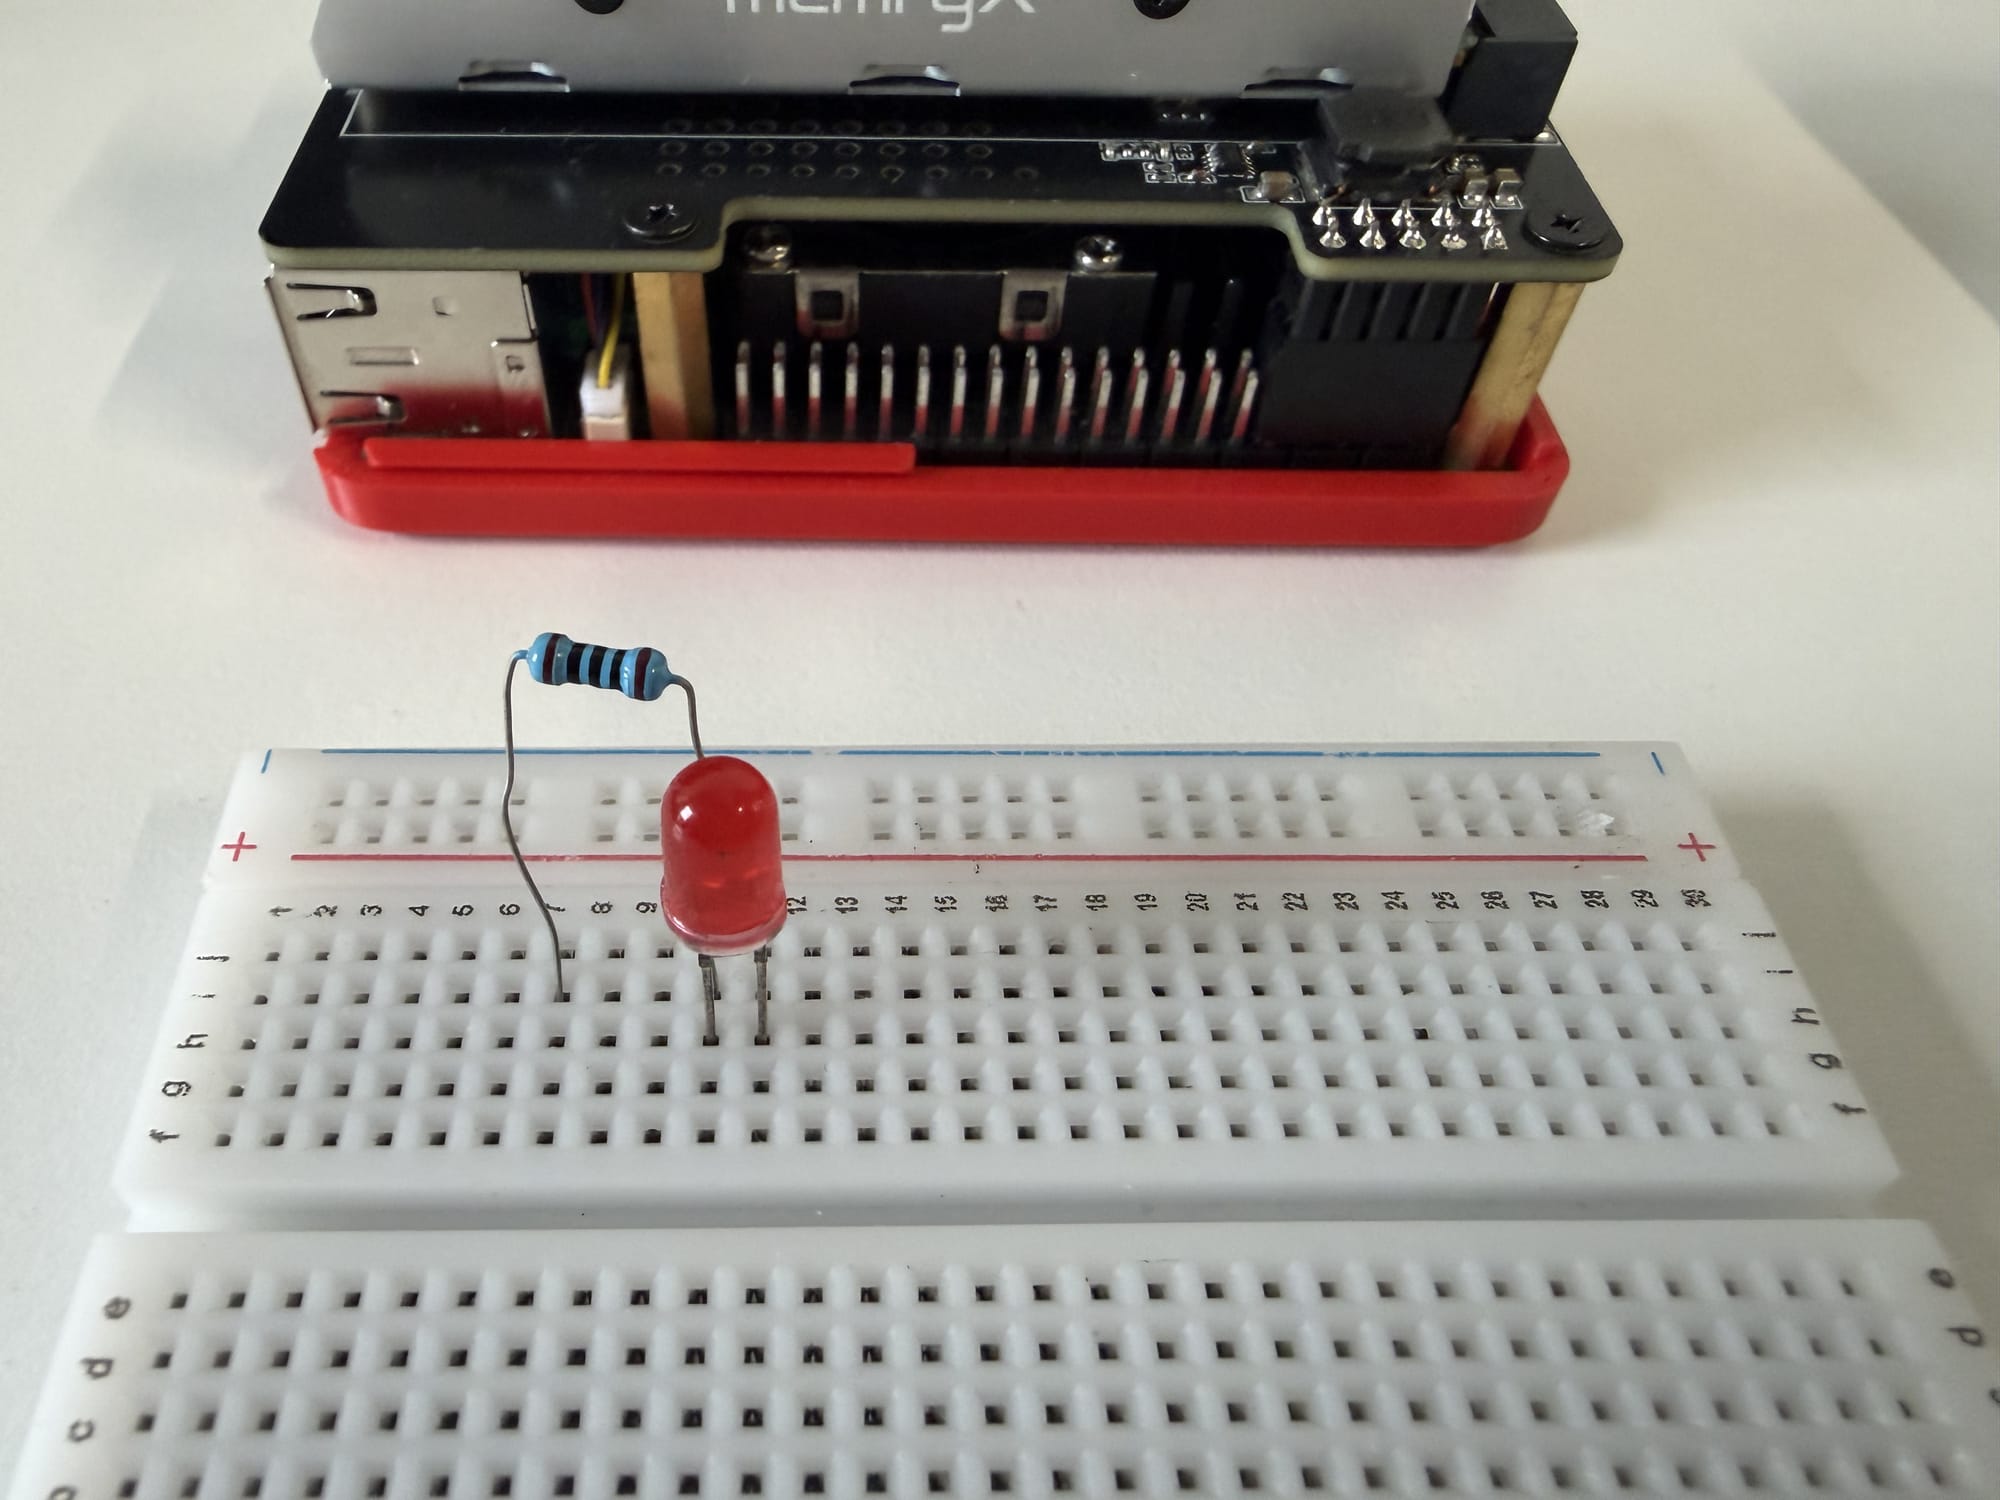
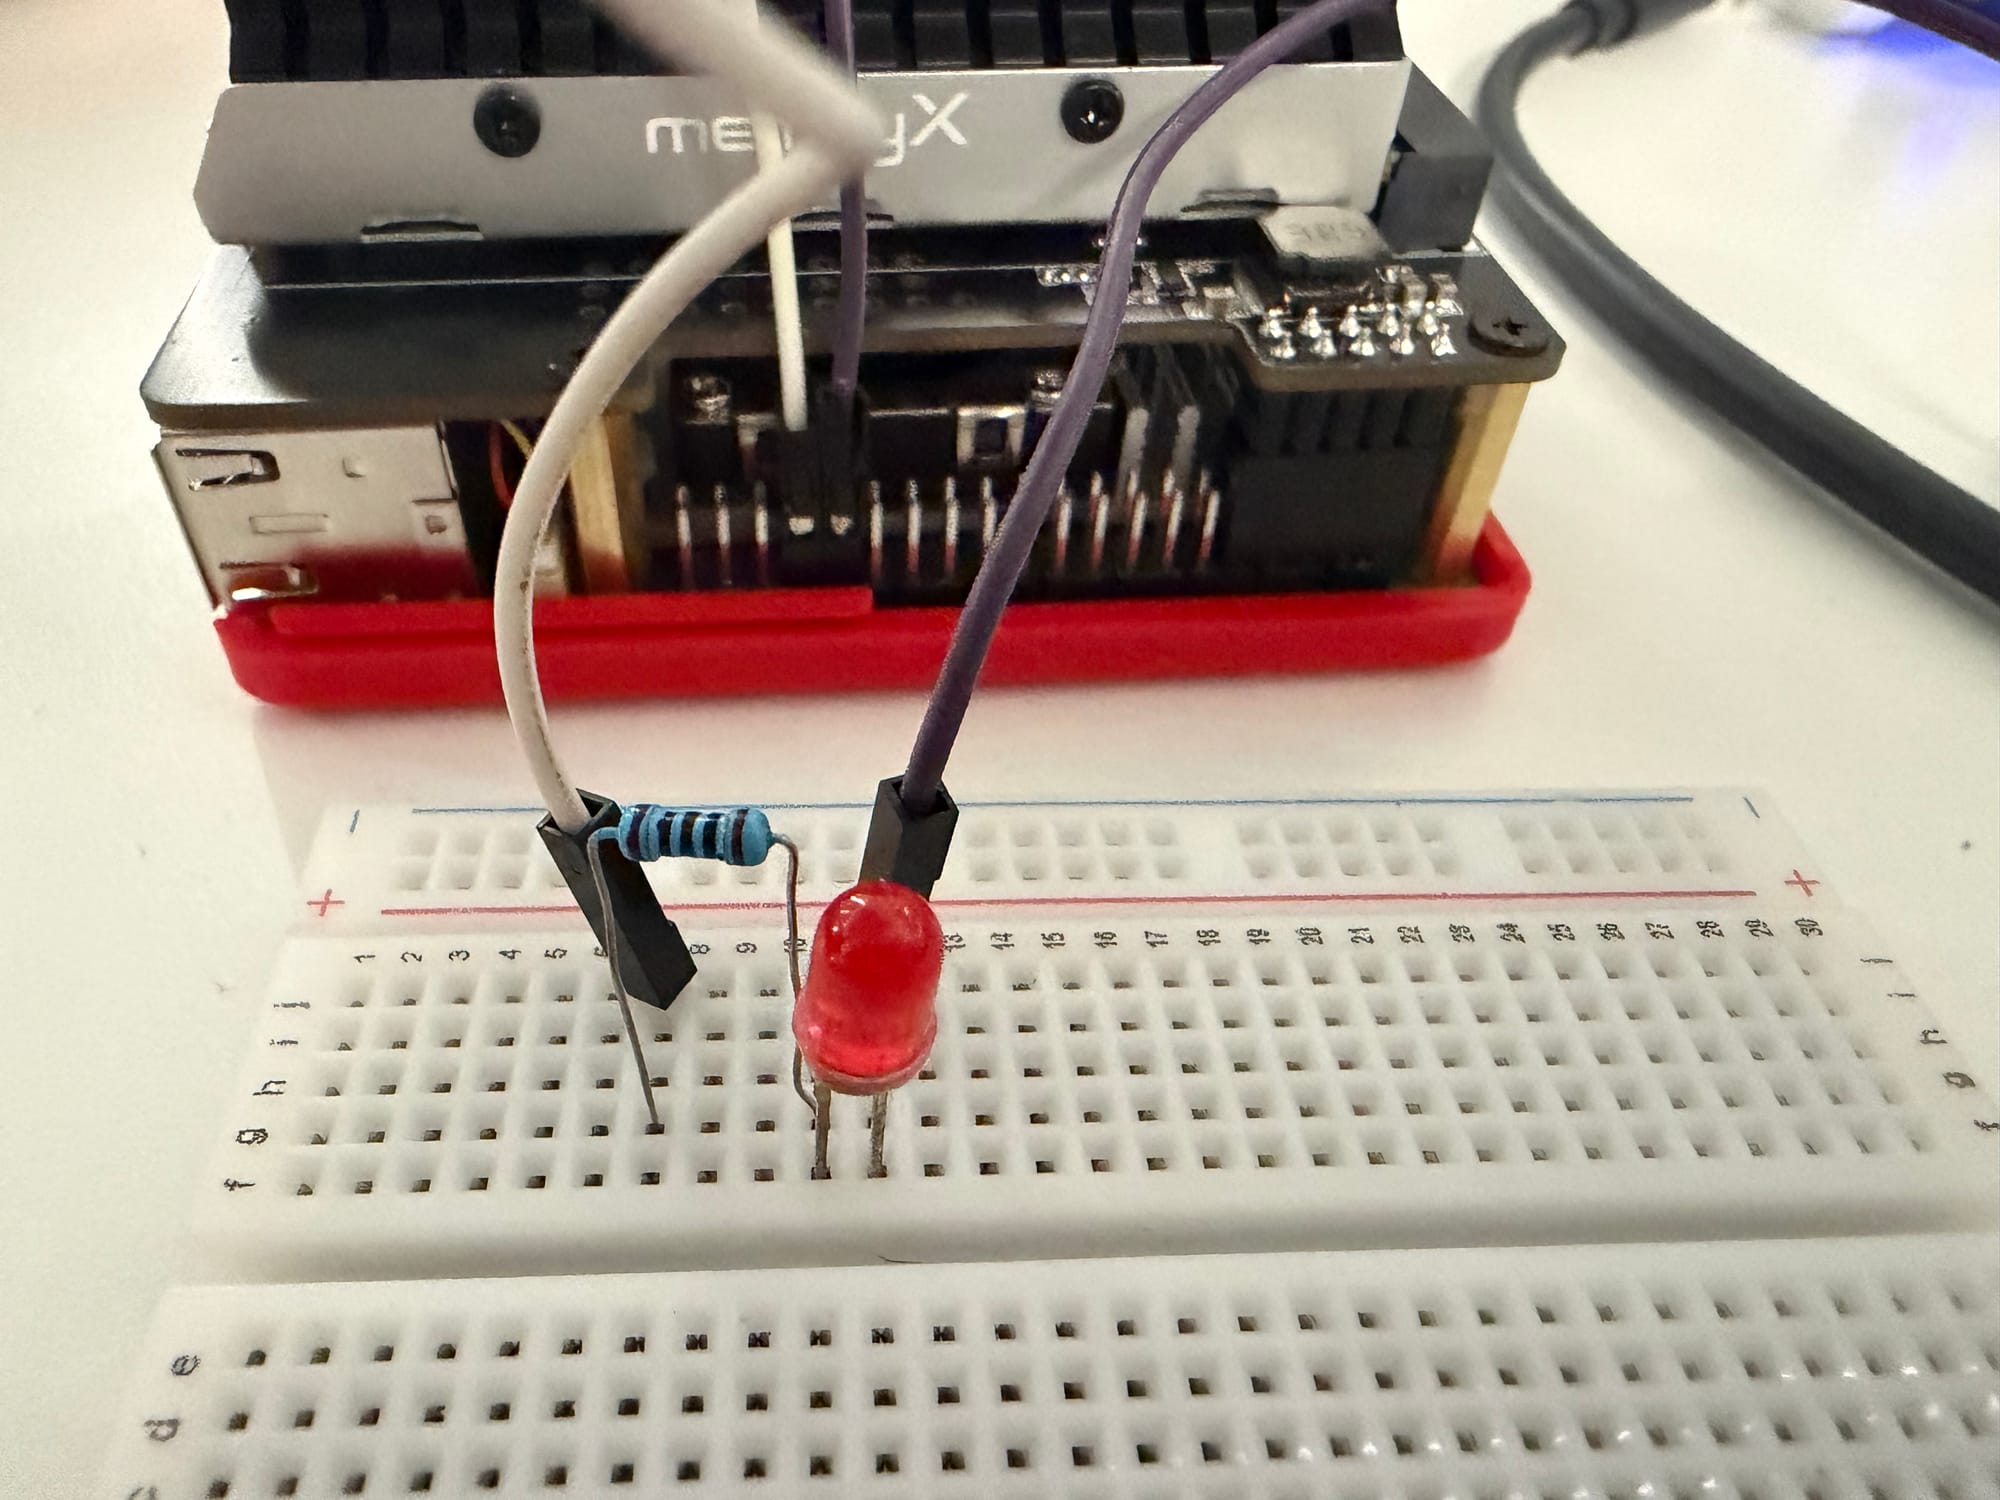
Finally, complete the circuit as follows:
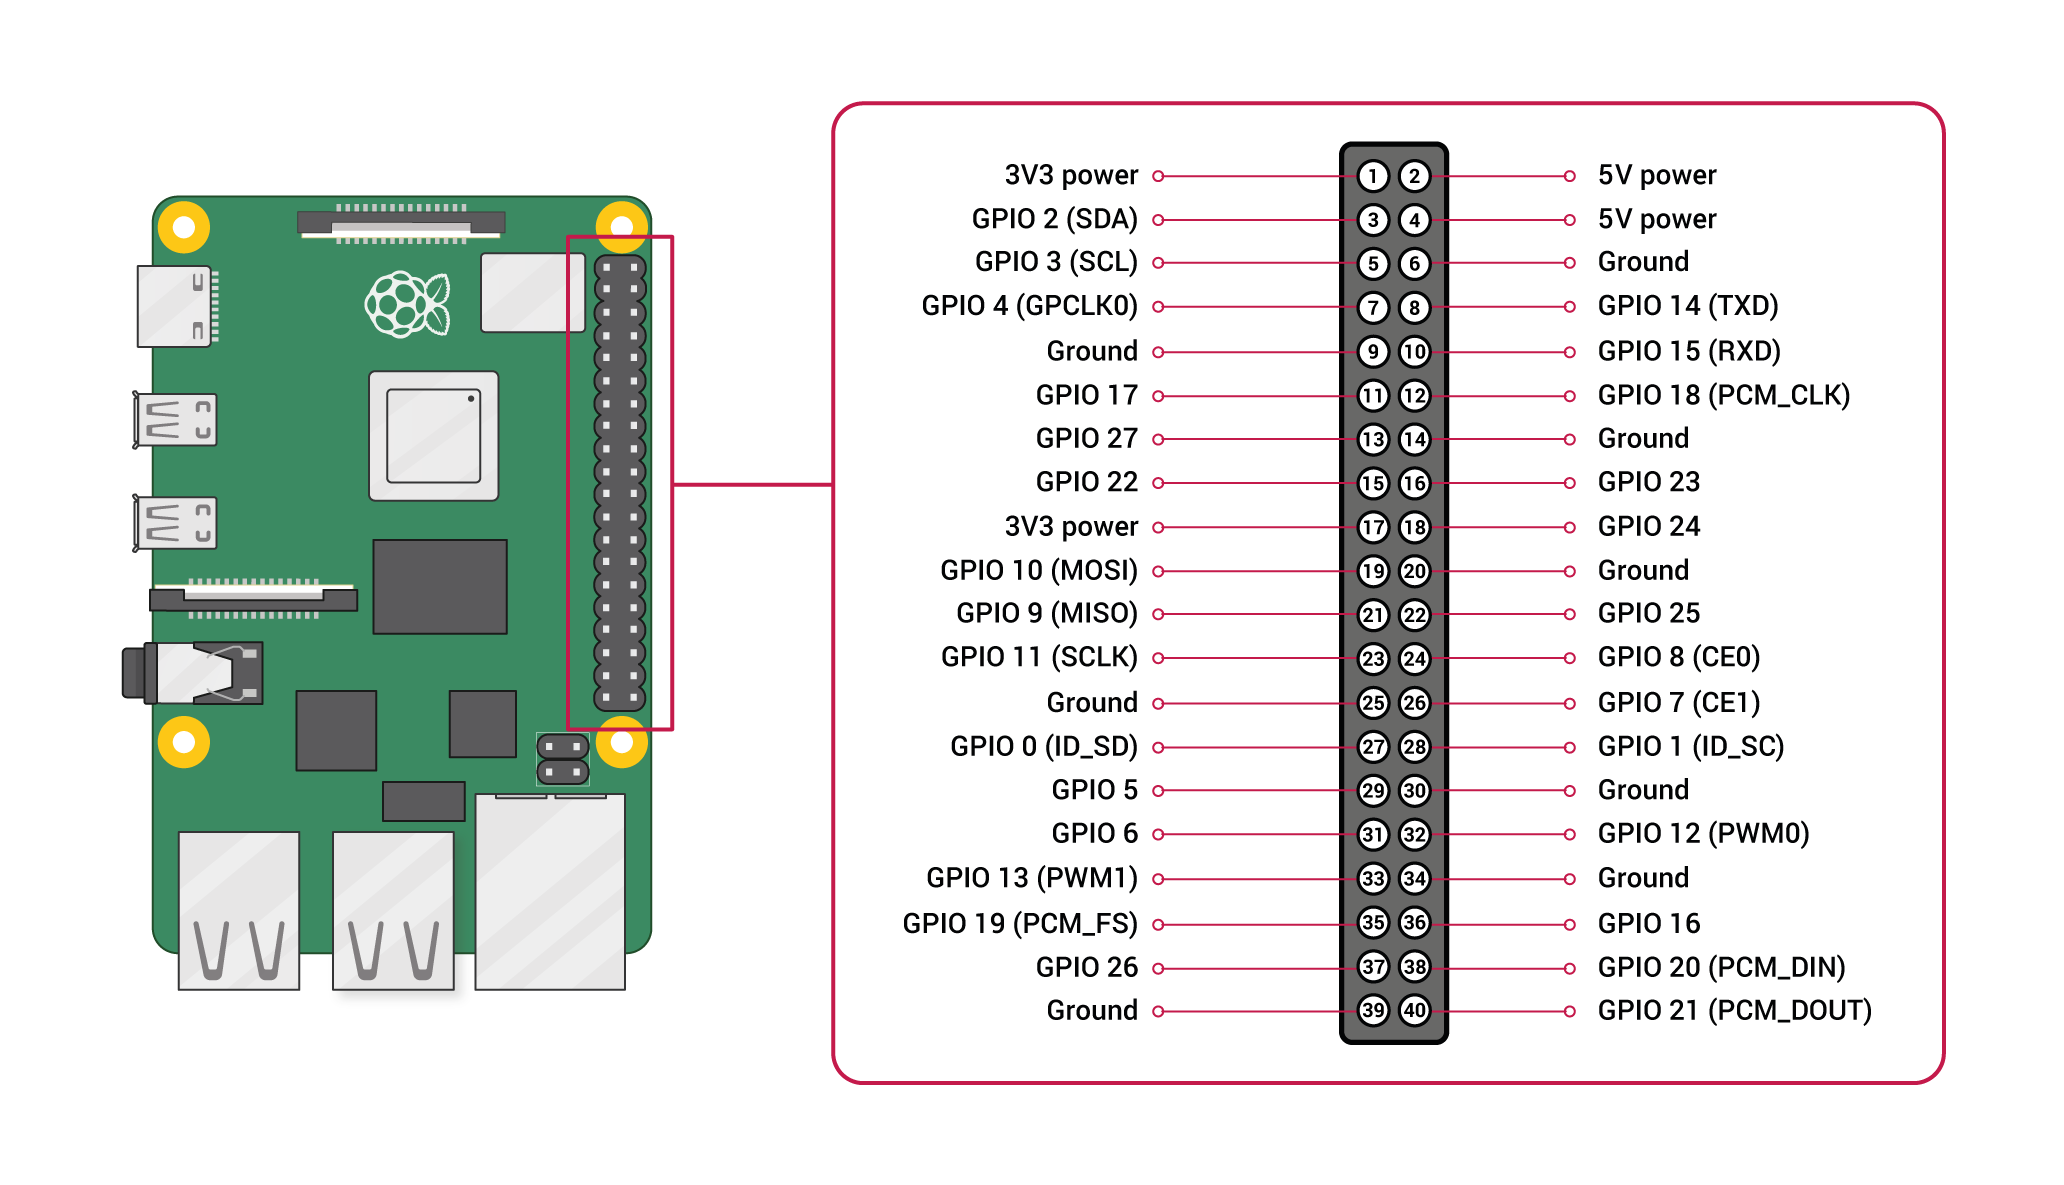
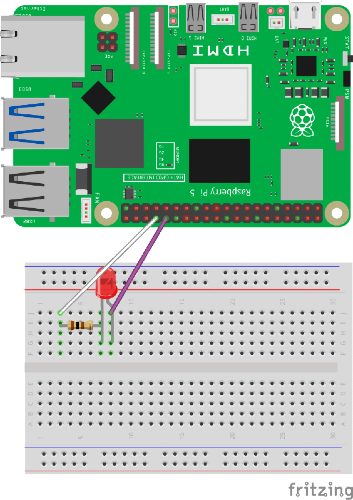
- Connect one jumper wire from physical pin 32, which corresponds to BCM GPIO 12, to the LED’s positive leg.
- Connect the second jumper wire from physical pin 34, or any available ground pin, to the free end of the resistor.
You can use the following diagram to identify the Raspberry Pi’s pin numbers and functions.
The following circuit diagram shows the completed wiring.
After building the circuit, let us write a Python program to control the LED.
uninstall the old GPIO library and install the robust new one:
pip3 uninstall RPi.GPIO
pip3 install rpi-lgpio
Create a new Python file named led_on_off.py. This guide uses Nano because it is lightweight, but you may use Visual Studio Code or any other text editor.
nano led_on_off.py
Copy and paste the following code into the file:
import RPi.GPIO as GPIO
import time

LED_PIN = 12

GPIO.setmode(GPIO.BCM)
GPIO.setup(LED_PIN, GPIO.OUT)

try:
    while True:
        GPIO.output(LED_PIN, GPIO.HIGH)
        print("LED ON")
        time.sleep(1)

        GPIO.output(LED_PIN,GPIO.LOW)
        print("LED OFF")
        time.sleep(1)

except KeyboardInterrupt:
	print("Stopped")

finally:
	GPIO.cleanup()
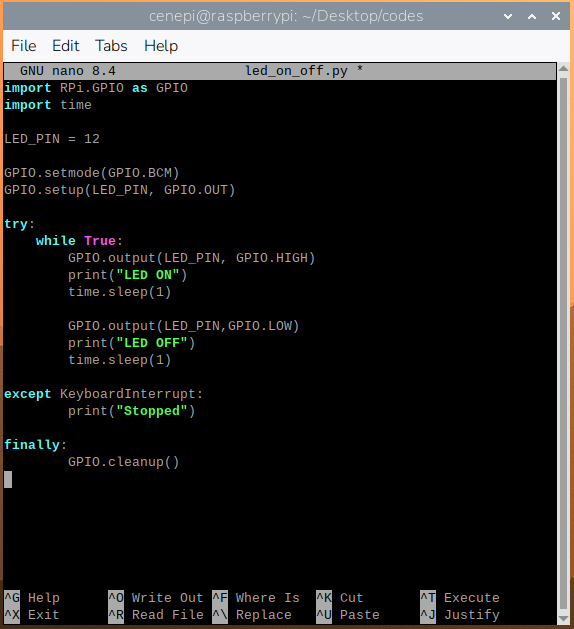
To save the file in Nano, press Ctrl+O, press Enter to confirm the filename, and then press Ctrl+X to exit.
Run the program:
python3 led_on_off.py
The LED should begin blinking, confirming that the circuit and Python program are working correctly.
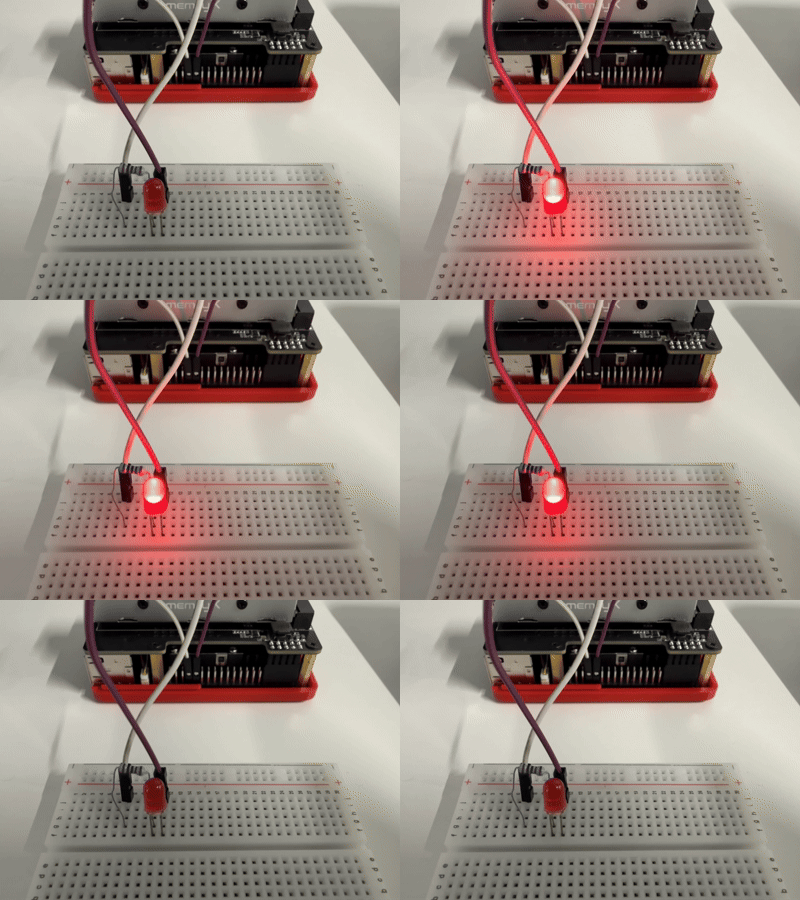
After confirming that the circuit, connections, and program work correctly, we can move to the next step and control the LED using hand gestures.
2: Using MediaPipe Hands to Control an LED
In Section 5, we ran the MediaPipe Hands example. We then built and tested a simple blinking LED circuit.
In this final step, we will combine the two projects to create an application that controls the LED using hand gestures.
After activating the virtual environment, navigate to the MediaPipe Hands Python source directory:
cd memryx_examples/video_inference/mediapipe_hands/src/python
If you did not run the Mediapipe example in Chapter 5, you need to download and unzip the pre-compiled model first.
Make a new file named led_hand_toggle
nano led_hand_toggle.py
...and paste (or download) the code below in it. Then press CTRL+S and CTRL+X
Show led_hand_toggle.py full code
import threading
import cv2
import sys
import os
import numpy as np
from pathlib import Path
from MxHandPose import MxHandPose
import time

import RPi.GPIO as GPIO


LED_PIN = 12  # BCM GPIO12, physical pin 32


class MediapipeHandsDemo:

    def __init__(self, mxpose, **kwargs):
        self.mxpose = mxpose

        # GPIO LED setup
        GPIO.setmode(GPIO.BCM)
        GPIO.setup(LED_PIN, GPIO.OUT)
        GPIO.output(LED_PIN, GPIO.LOW)

        self.led_on = False

        # Used so one touch toggles only once
        self.touching_box = False

        # Threading
        self.stop_event = threading.Event()
        self.camera_read_thread = threading.Thread(target=self.camera_read, daemon=True)
        self.display_thread = threading.Thread(target=self.and_display, daemon=True)

        self.cam_width = 0
        self.cam_height = 0
        self.cap = self.video_capture()

        # Start threads
        self.camera_read_thread.start()
        self.display_thread.start()

        # Keep main thread alive
        self.camera_read_thread.join()
        self.display_thread.join()

    ##############################################################################################################
    # LED control
    ##############################################################################################################

    def toggle_led(self):
        self.led_on = not self.led_on

        if self.led_on:
            GPIO.output(LED_PIN, GPIO.HIGH)
            print("LED ON")
        else:
            GPIO.output(LED_PIN, GPIO.LOW)
            print("LED OFF")

    def cleanup(self):
        try:
            GPIO.output(LED_PIN, GPIO.LOW)
            GPIO.cleanup()
        except Exception:
            pass

    ##############################################################################################################
    # Camera capture and display
    ##############################################################################################################

    def video_capture(self):
        camera = cv2.VideoCapture(0)
        camera.set(cv2.CAP_PROP_FOURCC, cv2.VideoWriter_fourcc(*'MJPG'))
        camera.set(cv2.CAP_PROP_FPS, 30)

        self.cam_width = int(camera.get(cv2.CAP_PROP_FRAME_WIDTH))
        self.cam_height = int(camera.get(cv2.CAP_PROP_FRAME_HEIGHT))

        return camera

    def camera_read(self):
        if not self.cap.isOpened():
            print("Error: Could not open camera.")
            self.cleanup()
            return

        while not self.stop_event.is_set():
            ret, frame = self.cap.read()

            if not ret:
                print("Error: Could not read frame.")
                break

            if not self.mxpose.full():
                frame = cv2.cvtColor(frame, cv2.COLOR_BGR2RGB)
                self.mxpose.put(frame)

        self.mxpose.stop()
        self.cap.release()
        self.cleanup()
        os._exit(0)

    def and_display(self):
        cv2.namedWindow('MediapipeHands', cv2.WINDOW_NORMAL)
        cv2.resizeWindow('MediapipeHands', self.cam_width + 20, self.cam_height + 20)

        while not self.stop_event.is_set():

            if cv2.getWindowProperty('MediapipeHands', cv2.WND_PROP_VISIBLE) < 1:
                self.stop_event.set()
                break

            if not self.mxpose.empty():
                annotated_frame = self.mxpose.get()

                frame = self.draw(annotated_frame)

                frame = cv2.cvtColor(frame, cv2.COLOR_RGB2BGR)

                cv2.imshow('MediapipeHands', frame)

                key = cv2.waitKey(1) & 0xFF
                if key == ord('q') or key == 27:
                    self.stop_event.set()
                    break

        cv2.destroyAllWindows()
        self.cleanup()
        os._exit(0)

    ##############################################################################################################
    # Drawing and interaction
    ##############################################################################################################

    def draw(self, annotated_frame):
        handkeypoints_lst, handtype_lst = self.get_handkeypoints_handtype(annotated_frame)
        img = annotated_frame.image

        currently_touching = False

        # Draw hand/finger landmarks again
        for i, hand_points in enumerate(handkeypoints_lst):
            is_left = False

            if i < len(handtype_lst):
                is_left = str(handtype_lst[i]).lower() == "left"

            img = self.drawLandmarks(img, [hand_points], is_left)

            # Index fingertip is landmark 8
            fingertip = hand_points[8]

            if self.check_box_touch(fingertip):
                currently_touching = True

        # Toggle only when finger first enters the box
        if currently_touching and not self.touching_box:
            self.toggle_led()

        self.touching_box = currently_touching

        # Draw the toggle box
        img = self.draw_toggle_box(img)


        '''
        # Show LED state text
        state_text = "LED: ON" if self.led_on else "LED: OFF"
        state_color = (0, 255, 0) if self.led_on else (255, 0, 0)

        cv2.putText(
            img,
            state_text,
            (20, 110),
            cv2.FONT_HERSHEY_SIMPLEX,
            0.9,
            state_color,
            2,
            cv2.LINE_AA
        )
        '''

        return img

    def get_handkeypoints_handtype(self, annotated_frame):
        handkeypoints_lst = []
        handtype_lst = []

        for handpose in annotated_frame.handposes:
            hp_reshaped = handpose.landmarks.reshape(21, 3).astype(np.int32)
            singlehand_keypoints = [(int(x), int(y)) for x, y, z in hp_reshaped]

            handkeypoints_lst.append(singlehand_keypoints)
            handtype_lst.append(handpose.handedness)

        return handkeypoints_lst, handtype_lst

    ##############################################################################################################
    # One toggle box
    ##############################################################################################################

    def get_toggle_box_region(self):
        return {
            "name": "TOGGLE",
            "x1": 20,
            "y1": 20,
            "x2": 170,
            "y2": 80,
        }

    def check_box_touch(self, fingertip):
        x, y = fingertip
        box = self.get_toggle_box_region()

        return box["x1"] <= x <= box["x2"] and box["y1"] <= y <= box["y2"]

    def draw_toggle_box(self, frame):
        box = self.get_toggle_box_region()

        x1 = box["x1"]
        y1 = box["y1"]
        x2 = box["x2"]
        y2 = box["y2"]

        if self.led_on:
            fill_color = (0, 255, 0)      # green in RGB
            text_color = (0, 0, 0)
            label = "ON"
        else:
            fill_color = (255, 0, 0)      # red in RGB
            text_color = (255, 255, 255)
            label = "OFF"

        # Filled box
        cv2.rectangle(frame, (x1, y1), (x2, y2), fill_color, -1)

        # Border
        cv2.rectangle(frame, (x1, y1), (x2, y2), (255, 255, 255), 3)

        # Text
        cv2.putText(
            frame,
            f"TOGGLE {label}",
            (x1 + 10, y1 + 38),
            cv2.FONT_HERSHEY_SIMPLEX,
            0.7,
            text_color,
            2,
            cv2.LINE_AA
        )

        return frame

    ##############################################################################################################
    # Hand landmark drawing
    ##############################################################################################################

    def drawLandmarks(self, frame, data, is_left):
        allhands = data

        if is_left:
            color = (255, 0, 255)
        else:
            color = (0, 255, 255)

        for myHand in allhands:
            cv2.line(frame, (myHand[0][0], myHand[0][1]), (myHand[1][0], myHand[1][1]), color, 2)
            cv2.line(frame, (myHand[1][0], myHand[1][1]), (myHand[2][0], myHand[2][1]), color, 2)
            cv2.line(frame, (myHand[2][0], myHand[2][1]), (myHand[3][0], myHand[3][1]), color, 2)
            cv2.line(frame, (myHand[3][0], myHand[3][1]), (myHand[4][0], myHand[4][1]), color, 2)

            cv2.line(frame, (myHand[0][0], myHand[0][1]), (myHand[5][0], myHand[5][1]), color, 2)
            cv2.line(frame, (myHand[5][0], myHand[5][1]), (myHand[6][0], myHand[6][1]), color, 2)
            cv2.line(frame, (myHand[6][0], myHand[6][1]), (myHand[7][0], myHand[7][1]), color, 2)
            cv2.line(frame, (myHand[7][0], myHand[7][1]), (myHand[8][0], myHand[8][1]), color, 2)

            cv2.line(frame, (myHand[0][0], myHand[0][1]), (myHand[17][0], myHand[17][1]), color, 2)
            cv2.line(frame, (myHand[17][0], myHand[17][1]), (myHand[18][0], myHand[18][1]), color, 2)
            cv2.line(frame, (myHand[18][0], myHand[18][1]), (myHand[19][0], myHand[19][1]), color, 2)
            cv2.line(frame, (myHand[19][0], myHand[19][1]), (myHand[20][0], myHand[20][1]), color, 2)

            cv2.line(frame, (myHand[5][0], myHand[5][1]), (myHand[9][0], myHand[9][1]), color, 2)
            cv2.line(frame, (myHand[9][0], myHand[9][1]), (myHand[13][0], myHand[13][1]), color, 2)
            cv2.line(frame, (myHand[13][0], myHand[13][1]), (myHand[17][0], myHand[17][1]), color, 2)

            cv2.line(frame, (myHand[9][0], myHand[9][1]), (myHand[10][0], myHand[10][1]), color, 2)
            cv2.line(frame, (myHand[10][0], myHand[10][1]), (myHand[11][0], myHand[11][1]), color, 2)
            cv2.line(frame, (myHand[11][0], myHand[11][1]), (myHand[12][0], myHand[12][1]), color, 2)

            cv2.line(frame, (myHand[13][0], myHand[13][1]), (myHand[14][0], myHand[14][1]), color, 2)
            cv2.line(frame, (myHand[14][0], myHand[14][1]), (myHand[15][0], myHand[15][1]), color, 2)
            cv2.line(frame, (myHand[15][0], myHand[15][1]), (myHand[16][0], myHand[16][1]), color, 2)

            for point in myHand:
                cv2.circle(frame, (point[0], point[1]), 4, (23, 90, 10), 1)

            for point in myHand:
                cv2.circle(frame, (point[0], point[1]), 3, (255, 255, 125), -1)

            # Highlight index fingertip clearly
            fingertip = myHand[8]
            cv2.circle(frame, (fingertip[0], fingertip[1]), 8, (0, 255, 0), 2)

        return frame


if __name__ == '__main__':

    project_dir = Path(__file__).resolve().parents[2]
    mx_modeldir = project_dir / 'models'

    try:
        mx_pose = MxHandPose(mx_modeldir=mx_modeldir, num_hands=2)
        paint = MediapipeHandsDemo(mxpose=mx_pose)

    except (FileNotFoundError, RuntimeError) as exc:
        print(f"Failed to start Mediapipe Hands: {exc}", file=sys.stderr)
        GPIO.cleanup()
        sys.exit(1)

    except KeyboardInterrupt:
        print("Stopped")
        GPIO.cleanup()
        sys.exit(0)
After saving the file, simply run it
python3 led_hand_toggle.py
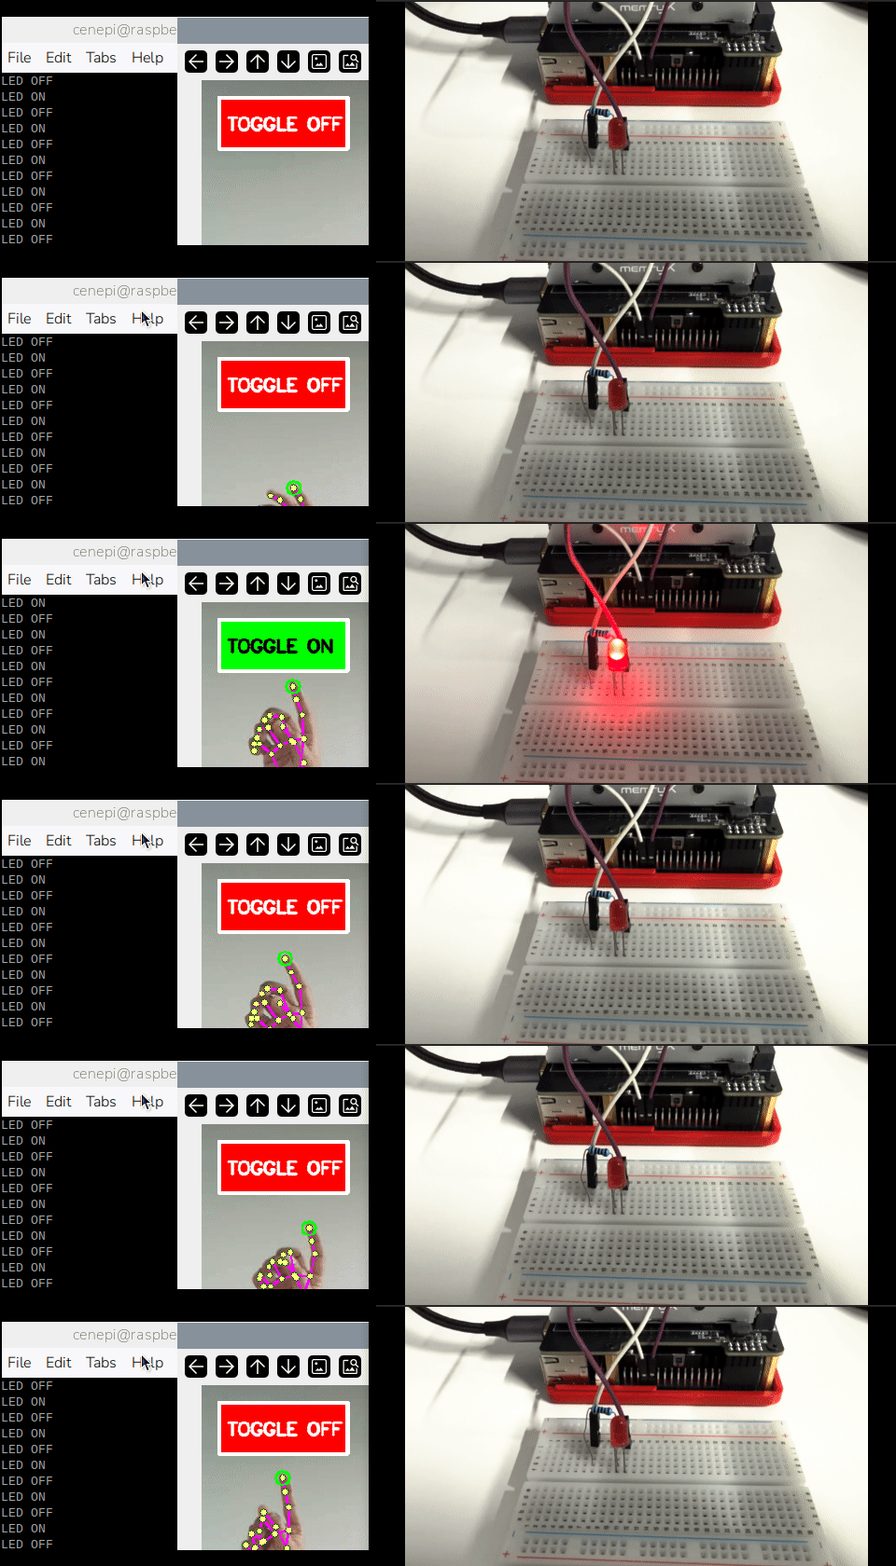
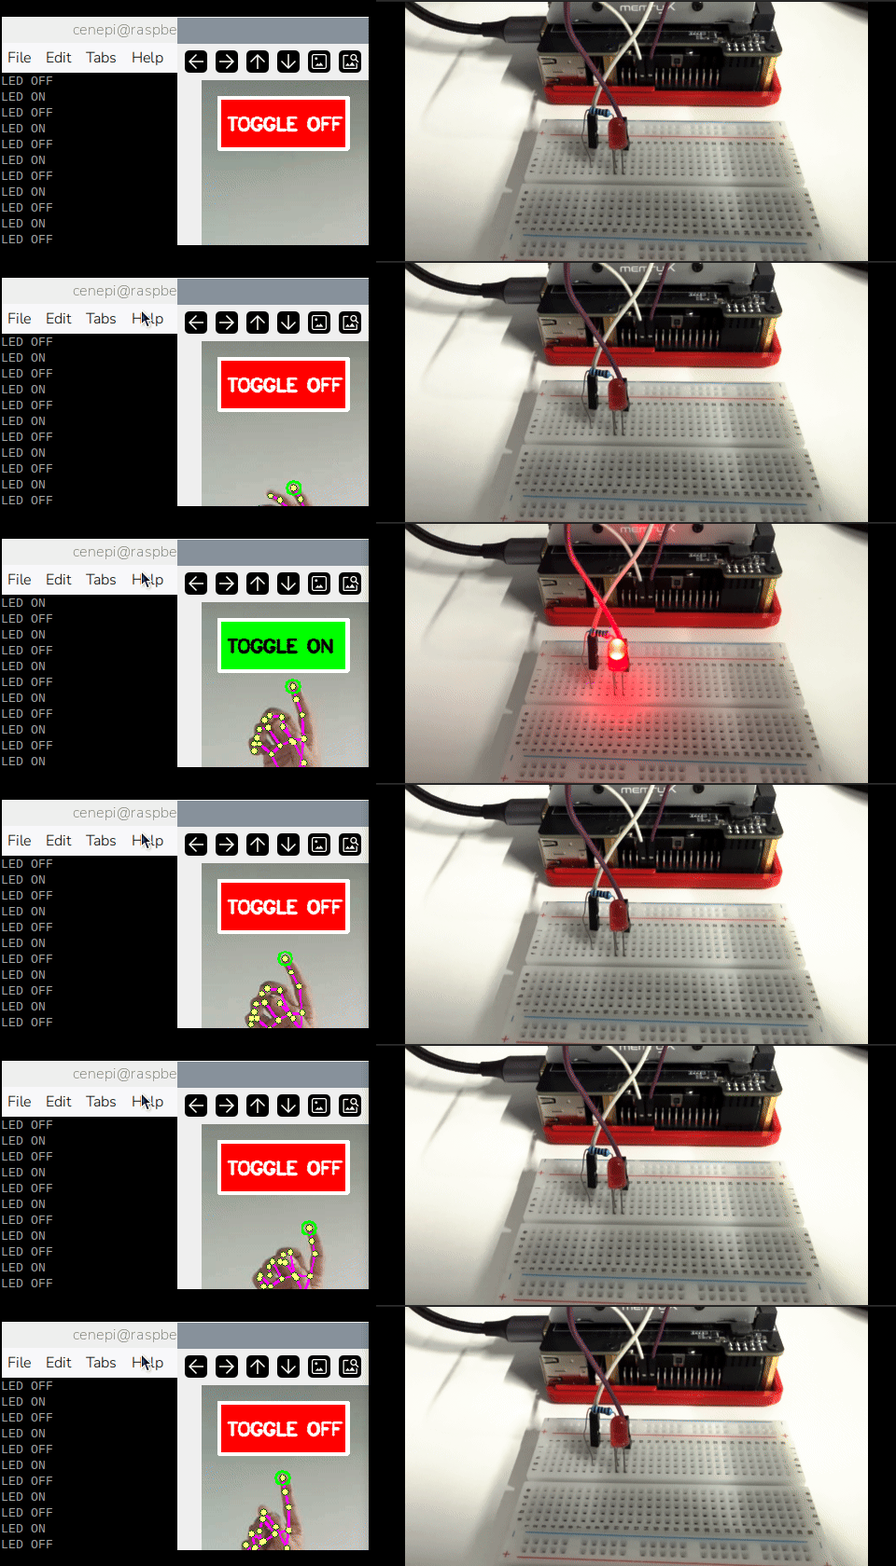
After launching the program, the camera window will appear with a box on top-left and it will start detecting and highlighting your hand. simply hover your hand over the box and you will see the LED turn on and off.
Conclusion
In this guide, we set up a Raspberry Pi 5 with the MemryX MX3 AI accelerator, installed the required runtime and SDK tools, ran real-time computer vision examples, and connected computer vision output to a simple physical circuit.
Blinking an LED is only the starting point. Once computer vision can interact with the Raspberry Pi’s GPIO pins, the same approach can be extended to gesture-controlled lighting, smart displays, robotics, automation systems, and many other embedded AI applications.
In future guides, we will build on this setup and explore additional ways to connect MemryX-accelerated computer vision with real-world hardware.